Lincoln Nautilus: Generator and Regulator / Generator Pulley. Removal and Installation
Removal
-
Follow the health and safety precautions..jpg) WARNING:
Before beginning any service procedure in this
section, refer to Safety Warnings in section 100-00 General Information.
Failure to follow this instruction may result in serious personal
injury.
WARNING:
Before beginning any service procedure in this
section, refer to Safety Warnings in section 100-00 General Information.
Failure to follow this instruction may result in serious personal
injury.
Refer to: Health and Safety Precautions (100-00 General Information, Description and Operation).
-
Remove the generator.
Refer to: Generator - 2.7L EcoBoost (238kW/324PS) (414-02 Generator and Regulator, Removal and Installation).
-
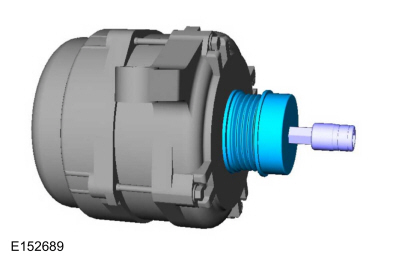
Using a small screwdriver or similar tool, insert the
tool through the rubber button on the center of the pulley cap and pry
off the cap. Discard the cap. A new cap must be installed if the clutch
is ok.
.jpg) |
-
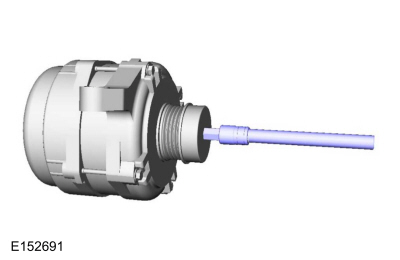
NOTICE: Do not insert anything into the fins of the generator to prevent the rotor inside the generator from turning. Inserting items into the generator could result in damage to the generator.
NOTE: The shaft and rotor will turn during removal.
Using a 17 mm hex tool and an impact gun, remove the clutch pulley. A couple of short bursts with the impact gun will remove the clutch pulley.
 |
Installation
-
Install the pulley and hand start.
.jpg) |
-
NOTICE: Do not insert anything into the fins of the generator to prevent the rotor inside the generator from turning. Inserting items into the generator could result in damage to the generator.
NOTE: The shaft and rotor will turn during installation.
While holding the outer diameter of the clutch pulley, torque the clutch pulley using a 17 mm hex tool, 75 Nm torque stick and an impact gun for 3-4 seconds. This makes sure the proper torque has been applied.
Torque: 55 lb.ft (75 Nm)
 |
-
Install a new cap onto the pulley with the rubber button facing inwards.
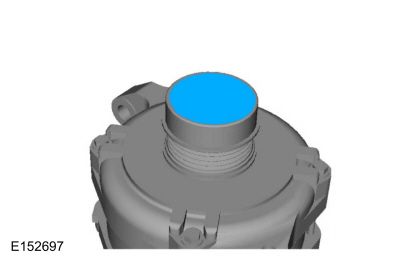 |
-
Install the generator.
Refer to: Generator - 2.7L EcoBoost (238kW/324PS) (414-02 Generator and Regulator, Removal and Installation).
 Generator - 2.0L EcoBoost (184kW/250PS) – MI4. Removal and Installation
Materials
Name
Specification
Motorcraft® Silicone Brake Caliper Grease and Dielectric CompoundXG-3-A
ESA-M1C200-AESE-M1C171-A
Removal
NOTE:
Removal steps in this procedure may contain installation details...

Other information:
Lincoln Nautilus 2018-2026 Service Manual: Driver Side Footwell Air Discharge Temperature Sensor. Removal and Installation
Removal Remove the climate control housing. Refer to: Climate Control Housing (412-00 Climate Control System - General Information, Removal and Installation). Disconnect the electrical connector. Rotate and remove the sensor. Installation To install, reverse the removal procedure. ..
Lincoln Nautilus 2018-2026 Owners Manual: Switching Shuffle Mode On and Off. Switching Repeat Mode On and Off. Setting a Memory Preset. Muting the Audio
Switching Shuffle Mode On and Off Press the button on the touchscreen to switch shuffle mode on or off. Note: Not all sources have shuffle mode. Switching Repeat Mode On and Off Press the button on the touchscreen to switch repeat mode on or off. Note: Not all sources have repeat mode. Setting a Memory Preset Select a station or channel. Press and hold a memory preset button on the touc..
Categories
- Manuals Home
- 1st Generation Nautilus Owners Manual
- 1st Generation Nautilus Service Manual
- Massage Seats
- Normal Scheduled Maintenance
- Opening the Liftgate
- New on site
- Most important about car
Auto-Start-Stop
What Is Auto-Start-Stop
The system is designed to help reduce fuel consumption and CO2 emissions by stopping the engine when it is idling, for example at traffic lights.
Auto-Start-Stop Precautions
WARNING: Apply the parking brake, shift into park (P), switch the ignition off and remove the key before you leave your vehicle. Failure to follow this instruction could result in personal injury or death.
WARNING: Apply the parking brake, shift into park (P), switch the ignition off and remove the key before you open the hood or have any service or repair work completed. If you do not switch the ignition off, the engine could restart at any time. Failure to follow this instruction could result in personal injury or d