Lincoln Nautilus: Generator and Regulator / Generator - 2.0L EcoBoost (184kW/250PS) – MI4. Removal and Installation
Lincoln Nautilus 2018-2024 Service Manual / Electrical / Battery and Charging System / Generator and Regulator / Generator - 2.0L EcoBoost (184kW/250PS) – MI4. Removal and Installation
Materials
| Name | Specification |
|---|---|
| Motorcraft® Silicone Brake Caliper Grease and Dielectric Compound XG-3-A |
ESA-M1C200-A ESE-M1C171-A |
Removal
NOTE: Removal steps in this procedure may contain installation details.
-
With the vehicle in NEUTRAL, position it on a hoist.
Refer to: Jacking and Lifting - Overview (100-02 Jacking and Lifting, Description and Operation).
-
Disconnect the negative battery cable at the battery.
Refer to: Battery Disconnect and Connect (414-01 Battery, Mounting and Cables, General Procedures).
-
NOTICE: Do not pull the engine appearance cover forward or sideways to remove. Failure to pull straight upward on the underside of the cover at the attachment points may result in damage to the cover or engine components.
NOTE: Lubricating the grommets with silicone grease aids in the installation of the engine appearance cover, and any future removal and installation of the cover.
-
If equipped.
-
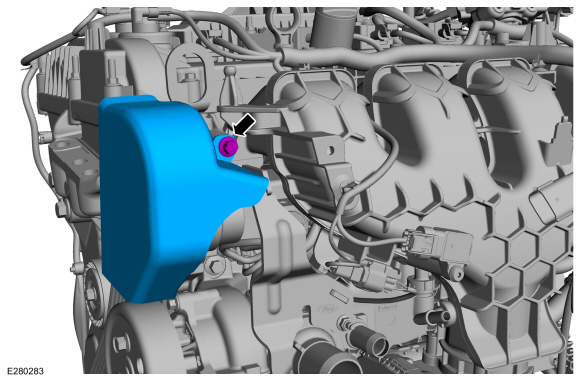
Remove the nut and the engine appearance cover.
-
Lubricate each grommet with silicone grease.
Material: Motorcraft® Silicone Brake Caliper Grease and Dielectric Compound / XG-3-A (ESA-M1C200-A) (ESE-M1C171-A)
-
If equipped.
.jpg) |
-
Remove the A/C compressor belt.
Refer to: Air Conditioning (A/C) Compressor Belt (303-05A Accessory Drive - 2.0L EcoBoost (184kW/250PS) – MI4, Removal and Installation).
-
Remove the bolt and the accessory drive belt safety shield.
Torque: 18 lb.ft (25 Nm)
 |
-
-
Rotate the accessory drive belt tensioner counterclockwise.
-
Position the accessory drive belt aside.
-
Rotate the accessory drive belt tensioner counterclockwise.
.jpg) |
-
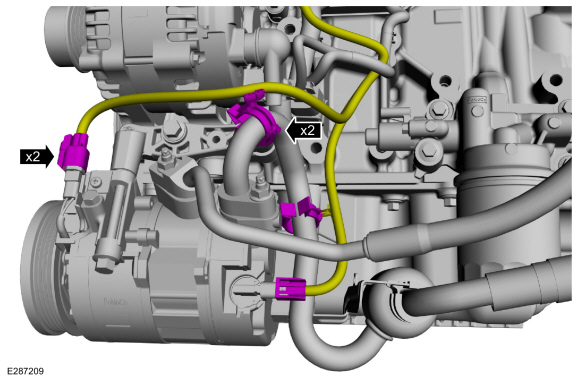
Disconnect the A/C compressor electrical connectors. Detach the retainers and position the wire harness aside.
 |
-
-
Remove the nut and position the A/C line bracket aside.
Torque: 18 lb.ft (25 Nm)
-
Remove the A/C compressor stud.
Torque: 80 lb.in (9 Nm)
-
Remove the bolts and position the A/C compressor aside. Support the A/C compressor.
Torque: 18 lb.ft (25 Nm)
-
Remove the nut and position the A/C line bracket aside.
.jpg) |
-
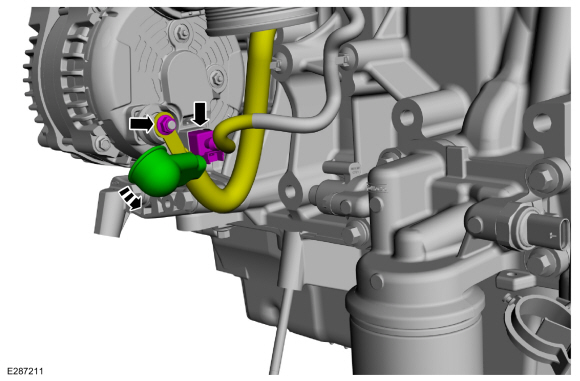
NOTICE: When installing the B+ terminal nut to the generator, finger-start the nut before tightening or component damage may occur.
Disconnect the generator electrical connector. Position the B+ wire protective cover, remove the nut and position the B+ wire.
Torque: 155 lb.in (17.5 Nm)
 |
-
Remove the lower generator bolts and the A/C compressor mounting bracket.
Torque: 18 lb.ft (25 Nm)
.jpg) |
-
Remove the bolt and the generator.
Torque: 18 lb.ft (25 Nm)
.jpg) |
Installation
-
To install, reverse the removal procedure.
-
Position the generator on the dowel pins. Do not fully
tighten the generator bolts until all of the bolts are installed
finger-tight.
.jpg) |
-
After installation, make sure the accessory drive belt is correctly seated on pulleys.
 |
 Specifications
General Specifications
Item
Specification
2.0L EcoBoost without climate controlled seats - 175 amp
Generator amps at 80...
 Generator Pulley. Removal and Installation
Removal
WARNING:
Before beginning any service procedure in this
section, refer to Safety Warnings in section 100-00 General Information...
Other information:
Lincoln Nautilus 2018-2024 Service Manual: Anti-Theft Alarm Horn. Removal and Installation
Removal Remove the RH loadspace trim panel. Refer to: Loadspace Trim Panel (501-05) . If equipped, remove the subwoofer and amplifier unit. Refer to: Subwoofer and Amplifier Unit (415-00 Information and Entertainment System - General Information - Vehicles With: SYNC 4, Removal and Installation)...
Lincoln Nautilus 2018-2024 Owners Manual: Switching Shuffle Mode On and Off. Switching Repeat Mode On and Off. Setting a Memory Preset. Muting the Audio
Switching Shuffle Mode On and Off Press the button on the touchscreen to switch shuffle mode on or off. Note: Not all sources have shuffle mode. Switching Repeat Mode On and Off Press the button on the touchscreen to switch repeat mode on or off...
Categories
- Manuals Home
- 1st Generation Nautilus Owners Manual
- 1st Generation Nautilus Service Manual
- Interior Lamp Function. Adjusting the Instrument Panel Lighting Brightness. Ambient Lighting. Interior Lighting – Troubleshooting
- Folding the Exterior Mirrors - Vehicles With: Manual Folding Mirrors. Folding the Exterior Mirrors - Vehicles With: Power Folding Mirrors
- Changing the 12V Battery
- New on site
- Most important about car
Replacing the Rear Wiper Blades
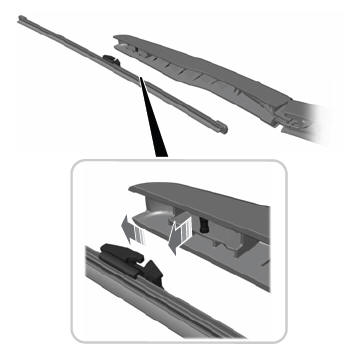
Note: Do not hold the wiper blade to lift the wiper arm.
Remove the wiper blade.Copyright © 2024 www.linautilus.com