Lincoln Nautilus: Front Suspension / Lower Arm. Removal and Installation
Special Tool(s) /
General Equipment
Removal
NOTICE:
Suspension fasteners are critical parts that affect the
performance of vital components and systems. Failure of these fasteners
may result in major service expense. Use the same or equivalent parts if
replacement is necessary. Do not use a replacement part of lesser
quality or substitute design. Tighten fasteners as specified.
-
Remove the wheels and tires.
Refer to: Wheel and Tire (204-04A Wheels and Tires, Removal and Installation).
-
If equipped.
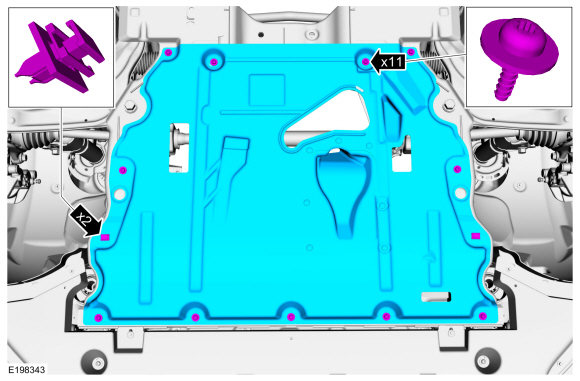
Remove the retainers and the under body shield.
-
If equipped.
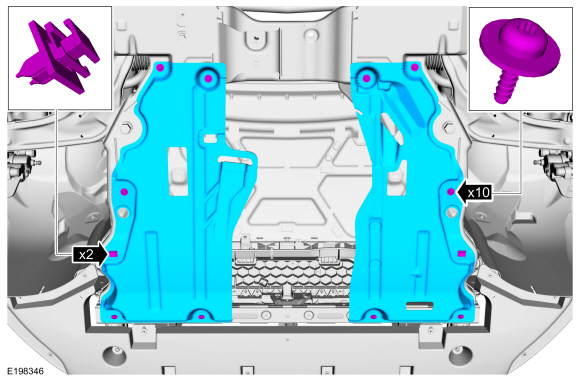
Remove the retainers and the dual under body shields.
-
If equipped.
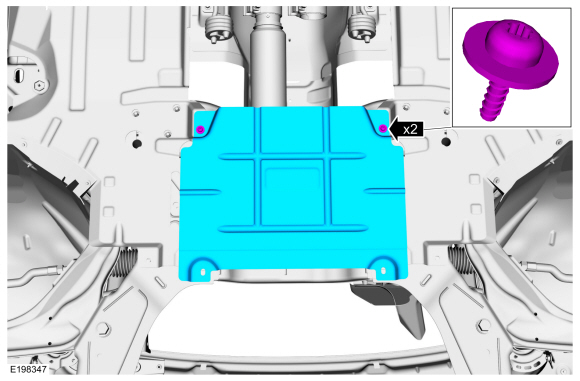
Remove the retainers and the center under body shield.
-
If equipped.
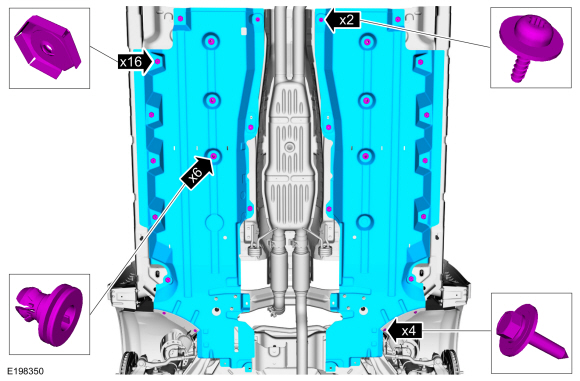
Remove the retainers and the floor pan under body shields.
-
NOTICE:
The front suspension height sensor must be
disconnected from the lower control arm prior to servicing suspension
components or damage to the suspension height sensor and/or the vehicle
dynamic suspension system may occur. The sensor will need to be
recalibrated after reassembly.
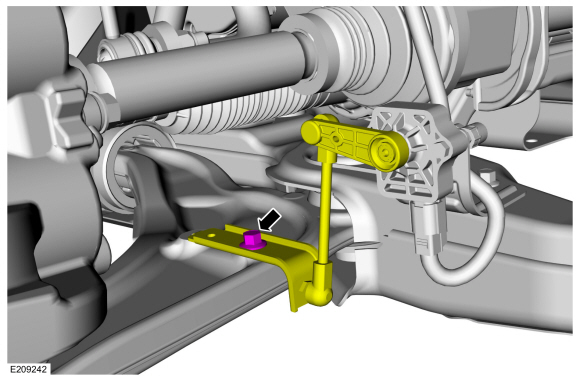
If equipped.
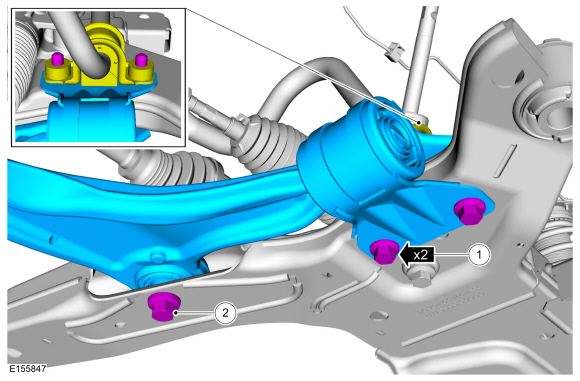
Remove the front height sensor arm bracket bolt and position the front height sensor arm bracket aside.
-
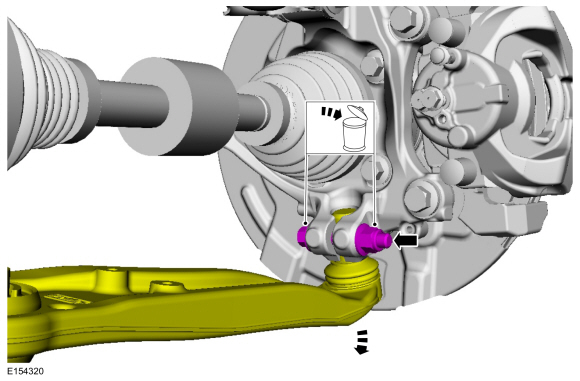
NOTICE:
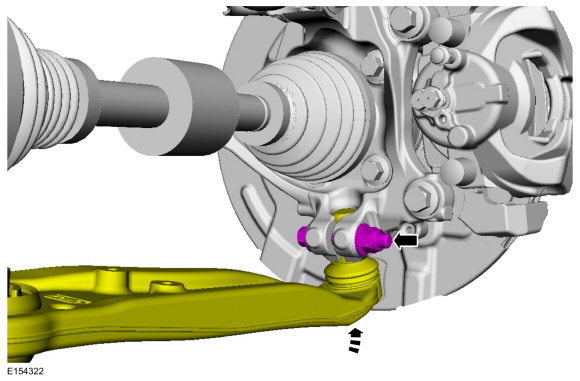
Do not use a prying device or separator fork between
the ball joint and the wheel knuckle. Damage to the ball joint or ball
joint seal may result. Only use the pry bar by inserting it into the
lower arm body opening.
NOTICE:
Use care when releasing the lower arm and wheel
knuckle into the resting position or damage to the ball joint seal may
occur.
Remove and discard the ball joint pinch bolt and nut and separate the ball joint from the wheel knuckle.
-
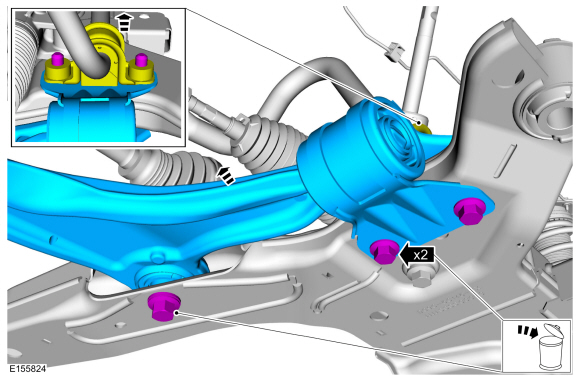
Remove and discard the lower arm forward and rearward bolts and remove the lower arm.
Installation
-
Only tighten the bolts finger tight at this stage.
-
Install the new lower arm rearward bolts.
-
Install the new lower arm forward bolt.
-
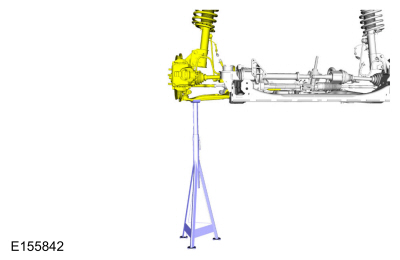
Raise the suspension to curb height.
Use the General Equipment: Vehicle/Axle Stands
-
NOTICE:
Tighten the suspension bushing fasteners with the
suspension loaded or with the weight of the vehicle resting on the
wheels and tires, otherwise incorrect clamp load and bushing damage may
occur.
-
Tighten the new lower arm rearward bolts.
Torque:
122 lb.ft (165 Nm)
-
Tighten the new lower arm forward bolt.
Torque:
240 lb.ft (325 Nm)
-
Position the ball joint into the wheel knuckle and install the new ball joint pinch bolt and nut.
Torque:
76 lb.ft (103 Nm)
-
If equipped.
Position the front height sensor arm bracket and install the front height sensor arm bracket bolt.
Torque:
177 lb.in (20 Nm)
-
If equipped.
Install the floor pan under body shields and the retainers.
-
If equipped.
Install the center under body shield and the retainers.
-
If equipped.
Install the dual under body shields and the retainers.
-
If equipped.
Install the under body shield and the retainers.
-
Install the wheels and tires.
Refer to: Wheel and Tire (204-04A Wheels and Tires, Removal and Installation).
-
Check and if necessary adjust front toe.
Refer to: Front Toe Adjustment (204-00 Suspension System - General Information, General Procedures).
Refer to: Front Toe Adjustment - Vehicles With: Adaptive Steering
(204-00 Suspension System - General Information, General Procedures).
-
Calibrate the suspension system. Connect the scan tool
and carry out the Ride Height Calibration routine. Follow the scan tool
directions.
Special Tool(s) /
General Equipment
204-161
(T97P-1175-A)
Installer, HalfshaftTKIT-1997-LM2TKIT-1997-F/FM2TKIT-1997-FLM2
205-D070
(D93P-1175-B)
Remover, Front Wheel Hub
Removal
NOTICE:
Suspension fasteners are critical parts that affect the
performance of vital components and systems...
Special Tool(s) /
General Equipment
Tie Rod End Remover
Removal
NOTICE:
Suspension fasteners are critical parts that affect the
performance of vital components and systems...
Other information:
Overview
The generator is driven by the FEAD belt. When the engine is
started, the generator begins to generate AC voltage which is internally
converted to DC voltage. The DC voltage is controlled by the voltage
regulator and supplied to the battery...
Overview
Driver Power Seat
The power driver seat is controlled by the DSM . The DSM is located
on the driver seat track. The DSM hard stop/soft stops must be set/reset
any time a new DSM , driver seat track, horizontal motor or driver seat
backrest is installed...
Categories
WARNING: If the tire pressure
monitor sensor becomes damaged it may
not function.
Note: The use of tire sealant may damage
your tire pressure monitoring system and
should only be used in roadside
emergencies. If you must use a sealant, use
the Tire Mobility Kit sealant. Replace the tire
pressure monitoring system sensor and
valve stem on the wheel by an authorized
dealer after use of the sealant.
Note: The tire pressure monitoring system
indicator light will illuminate when the spare
tire is in use. To restore the full function of
the monitoring system, all road wheels
equipped with tire pressure monitoring
sensors must be mounted on the vehicle.
If you get a flat tire while driving, do not apply
the brake hea
read more

 Front Wheel Bearing and Wheel Hub. Removal and Installation
 Wheel Knuckle. Removal and Installation