Lincoln Nautilus: Body Repairs - Vehicle Specific Information and Tolerance Checks / Body Panel Sectioning. General Procedures
Special Tool(s) / General Equipment
| Resistance Spotwelding Equipment | |
| MIG/MAG Welding Equipment | |
| Spot Weld Drill Bit |
Materials
| Name | Specification |
|---|---|
| Seam Sealer TA-2-B, 3M™ 08308, LORD Fusor® 803DTM |
- |
Repair
NOTICE: Do not begin removal of the vehicle body side until the replacement panel is available for reference.
NOTICE: Do not carry out body side sectioning repairs in areas of door hinge, safety belt or striker anchoring points. Welding within 50 mm (1.96 in) of door hinge or striker locations may compromise structural integrity during a collision.
NOTICE: Sectioning within the door hinge portion of the A-pillar, B-pillar or dog leg portion of the quarter panel is not approved by Ford Motor Company.
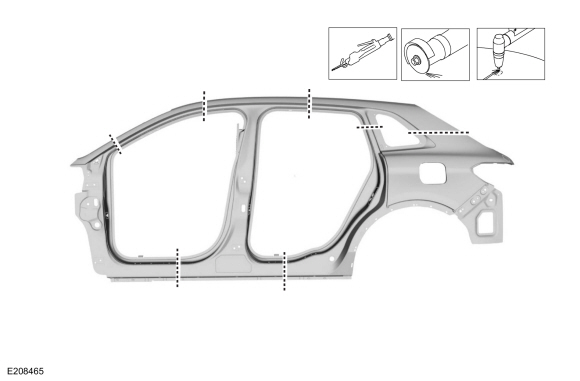
NOTE: LH side shown, RH side similar.
-
Only remove as much of the outer body side panel material as necessary using available tools.
Refer to: Joining Techniques (501-25 Body Repairs - General Information, General Procedures).
-
Body side replacement panels are released as 2-part panels.
 |
-
Detrim the vehicle as necessary and remove spot welds from the damaged area.
Use the General Equipment: Spot Weld Drill Bit
-
NOTE: Use resistance spotwelding equipment where possible. This will produce a higher quality repair.
NOTE: When welding overlapping surfaces or substrates, apply a high quality weld-through primer between the surfaces prior to welding.
Where possible, create a lap-joint backer plate using a portion of the old panel. This will create a stronger joint.
Use the General Equipment: Resistance Spotwelding Equipment
Use the General Equipment: MIG/MAG Welding Equipment
-
Rough finish all sectioning joints with a fibre-based
body filler, final finish sectioning joints and plug welds with a
conventional body filler.
-
Properly seal all horizontal joints to prevent moisture
intrusion. Water and moisture migrate toward horizontal joints and
corrosion tends to occur more rapidly in these areas.
Material: Seam Sealer / TA-2-B, 3M™ 08308, LORD Fusor® 803DTM
-
Proceed with the refinishing process using a Ford approved paint system and manufacturers recommendations.
-
Refer to: Corrosion Prevention (501-25 Body Repairs - General Information, General Procedures).
-
Reinstall vehicle trim as necessary.
 Vehicle Specific Body Construction. Description and Operation
For recommended metal repair guidelines and recommendations, refer to the following illustrations and: For additional information, refer to: Specifications (501-25 Body Repairs - General Information, Specifications)...

Other information:
Lincoln Nautilus 2018-2026 Service Manual: Climate Control System - Overview. Description and Operation
Overview The DATC system maintains the selected vehicle interior temperature by heating and/or cooling the air depending on the HVAC control panel selection. The driver may override the automatic mode of operation. The temperature control setting is the desired cabin air temperature. The blower motor control override buttons vary the blower motor speed. The driver and pa..
Lincoln Nautilus 2018-2026 Owners Manual: Auto Hold
How Does Auto Hold Work Auto Hold applies the brakes to hold your vehicle after you stop it and release the brake pedal. This can help when waiting on a hill or in traffic. Switching Auto Hold On and Off WARNING: The system does not replace the parking brake. When you leave your vehicle, always apply the parking brake. WARNING: You must remain in your vehicle when the system turns on. At al..
Categories
- Manuals Home
- 1st Generation Nautilus Owners Manual
- 1st Generation Nautilus Service Manual
- Normal Scheduled Maintenance
- Replacing the Rear Wiper Blades
- Fuel Quality
- New on site
- Most important about car
Programming the Garage Door Opener to Your Garage Door Opener Motor