Lincoln Nautilus: Multifunction Electronic Modules / Driver Door Module (DDM). Removal and Installation
Removal
NOTE: Removal steps in this procedure may contain installation details.
-
NOTE: If installing a new module, it is necessary to upload the module configuration information to the diagnostic scan tool prior to removing the module. This information must be downloaded into the new module after installation.
Carry out the PMI procedure for the DDM .
Refer to: Module Programming (418-01 Module Configuration) .
-
Remove the front door trim panel.
Refer to: Front Door Trim Panel (501-05 Interior Trim and Ornamentation, Removal and Installation).
-
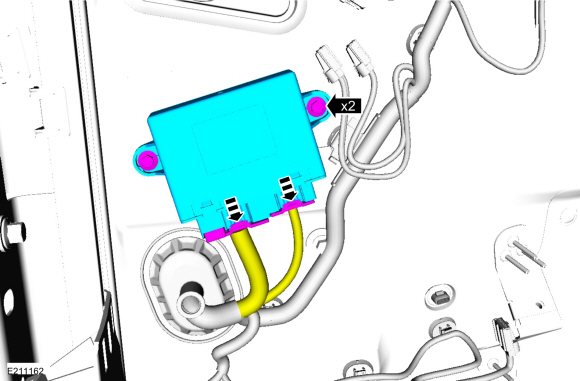
Remove the bolts and the DDM .
-
Disconnect the elecrical connectors.
Torque: 44 lb.in (5 Nm)
-
Disconnect the elecrical connectors.
 |
Installation
-
To install, reverse the removal procedure.
-
Using the previous diagnostic scan tool session, carry out the PMI procedure for the DDM .
-
If installing a new module, carry out the power door window initialization.
Refer to: Power Door Window Initialization (501-11 Glass, Frames and Mechanisms, General Procedures).
 Body Control Module (BCM). Removal and Installation
Removal
NOTE:
Removal steps in this procedure may contain installation details.
NOTE:
If the BCM
did not respond to the diagnostic scan tool, As-Built Data may need to
be entered as part of the repair...
 Passenger Door Module (PDM). Removal and Installation
Removal
NOTE:
Removal steps in this procedure may contain installation details.
NOTE:
If installing a new module, it is necessary to
upload the module configuration information to the diagnostic scan tool
prior to removing the module...
Other information:
Lincoln Nautilus 2018-2026 Owners Manual: Automatic Emergency Braking
What Is Automatic Emergency Braking Automatic emergency braking may activate if the system determines that a collision is imminent. The system may help reduce impact damage to avoid the crash completely. Automatic emergency braking is only available up to certain speeds...
Lincoln Nautilus 2018-2026 Owners Manual: Adaptive Cruise Control Indicators. Switching From Adaptive Cruise Control to Cruise Control. Lane Centering
Adaptive Cruise Control Indicators Illuminates when you switch adaptive cruise control on. The color of the indicator changes to indicate the system status. White indicates the system is on but inactive. Green indicates that you set the speed and the system is active...
Categories
- Manuals Home
- 1st Generation Nautilus Owners Manual
- 1st Generation Nautilus Service Manual
- Opening the Liftgate
- Child Safety Locks
- Opening and Closing the Hood
- New on site
- Most important about car
Changing a Flat Tire
WARNING: If the tire pressure monitor sensor becomes damaged it may not function.
Note: The use of tire sealant may damage your tire pressure monitoring system and should only be used in roadside emergencies. If you must use a sealant, use the Tire Mobility Kit sealant. Replace the tire pressure monitoring system sensor and valve stem on the wheel by an authorized dealer after use of the sealant.
Note: The tire pressure monitoring system indicator light will illuminate when the spare tire is in use. To restore the full function of the monitoring system, all road wheels equipped with tire pressure monitoring sensors must be mounted on the vehicle.
If you get a flat tire while driving, do not apply the brake hea