Lincoln Nautilus Manuals

Lincoln Nautilus: Driveshaft / Driveshaft. Diagnosis and Testing

Lincoln Nautilus 2018-2024 Service Manual / Chassis / Driveline / Driveshaft / Driveshaft. Diagnosis and Testing

Preliminary Inspection

  1. Verify the customer concern.
  1. Visually inspect the CV joints for obvious signs of mechanical damage.
  1. If an obvious cause for an observed or reported concern is found, correct the cause (if possible) before proceeding to the next step
  1. If the cause is not visually evident, verify the symptom and REFER to Symptom Chart: NVH.

Symptom Chart(s)

Diagnostics in this manual assume a certain skill level and knowledge of Ford-specific diagnostic practices.
REFER to: Diagnostic Methods (100-00 General Information, Description and Operation).

Symptom Chart: NVH

  Symptom Chart


Condition Possible Sources Actions
Driveline clunk - loud clunk when shifting from REVERSE to DRIVE
  • Damaged or worn CV -joints
  • INSPECT the CV -joints for wear or damage. INSTALL a new driveshaft as necessary.
    REFER to: Rear Driveshaft - 2.0L EcoBoost (184kW/250PS) – MI4 (205-01 Driveshaft, Removal and Installation).
    REFER to: Rear Driveshaft - 2.7L EcoBoost (238kW/324PS) (205-01 Driveshaft, Removal and Installation).
  • Damaged driveshaft center bearing support
  • INSPECT the insulator for wear or damage. INSTALL a new driveshaft as necessary.
    REFER to: Rear Driveshaft - 2.0L EcoBoost (184kW/250PS) – MI4 (205-01 Driveshaft, Removal and Installation).
    REFER to: Rear Driveshaft - 2.7L EcoBoost (238kW/324PS) (205-01 Driveshaft, Removal and Installation).
Driveline clunk — occurs as the vehicle starts to move forward following a stop
  • Worn driveshaft CV -joint with excessive play
  • INSPECT the CV -joint for a worn condition. INSTALL a new driveshaft if necessary.
    REFER to: Rear Driveshaft - 2.0L EcoBoost (184kW/250PS) – MI4 (205-01 Driveshaft, Removal and Installation).
    REFER to: Rear Driveshaft - 2.7L EcoBoost (238kW/324PS) (205-01 Driveshaft, Removal and Installation).
  • Damaged driveshaft center bearing support
  • INSPECT the insulator for wear or damage. INSTALL a new driveshaft as necessary.
    REFER to: Rear Driveshaft - 2.0L EcoBoost (184kW/250PS) – MI4 (205-01 Driveshaft, Removal and Installation).
    REFER to: Rear Driveshaft - 2.7L EcoBoost (238kW/324PS) (205-01 Driveshaft, Removal and Installation).
Buzz – buzzing noise is the same at cruise or coast/deceleration
  • Incorrect driveline angles
  • CHECK for correct driveline angles. REPAIR as necessary.
    REFER to: Driveshaft Angle Measurement (205-01 Driveshaft, General Procedures).
Rumble or Boom – noise occurs at coast/ deceleration, usually driveshaft speed-related and noticeable over a wide range of speeds
  • Driveshaft out of balance
  • CHECK the driveshaft for damage, missing weights or undercoating.
    REFER to: Driveshaft Runout and Balancing (205-01 Driveshaft, General Procedures).
    INSTALL a new driveshaft as necessary. REFER to: Rear Driveshaft - 2.0L EcoBoost (184kW/250PS) – MI4 (205-01 Driveshaft, Removal and Installation).
    REFER to: Rear Driveshaft - 2.7L EcoBoost (238kW/324PS) (205-01 Driveshaft, Removal and Installation).
Grunting — normally associated with a shudder experienced during acceleration from a complete stop
  • Driveshaft CV -joint binding
  • INSTALL a new driveshaft as necessary.
    REFER to: Rear Driveshaft - 2.0L EcoBoost (184kW/250PS) – MI4 (205-01 Driveshaft, Removal and Installation).
    REFER to: Rear Driveshaft - 2.7L EcoBoost (238kW/324PS) (205-01 Driveshaft, Removal and Installation).
Driveline shudder – occurs during acceleration from a slow speed or stop
  • Driveline angles out of specification
  • CHECK for correct driveline angles.
    REFER to: Driveshaft Angle Measurement (205-01 Driveshaft, General Procedures).
  • Binding or damaged driveshaft CV -joint
  • INSPECT the driveshaft CV -joints and coupling shaft for wear or damage. INSTALL a new driveshaft as necessary.
    REFER to: Rear Driveshaft - 2.0L EcoBoost (184kW/250PS) – MI4 (205-01 Driveshaft, Removal and Installation).
    REFER to: Rear Driveshaft - 2.7L EcoBoost (238kW/324PS) (205-01 Driveshaft, Removal and Installation).
Driveline vibration - occurs at cruising speeds
  • Worn or damaged driveshaft center bearing support
  • CHECK the insulator for damage or wear. ROTATE the driveshaft and CHECK for rough operation. INSTALL a new driveshaft as necessary.
    REFER to: Rear Driveshaft - 2.0L EcoBoost (184kW/250PS) – MI4 (205-01 Driveshaft, Removal and Installation).
    REFER to: Rear Driveshaft - 2.7L EcoBoost (238kW/324PS) (205-01 Driveshaft, Removal and Installation).
  • Loose axle pinion flange bolts
  • INSPECT the axle pinion flange. TIGHTEN the pinion flange bolts to specification.
    REFER to: Rear Driveshaft - 2.0L EcoBoost (184kW/250PS) – MI4 (205-01 Driveshaft, Removal and Installation).
    REFER to: Rear Driveshaft - 2.7L EcoBoost (238kW/324PS) (205-01 Driveshaft, Removal and Installation).
  • Excessive axle pinion flange runout
  • CARRY OUT a runout check. REPAIR as necessary.
    REFER to: Specifications (205-01 Driveshaft, Specifications).
  • Driveshaft is out of balance
  • CHECK the driveshaft for damage, missing balance weights or undercoating. CHECK the driveshaft balance. CARRY OUT a driveline vibration test.
    REFER to: Driveshaft Runout and Balancing (205-01 Driveshaft, General Procedures).
  • Binding or damaged driveshaft CV -joint
  • INSPECT the driveshaft CV -joint for wear or damage. INSTALL a new driveshaft as necessary.
    REFER to: Rear Driveshaft - 2.0L EcoBoost (184kW/250PS) – MI4 (205-01 Driveshaft, Removal and Installation).
    REFER to: Rear Driveshaft - 2.7L EcoBoost (238kW/324PS) (205-01 Driveshaft, Removal and Installation).
  • Excessive driveshaft runout
  • CARRY OUT a runout check.
    REFER to: Driveshaft Runout and Balancing (205-01 Driveshaft, General Procedures).
  • Driveline angles out of specification
  • CHECK for correct driveline angles. REPAIR as necessary.
    REFER to: Driveshaft Angle Measurement (205-01 Driveshaft, General Procedures).
  • Center bearing bolts not properly seated
  • REPLACE and TORQUE the center bearing bolts.
    REFER to: Rear Driveshaft - 2.0L EcoBoost (184kW/250PS) – MI4 (205-01 Driveshaft, Removal and Installation).
    REFER to: Rear Driveshaft - 2.7L EcoBoost (238kW/324PS) (205-01 Driveshaft, Removal and Installation).

    Specifications

    Item 2.0L EcoBoost 2.7L EcoBoost Driveshaft runout 0.6 mm (0.024 in) 0.6 mm (0.024 in) Driveshaft to PTU joint angle @ curb ride height 3...

    Driveshaft Angle Measurement. General Procedures

    Check NOTE: This procedure does not apply to CV joints, flex couplers or double cardan joints that are used in some driveshafts. This check is for single-cross and roller-style joints found in the driveshafts...

    Other information:

    Lincoln Nautilus 2018-2024 Service Manual: Spring. Removal and Installation


    Special Tool(s) / General Equipment Spring Compressor Vise Removal NOTICE: Suspension fasteners are critical parts that affect the performance of vital components and systems. Failure of these fasteners may result in major service expense...

    Lincoln Nautilus 2018-2024 Service Manual: Airbag and Seatbelt Pretensioner Supplemental Restraint System (SRS) - Component Location. Description and Operation


    Item Description 1 Driver and passenger C-pillar side impact sensors 2 Driver front door side impact sensor 3 Clockspring 4 PAD indicator 5 RCM 6 OCSM (includes OCS sensor and gel-filled bladder) 7 Passenger front door side impact sensor 8 Seat position sensors 9 LH and RH front impact severity sensors ..

    Categories

    Replacing the Rear Wiper Blades

    Lincoln Nautilus. Replacing the Rear Wiper Blades

    Lift the wiper arm.

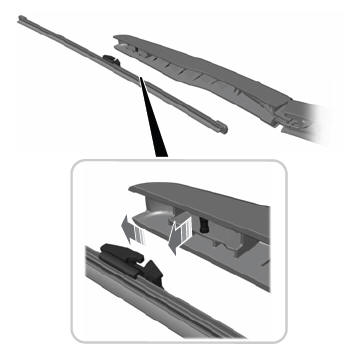
    Note: Do not hold the wiper blade to lift the wiper arm.

    Remove the wiper blade.

    read more

    Copyright © 2024 www.linautilus.com