Lincoln Nautilus: Seatbelt Systems / Front Seatbelt Anchor and Pretensioner. Removal and Installation
Special Tool(s) / General Equipment
 |
501-403 Tool, Pretensioner Quick Connect TKIT-2012D-FL TKIT-2012D-ROW |
Removal
NOTE: Removal steps in this procedure may contain installation details.
NOTE: RH shown, LH similar.
-
Depower the SRS .
Refer to: Supplemental Restraint System (SRS) Depowering (501-20 Supplemental Restraint System) .
-
Remove the lower B-pillar trim panel.
Refer to: B-Pillar Trim Panel (501-05 Interior Trim and Ornamentation, Removal and Installation).
-
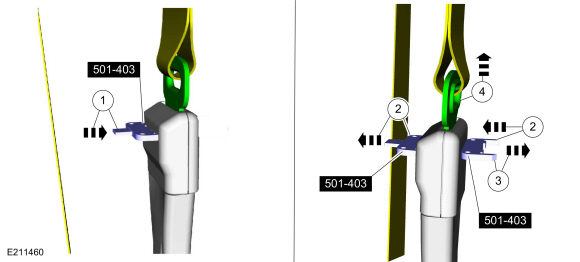
NOTE: Follow the unique instructions or graphic for this step in the installation.
Disconnect the seatbelt from the anchor and pretensioner.
-
Insert the special tool.
Install Special Service Tool: 501-403 Tool, Pretensioner Quick Connect.
-
NOTE: Allow insertion of the second tool to push the first tool from the mini-buckle.
Insert the second tool.
Install Special Service Tool: 501-403 Tool, Pretensioner Quick Connect.
-
Remove the second tool.
Remove Special Service Tool: 501-403 Tool, Pretensioner Quick Connect.
-
Disconnect the seatbelt from the anchor and pretensioner and position aside.
-
Insert the special tool.
 |
-
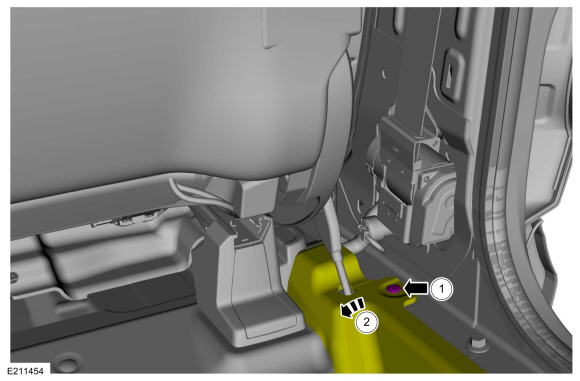
Position the carpet to access the seatbelt anchor and pretensioner.
-
Remove the pin-type retainer.
-
Position the carpet.
-
Remove the pin-type retainer.
 |
-
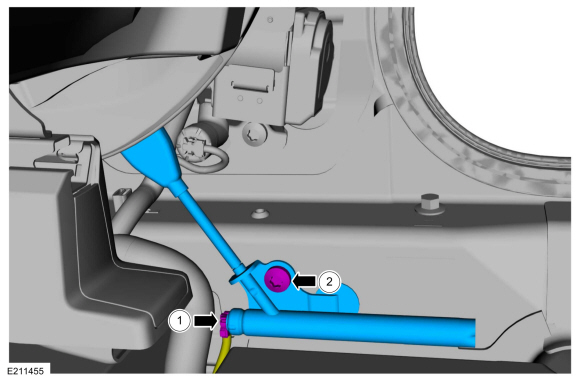
NOTE: Carpet shown removed for clarity.
Remove the seatbelt anchor and pretensioner.
-
Disconnect the electrical connector.
-
Remove the bolt.
Torque: 30 lb.ft (40 Nm)
-
Disconnect the electrical connector.
 |
Installation
NOTE: During installation, make sure the seatbelt webbing is not twisted and the seatbelts and buckles are accessible to the occupants.
-
To install, reverse the removal procedure.
-
NOTE: During the latching sequence, tongue insertion should not be hindered by excessive effort and a click will be heard when the seatbelt buckle latches the tongue. If the seatbelt tongue cannot be inserted into the seatbelt anchor and pretensioner, it will be necessary to reset the latch inside the seatbelt anchor and pretensioner using the service tools.
Insert the seatbelt into the anchor and pretensioner.
.jpg) |
-
Repower the SRS .
Refer to: Supplemental Restraint System (SRS) Repowering (501-20 Supplemental Restraint System) .
-
Check the seatbelt system for correct operation.
Refer to: Seatbelt Systems (501-20 Seatbelt Systems) .
 Seatbelt Twisted at the Seatbelt Guide. General Procedures
Adjustment
NOTE:
Typical D-ring shown, others similar.
If required, remove the necessary trim panel(s).
Fold the seatbelt as indicated...
 Front Seatbelt Buckle. Removal and Installation
Removal
NOTE:
Removal steps in this procedure may contain installation details.
NOTE:
Driver seat shown, passenger seat similar.
Remove the front seat...
Other information:
Lincoln Nautilus 2018-2026 Owners Manual: Keyless Entry Keypad Master Access Code
Unlocking the Doors Enter the factory-set five-digit code or your personal code. You must press each number within five seconds of each other. Press 3-4 within five seconds to unlock all doors. Locking the Doors Press and hold 7·8 and 9·0 at the same time with the driver door closed...
Lincoln Nautilus 2018-2026 Service Manual: Driveshaft Runout and Balancing. General Procedures
Special Tool(s) / General Equipment 100-002 (TOOL-4201-C) Holding Fixture with Dial Indicator Gauge Inspection NOTE: Driveline vibration exhibits a higher frequency and lower amplitude then high-speed shake. Driveline vibration is directly related to the speed of the vehicle and is noticed at various speeds...
Categories
- Manuals Home
- 1st Generation Nautilus Owners Manual
- 1st Generation Nautilus Service Manual
- USB Ports
- Child Safety Locks
- Auto Hold
- New on site
- Most important about car
Changing a Flat Tire
WARNING: If the tire pressure monitor sensor becomes damaged it may not function.
Note: The use of tire sealant may damage your tire pressure monitoring system and should only be used in roadside emergencies. If you must use a sealant, use the Tire Mobility Kit sealant. Replace the tire pressure monitoring system sensor and valve stem on the wheel by an authorized dealer after use of the sealant.
Note: The tire pressure monitoring system indicator light will illuminate when the spare tire is in use. To restore the full function of the monitoring system, all road wheels equipped with tire pressure monitoring sensors must be mounted on the vehicle.
If you get a flat tire while driving, do not apply the brake hea