Lincoln Nautilus: Driveshaft / Rear Driveshaft - 2.0L EcoBoost (184kW/250PS) – MI4. Removal and Installation
Special Tool(s) / General Equipment
| Flat Headed Screw Driver | |
| Punch | |
| Copper Hammer |
Removal
NOTE: Removal steps may contain installation instructions.
-
Remove the muffler and tailpipe.
Refer to: Muffler and Tailpipe (309-00A Exhaust System - 2.0L EcoBoost (184kW/250PS) – MI4, Removal and Installation).
-
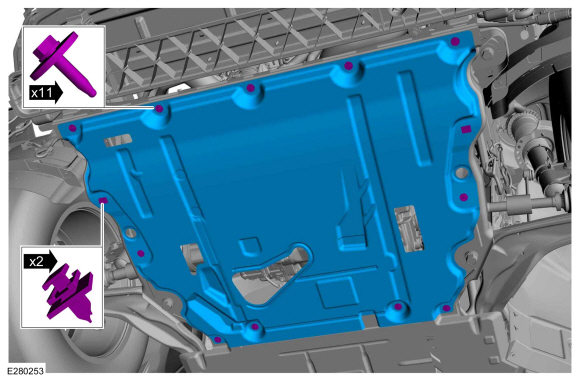
Remove the bolts, the retainers and the underbody shield.
 |
-
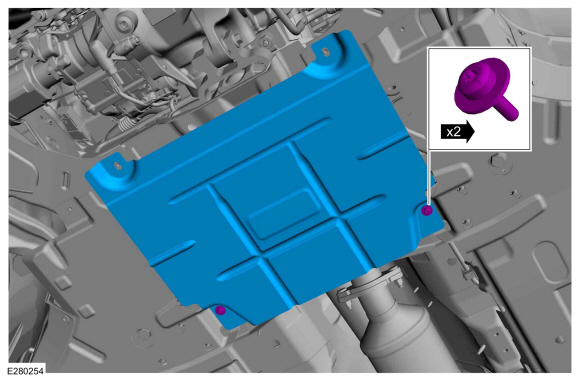
Remove the retainers and the center under body shield.
 |
-
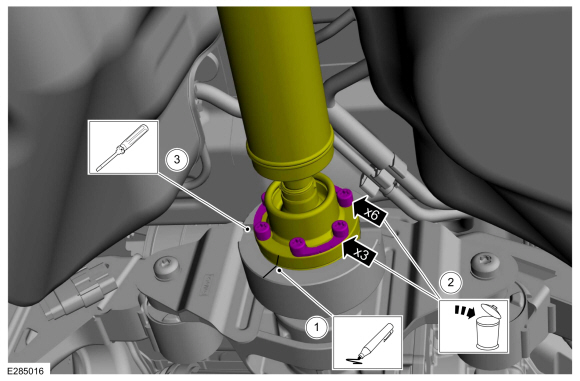
NOTE: The installation step requires the aid of another technician.
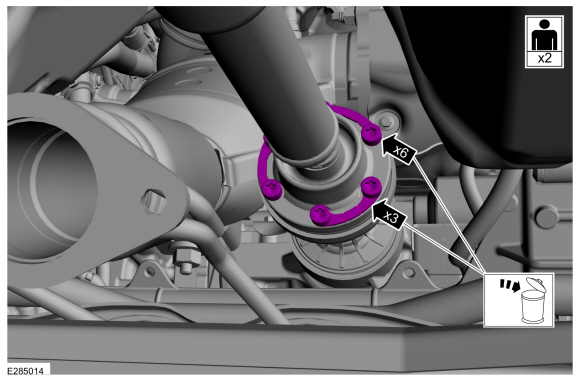
Remove and discard the driveshaft to PTU bolts and retaining straps.
Torque: 26 lb.ft (35 Nm)
 |
-
Separate the driveshaft from the PTU flange.
-
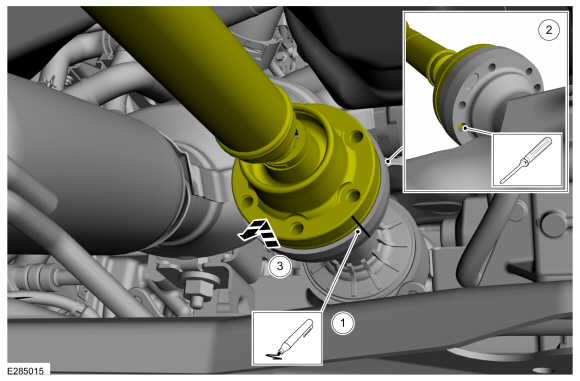
NOTE: Make sure that the component aligns with the installation mark.
Index-mark the driveshaft and PTU flange.
-
NOTICE: Do not remove driveshaft from the PTU flange by pulling on the driveshaft tube. Damage to the CV-joint can result.
Using general equipment, separate the driveshaft from the PTU flange.
Use the General Equipment: Punch
Use the General Equipment: Copper Hammer
-
Remove the driveshaft from the PTU flange.
-
 |
-
Separate the driveshaft from the drive pinion flange.
-
NOTE: Make sure that the component aligns with the installation mark.
Index-mark the driveshaft and RDU flange.
-
Remove and discard the driveshaft to drive pinion flange bolts and the retaining straps.
Torque: 26 lb.ft (35 Nm)
-
NOTICE: Do not remove driveshaft from the pinion flange by pulling on the driveshaft tube. Damage to the CV-joint can result.
Using a general equipment, separate the driveshaft from the drive pinion flange.
Use the General Equipment: Flat Headed Screw Driver
-
 |
-
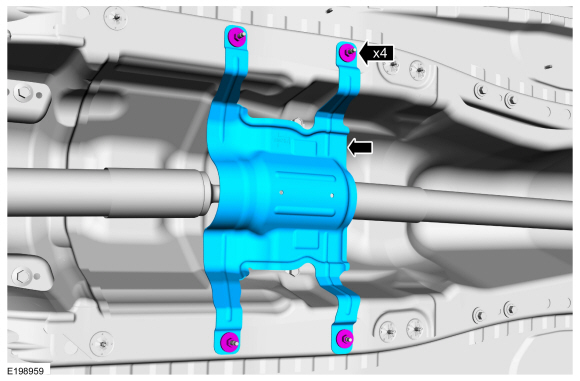
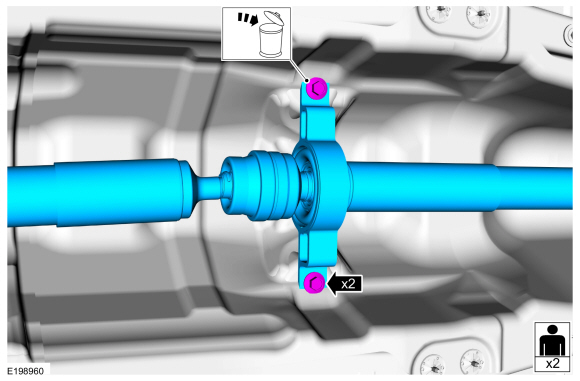
Remove the retainers and the center bearing heat shield.
Torque: 106 lb.in (12 Nm)
 |
-
NOTICE: The driveshaft is long and heavy with multiple CV-joints. The help of a assistant will be needed. Do not over articulate the driveshaft or damage may occur.
NOTE: When installing the driveshaft, it will be necessary to place the CV-joint flanges of the driveshaft into the PTU and RDU flanges before installing the center bearing bolts.
With the help from an assistant, remove and discard the center bearing bolts and remove the driveshaft.
Torque: 41 lb.ft (55 Nm)
 |
Installation
-
NOTE: If a driveshaft is installed and driveshaft vibration is encountered after installation, index the driveshaft.
To install, reverse the removal procedure.
 Driveshaft Runout and Balancing. General Procedures
Special Tool(s) /
General Equipment
100-002
(TOOL-4201-C)
Holding Fixture with Dial Indicator Gauge
Inspection
NOTE:
Driveline vibration exhibits a higher frequency and lower
amplitude then high-speed shake...
 Rear Driveshaft - 2.7L EcoBoost (238kW/324PS). Removal and Installation
Special Tool(s) /
General Equipment
Flat Headed Screw Driver
Removal
NOTE:
Removal steps in this procedure may contain installation details...
Other information:
Lincoln Nautilus 2018-2025 Service Manual: Oil Pressure Test - Gasoline. General Procedures
Oil Pressure Test 2.7L EcoBoost & 3.3L Duratec & 5.0L Ti-VCT NOTE: It is necessary to disconnect the battery to avoid setting any DTCs that could cause the PCM to command the oil pressure to other than what should be observed from a correctly operating system during the oil pressure test...
Lincoln Nautilus 2018-2025 Service Manual: Direct Current/Alternating Current (DC/AC) Inverter - System Operation and Component Description. Description and Operation
System Diagram Item Description 1 PCM 2 BCM 3 Direct Current/Alternating Current (DC/AC) Inverter 4 A/C Power Outlet Socket System Operation Network Message Chart Broadcast Message Originating Module Message Purpose Power pack torque status PCM Used to dete..
Categories
- Manuals Home
- 1st Generation Nautilus Owners Manual
- 1st Generation Nautilus Service Manual
- Changing the 12V Battery
- Fuel Quality
- Opening and Closing the Hood
- New on site
- Most important about car
Traction Control
How Does Traction Control Work
If your vehicle begins to slide, the system applies the brakes to individual wheels and, when needed, reduces power at the same time. If the wheels spin when accelerating on slippery or loose surfaces, the system reduces power in order to increase traction.
Switching Traction Control On and Off
WARNING: The stability and traction control light illuminates steadily if the system detects a failure. Make sure you did not manually disable the traction control system using the information display controls or the switch. If the stability control and traction control light is still illuminating steadily, have the system serviced by an authorized dealer immediately. Operating your vehicle with the traction co