Lincoln Nautilus: Roof Sheet Metal Repairs / Roof Panel - Vehicles With: Panoramic Roof Opening Panel. Removal and Installation
Lincoln Nautilus 2018-2026 Service Manual / Body and Paint / Body and Paint / Roof Sheet Metal Repairs / Roof Panel - Vehicles With: Panoramic Roof Opening Panel. Removal and Installation
Special Tool(s) / General Equipment
| Resistance Spotwelding Equipment | |
| Scraper for Straight Edges | |
| Spherical Cutter | |
| Hot Air Gun | |
| Spot Weld Drill Bit | |
| Locking Pliers |
Materials
| Name | Specification |
|---|---|
| Metal Bonding Adhesive TA-1, TA-1-B, 3M™ 08115, LORD Fusor® 108B, Henkel Teroson EP 5055 |
- |
| Seam Sealer TA-2-B, 3M™ 08308, LORD Fusor® 803DTM |
- |
| Flexible Foam Repair 3M™ 08463, LORD Fusor® 121 |
- |
Removal
NOTICE: Adequately protect all glass, exterior finish and interior trim during entire repair procedure.
-
Remove the following items:
-
Remove the windshield.
Refer to: Fixed Glass (501-11 Glass, Frames and Mechanisms, General Procedures).
-
Remove the liftgate.
Refer to: Liftgate (501-03 Body Closures, Removal and Installation).
-
Remove the roof opening panel and frame.
Refer to: Roof Opening Panel Frame (501-17 Roof Opening Panel, Removal and Installation).
-
Remove the side curtain airbag.
Refer to: Side Curtain Airbag (501-20B Supplemental Restraint System, Removal and Installation).
-
If equipped, remove the roof rail.
Refer to: Roof Rail (501-08 Exterior Trim and Ornamentation, Removal and Installation).
-
Remove the windshield.
-
If required, dimensionally restore vehicle to pre-accident condition.
Refer to: Body and Frame (501-26 Body Repairs - Vehicle Specific Information and Tolerance Checks, Description and Operation).
-
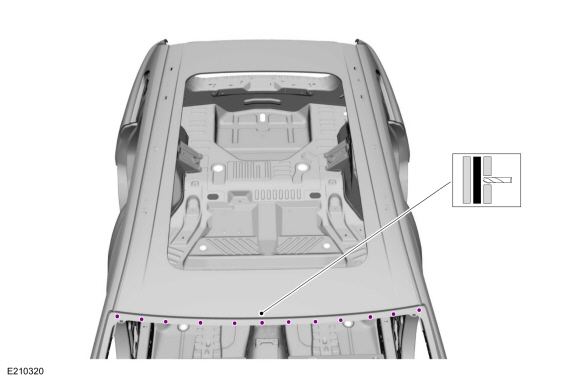
Drill out the spot welds from the front header flange.
Use the General Equipment: Spot Weld Drill Bit
 |
-
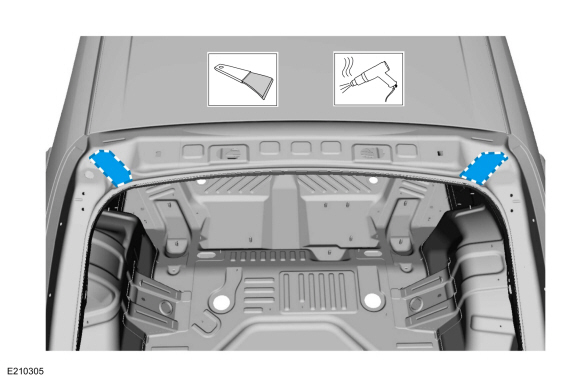
Remove the sealing strips from LH and RH rear roof panel flanges.
Use the General Equipment: Hot Air Gun
Use the General Equipment: Scraper for Straight Edges
 |
-
Drill out the spot welds from the rear header flange.
Use the General Equipment: Spot Weld Drill Bit
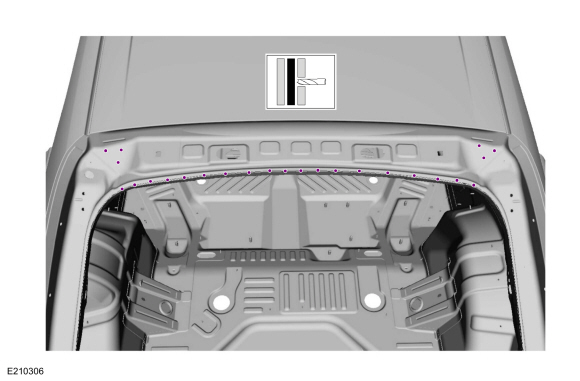 |
-
Using a spherical cutter or equivalent, cut the roof panel, inward from the edge of the roof ditch flange.
Use the General Equipment: Spherical Cutter
.jpg) |
-
NOTE: Leave as much NVH foam intact on the roof bows as possible.
With the aid of an assistant remove the roof panel.
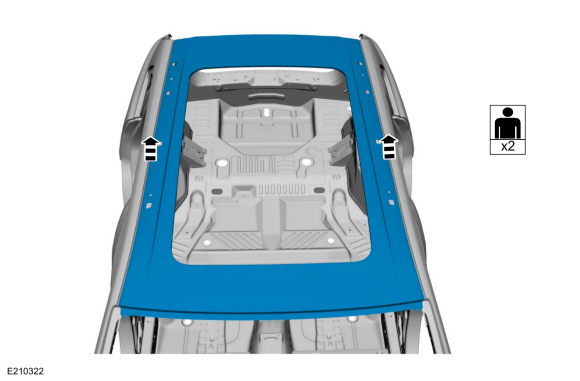 |
-
Using a spherical cutter or equivalent, remove the remaining portion of the roof flange and clean the area.
Use the General Equipment: Spherical Cutter
.jpg) |
Installation
NOTICE: Adequately protect all glass, exterior finish and interior trim during entire repair procedure.
-
Abrade the flange area of the replacement roof panel.
.jpg) |
-
With the aid of an assistant locate and reference mark
the replacement roof panel. Remove the roof panel after marking.
 |
-
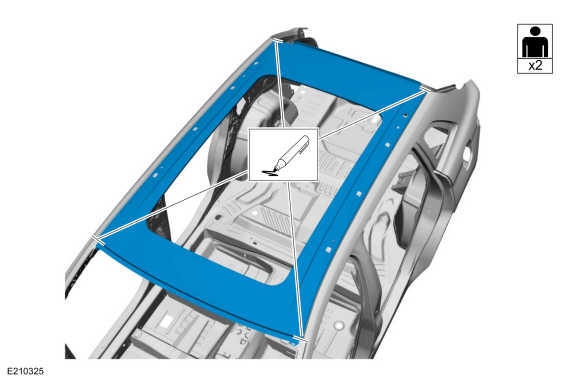
Apply a bead of adhesive to the roof rail flange and rear header flange.
Material: Metal Bonding Adhesive / TA-1, TA-1-B, 3M™ 08115, LORD Fusor® 108B, Henkel Teroson EP 5055
 |
-
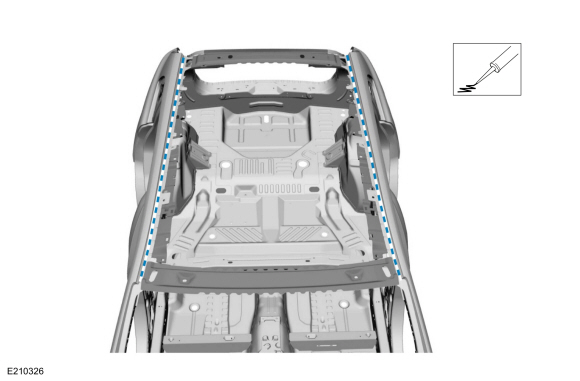
Apply NVH foam to the roof headers and reinforcements.
Material: Flexible Foam Repair / 3M™ 08463, LORD Fusor® 121
 |
-
NOTE: Do not lift the panel from the body once installed. If the panel requires repositioning, slide the panel to correct alignment location.
NOTE: To assure complete bonding, check all locations for full adhesive contact. Add additional adhesive as necessary.
NOTE: Inspect the roof panel-to-roof reinforcement contact points for full contact. Fill any voids with additional NVH foam.
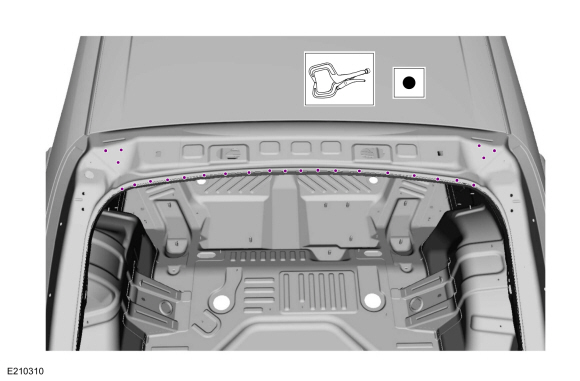
With the aid of an assistant install the roof panel, locate the roof panel to the reference marks and spot weld at the windshield header flange.
Use the General Equipment: Resistance Spotwelding Equipment
Use the General Equipment: Locking Pliers
.jpg) |
-
Spot weld the rear roof panel flange.
Use the General Equipment: Resistance Spotwelding Equipment
 |
-
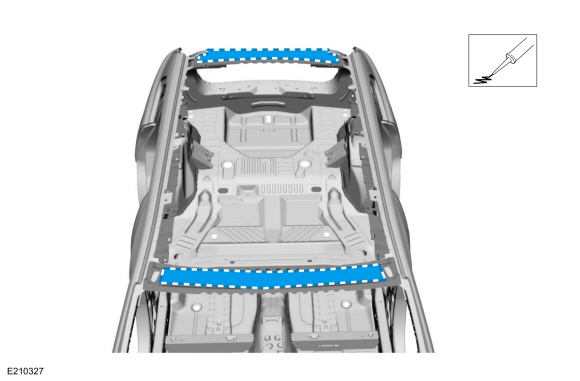
Apply sealer to the rear header flanges.
Material: Seam Sealer / TA-2-B, 3M™ 08308, LORD Fusor® 803DTM
.jpg) |
-
Metal finish the repair area using typical metal finishing procedures.
-
Sealing work: All areas must be sealed to production level.
-
Sand and prime the entire repair area with a Ford approved paint system.
-
Refinish using a Ford approved paint system.
-
Install the following items:
-
Install the windshield.
Refer to: Fixed Glass (501-11 Glass, Frames and Mechanisms, General Procedures).
-
Install the liftgate.
Refer to: Liftgate (501-03 Body Closures, Removal and Installation).
-
Install the side curtain airbag.
Refer to: Side Curtain Airbag (501-20B Supplemental Restraint System, Removal and Installation).
-
Install the roof opening panel and frame.
Refer to: Roof Opening Panel Frame (501-17 Roof Opening Panel, Removal and Installation).
-
If equipped, install the roof rail.
Refer to: Roof Rail (501-08 Exterior Trim and Ornamentation, Removal and Installation).
-
Install the windshield.
 Roof Front Frame. Removal and Installation
Special Tool(s) /
General Equipment
Resistance Spotwelding Equipment
Spot Weld Drill Bit
Locking Pliers
Materials
Name
Specification
Seam SealerTA-2-B, 3M™ 08308, LORD Fusor® 803DTM
-
Removal
NOTE:
Factory welds may be substituted with resistance or MIG
plug welds...
 Roof Panel. Removal and Installation
Special Tool(s) /
General Equipment
Resistance Spotwelding Equipment
Scraper for Straight Edges
Spherical Cutter
Hot Air Gun
Spot Weld Drill Bit
Locking Pliers
Materials
Name
Specification
Metal Bonding AdhesiveTA-1, TA-1-B, 3M™ 08115, LORD Fusor® 108B, Henkel Teroson EP 5055
-
Seam SealerTA-2-B, 3M™ 08308, LORD Fusor® 803DTM
-
..
Other information:
Lincoln Nautilus 2018-2026 Owners Manual: Cooling System Capacity and Specification - 2.0L
Use coolant that meets the defined specification. If you do not use coolant that meets the defined specification, it could result in: Component damage that your vehicle warranty does not cover. Reduced vehicle performance. Capacities Materials ..
Lincoln Nautilus 2018-2026 Service Manual: Rain Sensor. Removal and Installation
Materials Name Specification Motorcraft® Ultra-Clear Spray Glass CleanerZC-23 ESR-M14P5-A Removal Remove the interior rear view mirror. Refer to: Interior Rear View Mirror (501-09) . Remove the rain sensor. Disconnect the electrical connector and position aside. On both sides. Release the retainers. Remove the rain sens..
Categories
- Manuals Home
- 1st Generation Nautilus Owners Manual
- 1st Generation Nautilus Service Manual
- Switching the Lane Keeping System On and Off. Switching the Lane Keeping System Mode
- Massage Seats
- Folding the Exterior Mirrors - Vehicles With: Manual Folding Mirrors. Folding the Exterior Mirrors - Vehicles With: Power Folding Mirrors
- New on site
- Most important about car
Programming the Garage Door Opener to Your Garage Door Opener Motor
Copyright © 2026 www.linautilus.com