Lincoln Nautilus: Side Panel Sheet Metal Repairs / A-Pillar Outer Panel. Removal and Installation
Special Tool(s) / General Equipment
| Resistance Spotwelding Equipment | |
| Spherical Cutter | |
| Hot Air Gun | |
| Air Body Saw | |
| 8 mm Drill Bit | |
| MIG/MAG Welding Equipment | |
| Spot Weld Drill Bit | |
| Locking Pliers |
Materials
| Name | Specification |
|---|---|
| Metal Bonding Adhesive TA-1, TA-1-B, 3M™ 08115, LORD Fusor® 108B, Henkel Teroson EP 5055 |
- |
| Seam Sealer TA-2-B, 3M™ 08308, LORD Fusor® 803DTM |
- |
Removal
-
Restore vehicle to pre-accident dimensions, if required.
Refer to: Body and Frame (501-26 Body Repairs - Vehicle Specific Information and Tolerance Checks, Description and Operation).
-
Remove the following items:
-
Remove the hood.
Refer to: Hood (501-02) .
-
Remove the front door.
Refer to: Front Door (501-03) .
-
Remove the fender.
Refer to: Fender (501-02) .
-
Remove the hood.
-
Position aside the carpet and wiring.
-
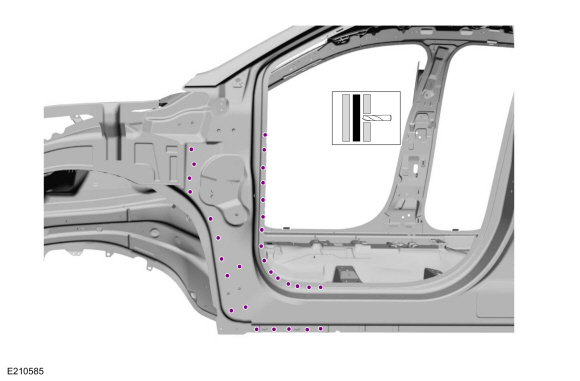
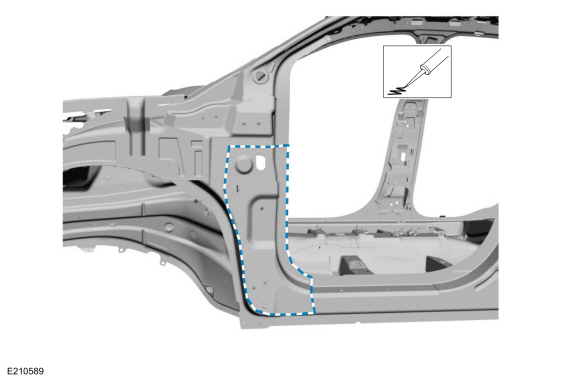
NOTE: Sectioning cutlines shown are intended as a general guideline, depending on vehicle damage.
Determine sectioning point and carefully cut the outer body panel only.
Use the General Equipment: Air Body Saw
.jpg) |
-
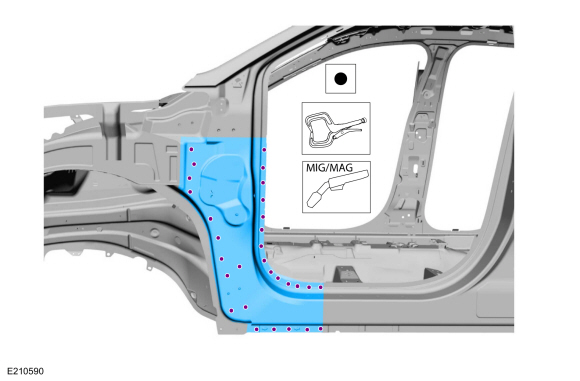
Remove the spot welds.
Use the General Equipment: Spot Weld Drill Bit
 |
-
NOTE: Use of a heat gun may aid in softening the adhesive.
Remove the panel.
Use the General Equipment: Hot Air Gun
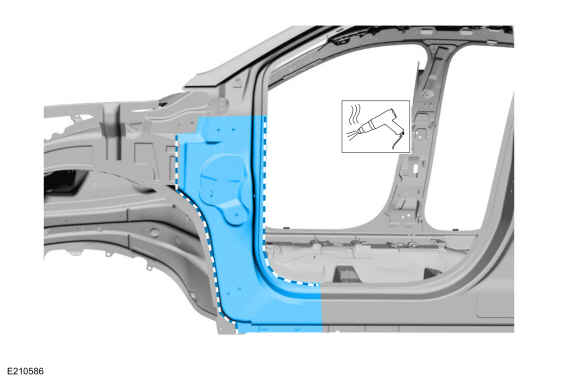 |
Installation
-
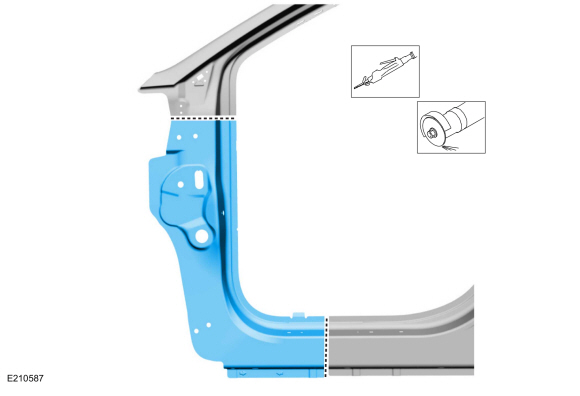
Cut section from the replacement panel.
Use the General Equipment: Air Body Saw
Use the General Equipment: Spherical Cutter
 |
-
Drill holes for plug welding in the replacement part.
Use the General Equipment: 8 mm Drill Bit
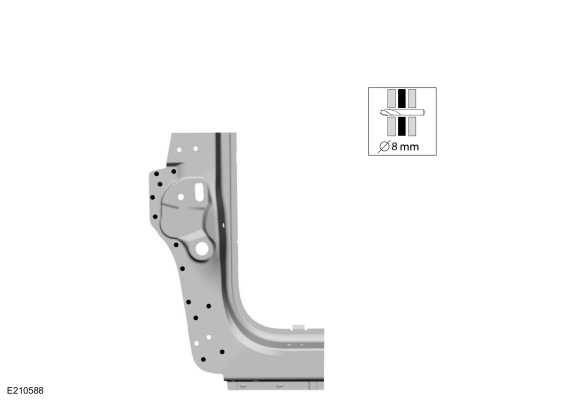 |
-
NOTE: Adhesive is applied between the panels and may be resistance welded through.
Apply adhesive as indicated.
Material: Metal Bonding Adhesive / TA-1, TA-1-B, 3M™ 08115, LORD Fusor® 108B, Henkel Teroson EP 5055
 |
-
Install and weld the replacement panel.
Use the General Equipment: Resistance Spotwelding Equipment
Use the General Equipment: MIG/MAG Welding Equipment
Use the General Equipment: Locking Pliers
 |
-
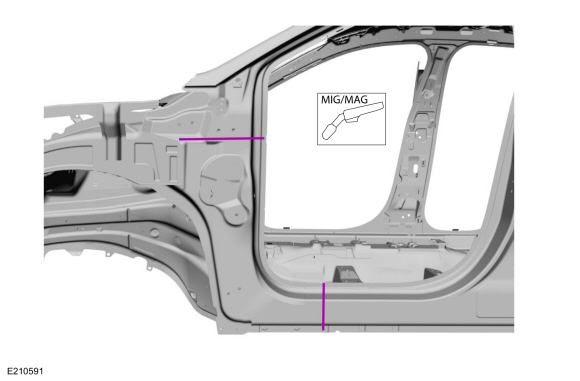
MIG seam weld the replacement panel.
Use the General Equipment: MIG/MAG Welding Equipment
 |
-
Metal finish the repair area using typical repair techniques.
-
Refinish the repair area using a Ford approved paint system.
-
NOTE: Apply seam sealer after priming the area.
Sealing work: All areas must be sealed to production level.
Material: Seam Sealer / TA-2-B, 3M™ 08308, LORD Fusor® 803DTM
-
Restore corrosion protection.
Refer to: Corrosion Prevention (501-25 Body Repairs - General Information, General Procedures).
-
Remove the following items:
-
Install the fender.
Refer to: Fender (501-02) .
-
Install the front door.
Refer to: Front Door (501-03) .
-
Install the hood.
Refer to: Hood (501-02) .
-
Install the fender.
-
Reposition the carpet and wiring.

 A-Pillar Outer Panel Section and Reinforcement. Removal and Installation
Special Tool(s) /
General Equipment
Resistance Spotwelding Equipment
Spherical Cutter
Grinder
Hot Air Gun
Air Body Saw
8 mm Drill Bit
MIG/MAG Welding Equipment
Spot Weld Drill Bit
Locking Pliers
Materials
Name
Specification
Metal Bonding AdhesiveTA-1, TA-1-B, 3M™ 08115, LORD Fusor® 108B, Henkel Teroson EP 5055
-
Seam Sealer..
Other information:
Lincoln Nautilus 2018-2026 Service Manual: Air Conditioning (A/C) Compressor Outlet Line - 2.0L EcoBoost (184kW/250PS) – MI4. Removal and Installation
Removal NOTICE: During the removal of components, cap, tape or otherwise appropriately protect all openings to prevent the ingress of dirt or other contamination. Remove protective materials prior to installation. NOTE: Removal steps in this procedure may contain installation details. Recover the refrigerant. Refer to the appropriate Recovery procedure in Group 412. ..
Lincoln Nautilus 2018-2026 Service Manual: Turn Signal and Hazard Lamps. Diagnosis and Testing
DTC Charts DTC Chart: BCM Diagnostics in this manual assume a certain skill level and knowledge of Ford-specific diagnostic practices. REFER to: Diagnostic Methods (100-00 General Information, Description and Operation). DTC Description Action B123A:11 Left Front Turn Indicator: Circuit Short to Ground GO ..
Categories
- Manuals Home
- 1st Generation Nautilus Owners Manual
- 1st Generation Nautilus Service Manual
- Replacing the Rear Wiper Blades
- Folding the Exterior Mirrors - Vehicles With: Manual Folding Mirrors. Folding the Exterior Mirrors - Vehicles With: Power Folding Mirrors
- Child Safety Locks
- New on site
- Most important about car
Changing a Flat Tire
WARNING: If the tire pressure monitor sensor becomes damaged it may not function.
Note: The use of tire sealant may damage your tire pressure monitoring system and should only be used in roadside emergencies. If you must use a sealant, use the Tire Mobility Kit sealant. Replace the tire pressure monitoring system sensor and valve stem on the wheel by an authorized dealer after use of the sealant.
Note: The tire pressure monitoring system indicator light will illuminate when the spare tire is in use. To restore the full function of the monitoring system, all road wheels equipped with tire pressure monitoring sensors must be mounted on the vehicle.
If you get a flat tire while driving, do not apply the brake hea