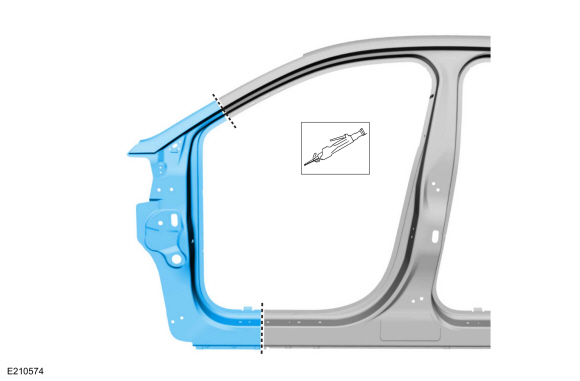
Lincoln Nautilus: Side Panel Sheet Metal Repairs / A-Pillar Outer Panel Section and Reinforcement. Removal and Installation
Special Tool(s) / General Equipment
| Resistance Spotwelding Equipment | |
| Spherical Cutter | |
| Grinder | |
| Hot Air Gun | |
| Air Body Saw | |
| 8 mm Drill Bit | |
| MIG/MAG Welding Equipment | |
| Spot Weld Drill Bit | |
| Locking Pliers |
Materials
| Name | Specification |
|---|---|
| Metal Bonding Adhesive TA-1, TA-1-B, 3M™ 08115, LORD Fusor® 108B, Henkel Teroson EP 5055 |
- |
| Seam Sealer TA-2-B, 3M™ 08308, LORD Fusor® 803DTM |
- |
| Flexible Foam Repair 3M™ 08463, LORD Fusor® 121 |
- |
Removal
-
Restore vehicle to pre-accident dimensions, if required.
Refer to: Body and Frame (501-26 Body Repairs - Vehicle Specific Information and Tolerance Checks, Description and Operation).
-
Remove the following items:
-
Remove the hood.
Refer to: Hood (501-02) .
-
Remove the windshield glass.
Refer to: Fixed Glass (501-11 Glass, Frames and Mechanisms, General Procedures).
-
Remove the fender.
Refer to: Fender (501-02) .
-
Remove the front door.
Refer to: Front Door (501-03) .
-
Remove the fender apron reinforcement outer panel.
Refer to: Fender Apron Panel Reinforcement (501-27 Front End Sheet Metal Repairs, Removal and Installation).
-
Remove the hood.
-
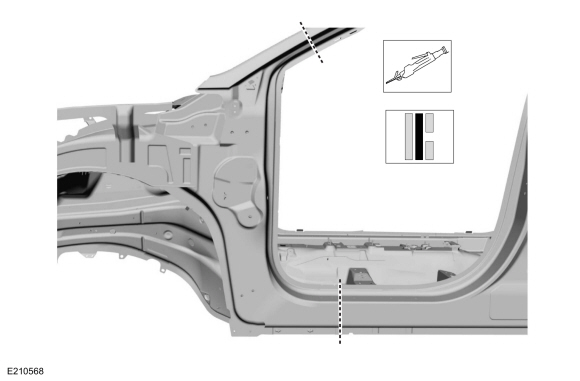
Remove the welds on the A-pillar flange.
Use the General Equipment: Grinder
.jpg) |
-
NOTE: Due to construction and design of the A-pillar reinforcement no sectioning can be performed on this component. The inner reinforcement must be replaced at the factory seams.
Partial replacement due to damage is possible and reasonable on outer panel only. Cut the outer panel.
Use the General Equipment: Spherical Cutter
Use the General Equipment: Air Body Saw
 |
-
Remove the welds.
Use the General Equipment: Spot Weld Drill Bit
.jpg) |
-
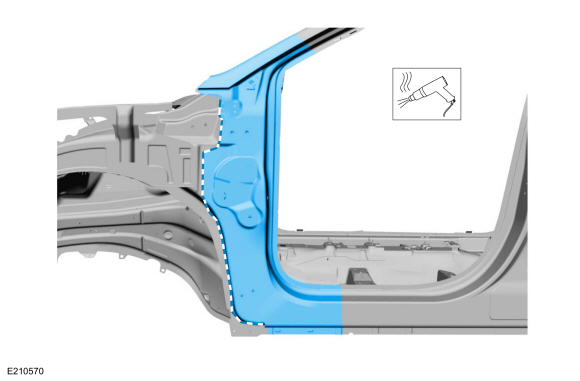
NOTE: The use of a heat gun may aid in softening the adhesive.
Remove the outer panel.
Use the General Equipment: Hot Air Gun
 |
-
Remove the A-pillar reinforcement welds.
Use the General Equipment: Spot Weld Drill Bit
 |
-
NOTE: The use of a heat gun may aid in softening the adhesive.
Remove the A-pillar reinforcement.
 |
Installation
-
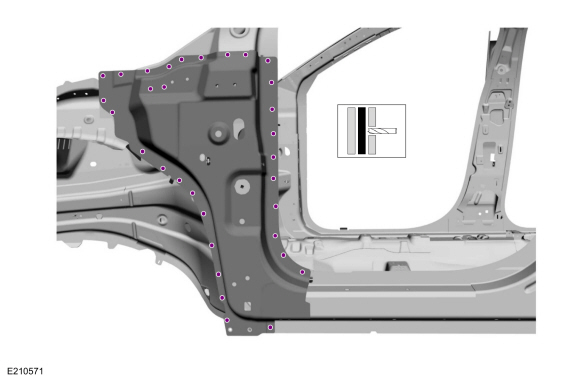
Apply adhesive to the flange areas as indicated.
Material: Metal Bonding Adhesive / TA-1, TA-1-B, 3M™ 08115, LORD Fusor® 108B, Henkel Teroson EP 5055
.jpg) |
-
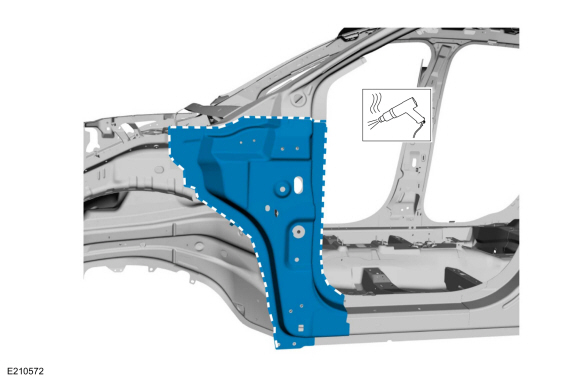
Install and weld the inner reinforcement.
Use the General Equipment: Locking Pliers
Use the General Equipment: Resistance Spotwelding Equipment
Use the General Equipment: MIG/MAG Welding Equipment
.jpg) |
-
Cut section from the replacement part.
Use the General Equipment: Air Body Saw
 |
-
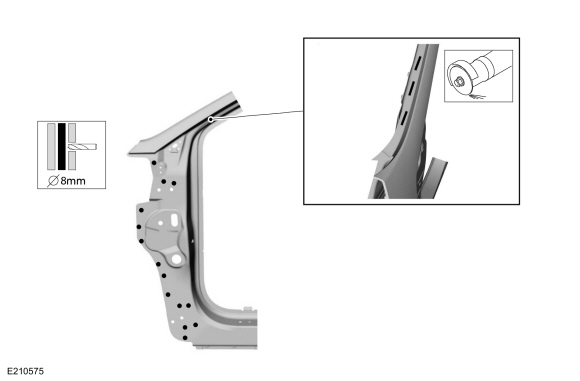
Drill plug weld holes and prepare the windshield flange for welding.
Use the General Equipment: 8 mm Drill Bit
Use the General Equipment: Grinder
 |
-
Apply adhesive and NVH foam as indicated.
Material: Metal Bonding Adhesive / TA-1, TA-1-B, 3M™ 08115, LORD Fusor® 108B, Henkel Teroson EP 5055
Material: Flexible Foam Repair / 3M™ 08463, LORD Fusor® 121
.jpg) |
-
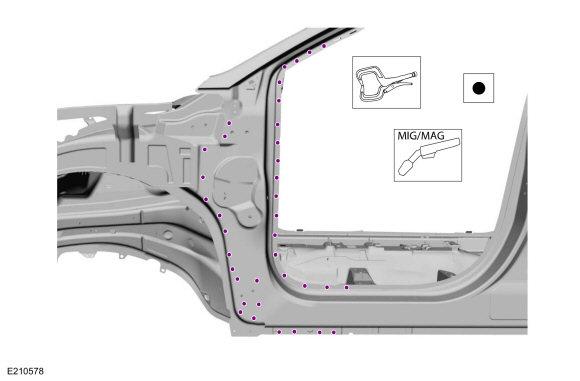
Install and seam weld the replacement outer panel section.
Use the General Equipment: Locking Pliers
Use the General Equipment: MIG/MAG Welding Equipment
.jpg) |
-
Weld the outer panel.
Use the General Equipment: Locking Pliers
Use the General Equipment: Resistance Spotwelding Equipment
Use the General Equipment: MIG/MAG Welding Equipment
 |
-
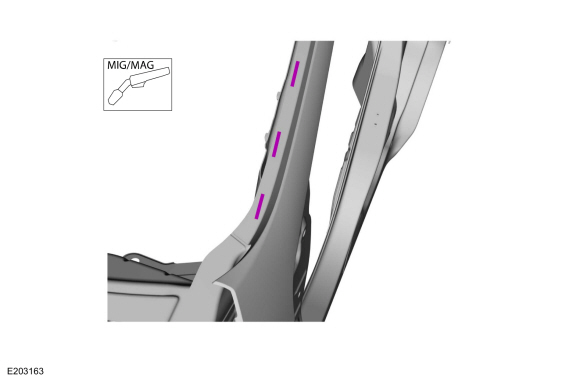
Weld the A-pillar flange.
Use the General Equipment: MIG/MAG Welding Equipment
 |
-
Install the fender apron panel reinforcement outer panel.
Refer to: Fender Apron Panel Reinforcement (501-27 Front End Sheet Metal Repairs, Removal and Installation).
-
Finish the repair areas using typical metal finishing techniques.
-
All areas must be sealed to production level.
Material: Seam Sealer / TA-2-B, 3M™ 08308, LORD Fusor® 803DTM
-
Refinish using a Ford approved paint system.
-
Restore corrosion protection.
Refer to: Corrosion Prevention (501-25 Body Repairs - General Information, General Procedures).
-
Install the following items:
-
Install the windshield glass.
Refer to: Fixed Glass (501-11 Glass, Frames and Mechanisms, General Procedures).
-
Install the fender.
Refer to: Fender (501-02) .
-
Install the front door.
Refer to: Front Door (501-03) .
-
Install the hood.
Refer to: Hood (501-02) .
-
Install the windshield glass.

 A-Pillar Reinforcement. Removal and Installation
Special Tool(s) /
General Equipment
Hot Air Gun
8 mm Drill Bit
MIG/MAG Welding Equipment
Spot Weld Drill Bit
Locking Pliers
Materials
Name
Specification
Metal Bonding AdhesiveTA-1, TA-1-B, 3M™ 08115, LORD Fusor® 108B, Henkel Teroson EP 5055
-
Seam SealerTA-2-B, 3M™ 08308, LORD Fusor® 803DTM
-
Removal
NOTE:
Left hand (LH) s..
Other information:
Lincoln Nautilus 2018-2025 Service Manual: Headlamps. Diagnosis and Testing
DTC Charts DTC Chart: BCM Diagnostics in this manual assume a certain skill level and knowledge of Ford-specific diagnostic practices. REFER to: Diagnostic Methods (100-00 General Information, Description and Operation). DTC Description Action B1499:11 Exterior Lamps Power Supply "A": Circuit Short to Ground ..
Lincoln Nautilus 2018-2025 Owners Manual: Interior Air Quality
What Is the Cabin Air Filter The cabin air filter improves the quality of air in your vehicle by trapping dust, pollen and other particles. Replacing the Cabin Air Filter Replace the filter at regular intervals. See Scheduled Maintenance. The cabin air filter is behind the glove compartment. To remove the lower glove compartment and access the filter: Open the glove compartment. Press the..
Categories
- Manuals Home
- 1st Generation Nautilus Owners Manual
- 1st Generation Nautilus Service Manual
- Massage Seats
- Opening and Closing the Hood
- USB Ports
- New on site
- Most important about car
Traction Control
How Does Traction Control Work
If your vehicle begins to slide, the system applies the brakes to individual wheels and, when needed, reduces power at the same time. If the wheels spin when accelerating on slippery or loose surfaces, the system reduces power in order to increase traction.
Switching Traction Control On and Off
WARNING: The stability and traction control light illuminates steadily if the system detects a failure. Make sure you did not manually disable the traction control system using the information display controls or the switch. If the stability control and traction control light is still illuminating steadily, have the system serviced by an authorized dealer immediately. Operating your vehicle with the traction co