Lincoln Nautilus: Front End Body Panels / Active Grille Shutter. Removal and Installation
Lincoln Nautilus 2018-2026 Service Manual / Body and Paint / Body and Paint / Front End Body Panels / Active Grille Shutter. Removal and Installation
Removal
NOTE: Removal steps in this procedure may contain installation details.
-
Remove the front bumper cover.
Refer to: Front Bumper Cover (501-19 Bumpers, Removal and Installation).
-
-
Disconnect the electrical connectors and the retainers.
-
Disconnect the electrical connector, the retainers and remove the ambient air temperature sensor.
-
Disconnect the electrical connectors and the retainers.
.jpg) |
-
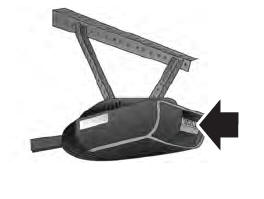
Remove the bolts and the horn.
Torque: 89 lb.in (10 Nm)
.jpg) |
-
On both sides.
Remove the push pins and the air deflector.
.jpg) |
-
Remove the push pins and position aside the air deflector.
.jpg) |
-
-
Remove the bolts.
Torque: 35 lb.in (4 Nm)
-
Remove the bolts.
Torque: 71 lb.in (8 Nm)
-
Remove the bolts.
.jpg) |
-
NOTE: Components not shown for clarity.
-
Remove the bolts.
-
Release the retaining tabs.
-
Remove the spacer assembly.
Torque: 27 lb.in (3 Nm)
-
Remove the bolts.
.jpg) |
-
Remove the active grille shutter.
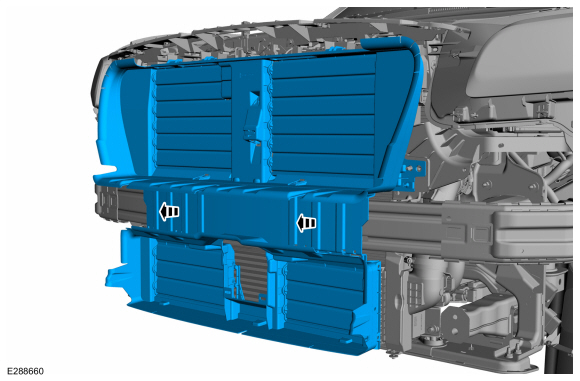 |
Installation
-
To install, reverse the removal procedure.
 Active Grille Shutter. Diagnosis and Testing
DTC Chart: Powertrain Control Module (PCM)
Diagnostics in this manual assume a certain skill level and knowledge of Ford-specific diagnostic practices...
 Active Grille Shutter Actuator. Removal and Installation
Removal
NOTE:
Removal steps in this procedure may contain installation details.
Remove the active grille shutter.
Refer to: Active Grille Shutter (501-02 Front End Body Panels, Removal and Installation)...
Other information:
Lincoln Nautilus 2018-2026 Service Manual: Blind Spot Information System - Component Location. Description and Operation
Component Location - BLIS ®/ CTA Item Description 1 RH exterior mirror 2 PDM 3 SODR 4 SODL 5 DDM 6 LH exterior mirror ..
Lincoln Nautilus 2018-2026 Service Manual: Evaporator Inlet and Outlet Manifold - 2.0L EcoBoost (184kW/250PS) – MI4. Removal and Installation
Removal NOTICE: During the removal of components, cap, tape or otherwise appropriately protect all openings to prevent the ingress of dirt or other contamination. Remove protective materials prior to installation. NOTE: Removal steps in this procedure may contain installation details. Recover the refrigerant. Refer to the appropriate Recovery procedure in Group 412. ..
Categories
- Manuals Home
- 1st Generation Nautilus Owners Manual
- 1st Generation Nautilus Service Manual
- Changing the 12V Battery
- Opening and Closing the Hood
- Interior Lamp Function. Adjusting the Instrument Panel Lighting Brightness. Ambient Lighting. Interior Lighting – Troubleshooting
- New on site
- Most important about car
Programming the Garage Door Opener to Your Garage Door Opener Motor
Copyright © 2026 www.linautilus.com