Lincoln Nautilus: Front Seats / Driver Multi-Contour Seat Module [SCMG]. Removal and Installation
Special Tool(s) / General Equipment
| Interior Trim Remover |
Removal
NOTE: Drivers seat SCMG shown, passenger seat SCMH similar.
-
NOTE: This step is only necessary when installing a new component.
NOTE: The PMI process must begin with the current SCMG or SCMH installed. If the current SCMG or SCMH does not respond to the diagnostic scan tool, the tool may prompt for As-Built Data as part of the repair.
Using a diagnostic scan tool, begin the PMI process for the SCMG or SCMH following the on-screen instructions.
-
Remove the front seat.
Refer to: Front Seat (501-10A Front Seats, Removal and Installation).
-
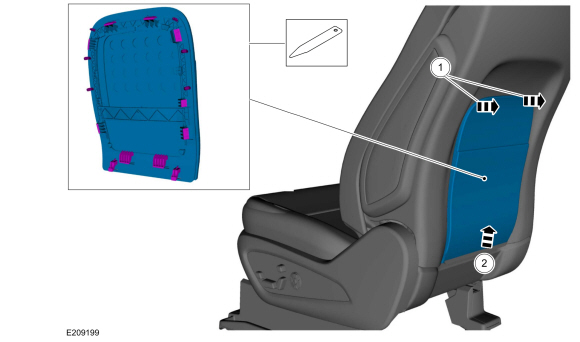
Remove the front seat back panel.
-
Release the locking tabs and pin-type retainers.
Use the General Equipment: Interior Trim Remover
-
Slide the front seat back panel upward.
-
Release the locking tabs and pin-type retainers.
 |
-
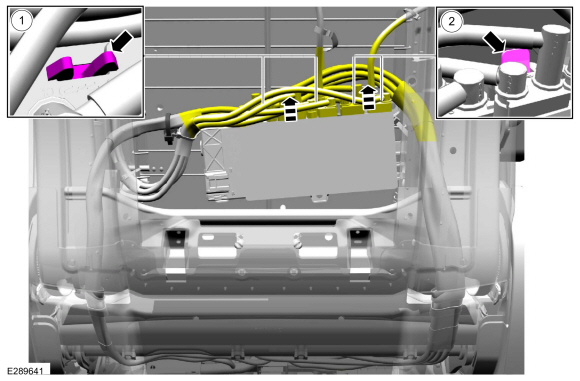
NOTE: After disconnecting the hose and lock assemblies, verify the black O-ring and white spacer remains with each hose.
NOTE: When connecting the hose and lock assemblies, an audible click must be heard for correct installation.
Disconnect the hose and lock assemblies from the SCMG .
-
NOTE: The color codes of the hoses and locks are, Orange lock: black - transparent blue - blue - green, Green lock: transparent yellow - transparent magenta
Release the locking tabs and disconnect the seat cushion adjuster hose assemblies.
-
NOTE: The color codes of the hoses and locks are, Orange lock: black - transparent blue - blue - green, Green lock: transparent yellow - transparent magenta
Release the locking tabs and disconnect the seat cushion adjuster hose assemblies.
-
 |
-
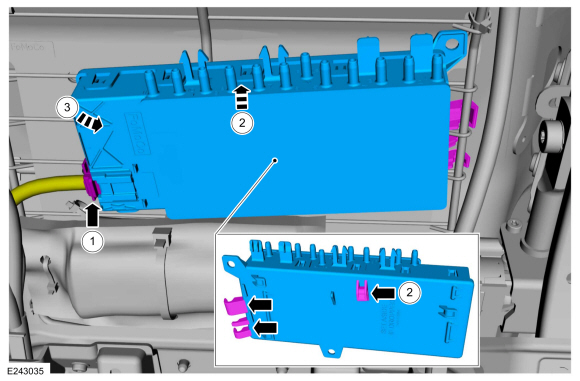
Remove the SCMG .
-
Disconnect the electrical connector.
-
Lift upwards on the SCMG to release the rear locking clip.
-
Rotate the SCMG to release the side locking clips.
-
Disconnect the electrical connector.
 |
Installation
-
To install, reverse the removal procedure.
-
NOTE: This step is only necessary when installing a new component.
Using a diagnostic scan tool, complete the PMI process for the SCMG or SCMH following the on-screen instructions.
 Driver Front Seat Module (DSM). Removal and Installation
Removal
NOTE:
DSM shown, SCMB (front passenger seat control module) is similar.
NOTE:
Removal steps in this procedure may contain installation details...
 Front Head Restraint Guide Sleeve. Removal and Installation
Special Tool(s) /
General Equipment
Flat Headed Screw Driver
Removal
NOTE:
Typical head restraint guide sleeve shown, others similar.
Remove the front head restraint...
Other information:
Lincoln Nautilus 2018-2026 Owners Manual: Information on the Tire Sidewall
Both United States and Canada Federal regulations require tire manufacturers to place standardized information on the sidewall of all tires. This information identifies and describes the fundamental characteristics of the tire and also provides a U...
Lincoln Nautilus 2018-2026 Service Manual: Wire Terminal Inspection and Removal. General Procedures
Disconnect WARNING: Before beginning any service procedure in this section, refer to Health and Safety Precautions in section 100-00 General Information. Failure to follow this instruction may result in serious personal injury. Refer to: Health and Safety Precautions (100-00 General Information, Description and Operation)...
Categories
- Manuals Home
- 1st Generation Nautilus Owners Manual
- 1st Generation Nautilus Service Manual
- Opening and Closing the Hood
- Power Outlet - Vehicles With: 110V Power Outlet
- Folding the Exterior Mirrors - Vehicles With: Manual Folding Mirrors. Folding the Exterior Mirrors - Vehicles With: Power Folding Mirrors
- New on site
- Most important about car
Programming the Garage Door Opener to Your Garage Door Opener Motor