Lincoln Nautilus: Engine System - General Information / Intake Manifold Vacuum Test - Gasoline. General Procedures
Lincoln Nautilus 2018-2026 Service Manual / Powertrain / Engine / Engine System - General Information / Intake Manifold Vacuum Test - Gasoline. General Procedures
-
Bring the engine to normal operating temperature. Connect
the Vacuum/Pressure Tester to the intake manifold. Run the engine at the
specified idle speed.
-
The vacuum gauge should read between 51-74 kPa (15-22 in-Hg)
depending upon the engine condition and the altitude at which the test
is conducted. Subtract 4.0193 kPa (1 in-Hg) from the specified reading
for every 304.8 m (1,000 feet) of elevation above sea level.
-
The reading should be steady. If necessary, adjust the gauge
damper control (where used) if the needle is fluttering rapidly. Adjust
the damper until the needle moves easily without excessive flutter.
Intake Manifold Vacuum Test - Interpreting Vacuum Gauge Readings
-
A careful study of the vacuum gauge reading while the
engine is idling will help pinpoint trouble areas. Always conduct other
appropriate tests before arriving at a final diagnostic decision. Vacuum
gauge readings, although helpful, must be interpreted carefully.
-
Most vacuum gauges have a normal band indicated on the
gauge face. The following are potential gauge readings. Some are normal;
others should be investigated further.
-
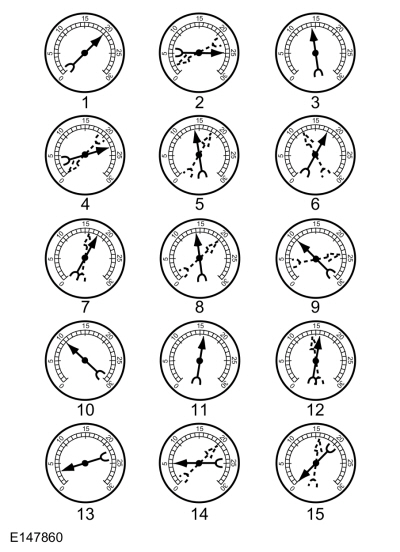
The following are potential gauge readings. Some are normal; others should be investigated further.
Visual Inspection Chart
Mechanical - 1. NORMAL READING: Needle between 51-74 kPa (15-22 in-Hg) and holding steady.
- 2. NORMAL READING DURING RAPID ACCELERATION AND DECELERATION: When the engine is rapidly accelerated (dotted needle), the needle will drop to a low reading (not to zero). When the throttle is suddenly released, the needle will snap back up to a higher than normal figure.
- 3. NORMAL FOR HIGH-LIFT CAMSHAFT WITH LARGE OVERLAP: The needle will register as low as 51 kPa (15 in-Hg) but will be relatively steady. Some oscillation is normal.
- 4. WORN RINGS OR DILUTED OIL: When the engine is accelerated (dotted needle), the needle drops to 0 kPa (0 in-Hg). Upon deceleration, the needle runs slightly above 74 kPa (22 in-Hg).
- 5. STICKING VALVES: When the needle (dotted) remains steady at a normal vacuum but occasionally flicks (sharp, fast movement) down and back about 13 kPa (4 in-Hg), one or more valves may be sticking.
- 6. BURNED OR WARPED VALVES: A regular, evenly-spaced, downscale flicking of the needle indicates one or more burned or warped valves. Insufficient valve clearance will also cause this reaction.
- 7. POOR VALVE SEATING: A small but regular downscale flicking can mean one or more valves are not seating.
- 8. WORN VALVE GUIDES: When the needle oscillates over about a 13 kPa (4 in-Hg) range at idle speed, the valve guides could be worn. As engine speed increases, the needle will become steady if guides are responsible.
- 9. WEAK VALVE SPRINGS: When the needle oscillation becomes more violent as engine rpm is increased, weak valve springs are indicated. The reading at idle could be relatively steady.
- 10. LATE VALVE TIMING: A steady but low reading could be caused by late valve timing.
- 11. IGNITION TIMING RETARDING: Retarded ignition timing will produce a steady but somewhat low reading.
- 12. INSUFFICIENT SPARK PLUG GAP: When spark plugs are gapped too close, a regular, small pulsation of the needle can occur.
- 13. INTAKE LEAK: A low, steady reading can be caused by an intake manifold or TB gasket leak.
- 14. BLOWN HEAD GASKET: A regular drop of fair magnitude can be caused by a blown head gasket or warped cylinder head-to-cylinder block surface.
- 15. RESTRICTED EXHAUST SYSTEM: When the engine is first started and is idled, the reading may be normal, but as the engine rpm is increased, the back pressure caused by a clogged muffler, kinked tailpipe or other concerns will cause the needle to slowly drop to 0 kPa (0 in-Hg). The needle then may slowly rise. Excessive exhaust clogging will cause the needle to drop to a low point even if the engine is only idling.
 |
-
When vacuum leaks are indicated, search out and correct
the cause. Excess air leaking into the system will upset the fuel
mixture and cause concerns such as rough idle, missing on acceleration
or burned valves. If the leak exists in an accessory unit, the unit will
not function correctly. Always fix vacuum leaks.
 Exhaust Manifold Cleaning and Inspection. General Procedures
Special Tool(s) /
General Equipment
Feeler Gauge
Cleaning
Clean the exhaust manifold using a suitable solvent. Use
a plastic scraping tool to clean the gasket sealing surfaces...
 Oil Consumption Test - Gasoline. General Procedures
Nearly all engines consume oil, which is essential for
normal lubrication of the cylinder bore walls and pistons and rings.
Determining the level of oil consumption may require testing by
recording how much oil is being added over a given set of miles...
Other information:
Lincoln Nautilus 2018-2026 Service Manual: Front Seats - Overview. Description and Operation
Overview Driver Power Seat The power driver seat is controlled by the DSM . The DSM is located on the driver seat track. The DSM hard stop/soft stops must be set/reset any time a new DSM , driver seat track, horizontal motor or driver seat backrest is installed...
Lincoln Nautilus 2018-2026 Service Manual: Steering Column - Overview. Description and Operation
Steering Column Overview The steering column system consists of the following components: Steering wheel SCCM Telescopic and tilt motors (power adjustable steering column) Steering column control switch (power adjustable steering column) The steering column is the mechanical linkage between the steering wheel and the steering gear...
Categories
- Manuals Home
- 1st Generation Nautilus Owners Manual
- 1st Generation Nautilus Service Manual
- Engine Oil Capacity and Specification - 2.0L
- Opening and Closing the Hood
- Folding the Exterior Mirrors - Vehicles With: Manual Folding Mirrors. Folding the Exterior Mirrors - Vehicles With: Power Folding Mirrors
- New on site
- Most important about car
Locating the Pre-Collision Assist Sensors
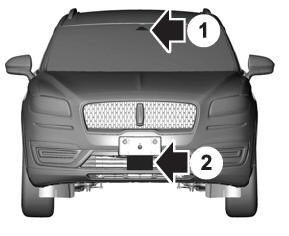
If a message regarding a blocked sensor or camera appears in the information display, something is obstructing the radar signals or camera images. The radar sensor is behind the fascia cover in the center of the lower grille. With a blocked sensor or camera, the system may not function, or performance may reduce. See Pre-Collision Assist – Information Messages.
Copyright © 2026 www.linautilus.com