Lincoln Nautilus: Rear Suspension / Rear Shock Absorber. Removal and Installation
Special Tool(s) / General Equipment
| Vehicle/Axle Stands |
Removal
NOTICE: Suspension fasteners are critical parts that affect the performance of vital components and systems. Failure of these fasteners may result in major service expense. Use the same or equivalent parts if replacement is necessary. Do not use a replacement part of lesser quality or substitute design. Tighten fasteners as specified.
-
Remove the wheel and tire.
Refer to: Wheel and Tire (204-04A Wheels and Tires, Removal and Installation).
-
NOTICE: The rear suspension height sensor must be disconnected from the lower control arm prior to servicing suspension components or damage to the suspension height sensor and/or the vehicle dynamic suspension system may occur. The sensor will need to be recalibrated after reassembly.
If equipped.
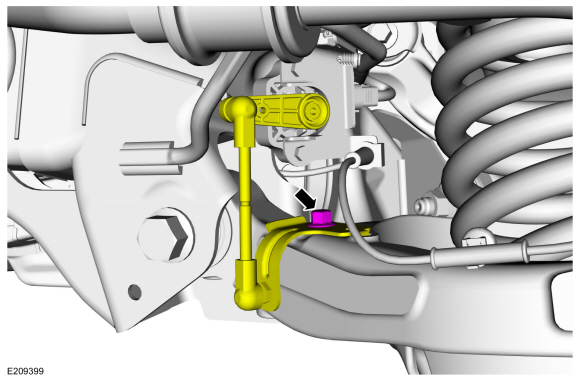
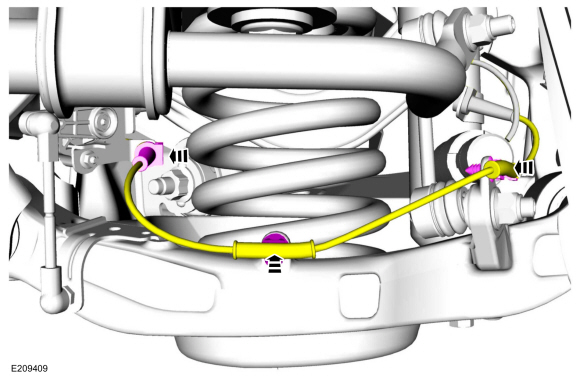
Remove the rear height sensor arm bracket bolt and position the rear height sensor arm bracket aside.
 |
-
If equipped.
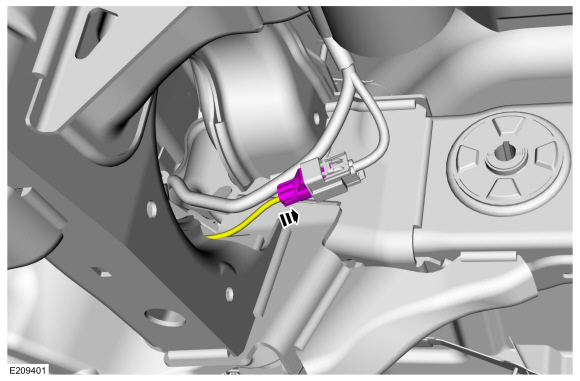
Disconnect the rear shock absorber electrical connector.
 |
-
If equipped.
Unclip the rear shock absorber wire harness retaining clips and position the harness aside.
 |
-
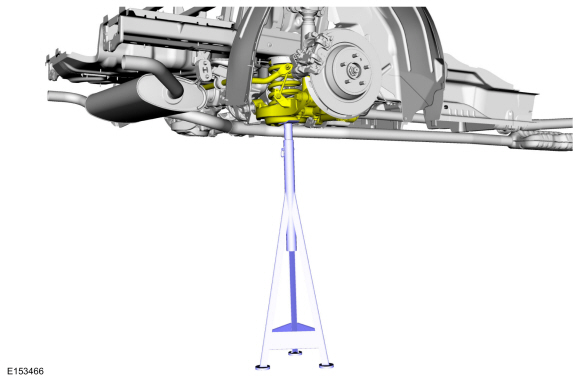
Support the rear suspension using an axle stand.
Use the General Equipment: Vehicle/Axle Stands
 |
-
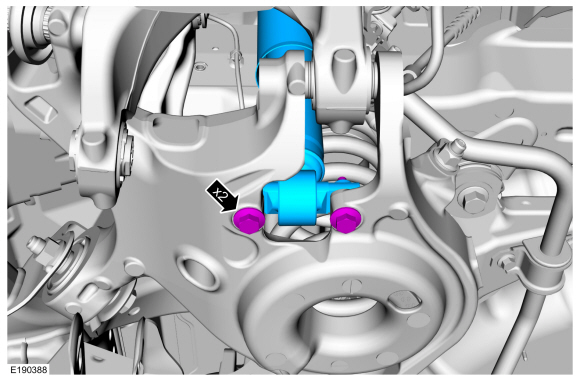
Remove and discard the rear shock absorber lower bolts.
Torque: 35 lb.ft (48 Nm)
 |
-
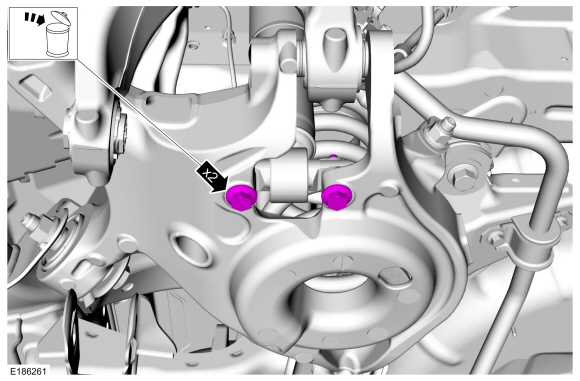
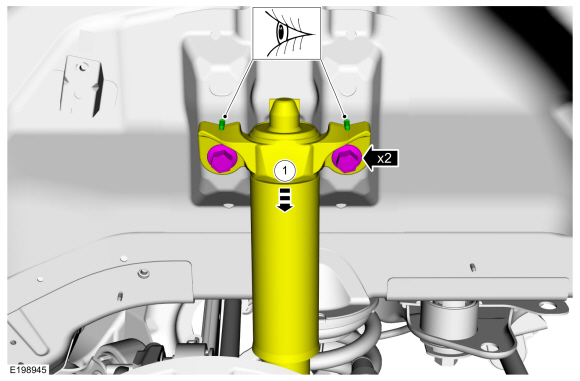
Remove and discard the rear shock absorber upper bolts.
 |
-
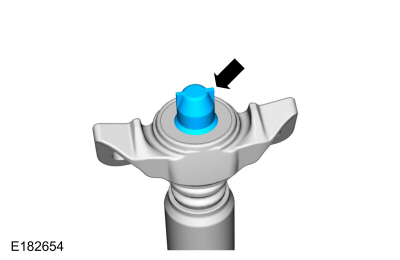
NOTE: This step is only necessary when installing a new component.
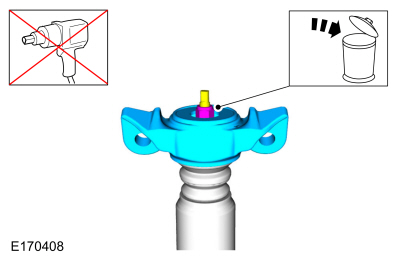
Remove the rear shock absorber rod nut cap.
 |
-
NOTICE: Do not use power tools to remove the nut.
NOTE: This step is only necessary when installing a new component.
NOTE: Use the hex-holding feature to prevent the shock absorber rod from turning while removing or installing the shock absorber rod nut.
Remove and discard the rear shock absorber rod nut.
 |
Installation
-
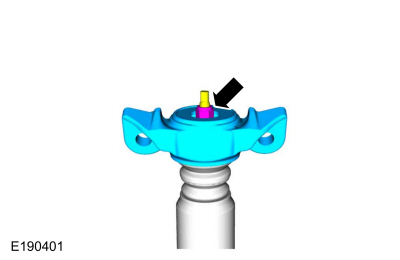
NOTE: This step is only necessary when installing a new component.
NOTE: Use the hex-holding feature to prevent the shock absorber rod from turning while removing or installing the shock absorber rod nut.
Install the new rear shock absorber rod nut.
Torque: 22 lb.ft (30 Nm)
 |
-
NOTE: This step is only necessary when installing a new component.
NOTE: If equipped.
Install the rear shock absorber rod nut cap.
|
-
Install the rear shock absorber and install the new rear shock absorber lower bolts.
Torque: 35 lb.ft (48 Nm)
 |
-
-
Compress the rear shock absorber and align the rear
shock absorber upper mount under the body alignment pins.
-
Install the new rear shock absorber upper bolts.
Torque: 76 lb.ft (103 Nm)
-
Compress the rear shock absorber and align the rear
shock absorber upper mount under the body alignment pins.
 |
-
If equipped.
Position the rear shock absorber wire harness and clip the harness retaining clips into place.
 |
-
If equipped.
Connect the rear shock absorber electrical connector.
 |
-
If equipped.
Position the rear height sensor arm bracket and install the rear height sensor arm bracket bolt.
Torque: 177 lb.in (20 Nm)
|
-
Install the wheel and tire.
Refer to: Wheel and Tire (204-04A Wheels and Tires, Removal and Installation).
-
Calibrate the suspension system. Connect the scan tool
and carry out the Ride Height Calibration routine. Follow the scan tool
directions.
 Lower Arm Vertical Link. Removal and Installation
Special Tool(s) /
General Equipment
Vehicle/Axle Stands
Removal
NOTICE:
Suspension fasteners are critical parts that affect the
performance of vital components and systems...
 Rear Stabilizer Bar. Removal and Installation
Removal
NOTICE:
Suspension fasteners are critical parts that affect the
performance of vital components and systems. Failure of these fasteners
may result in major service expense...
Other information:
Lincoln Nautilus 2018-2026 Service Manual: Rear Seats - System Operation and Component Description. Description and Operation
System Operation Rear Heated Seats The heated seats operate in a sequence of high, low and off with each press of the heated seat switch. Rear heated seats are equipped with a single heated seat module to control both outboard rear heated seats...
Lincoln Nautilus 2018-2026 Owners Manual: Driver Alert
What Is Driver Alert Driver alert alerts you if it determines that you are becoming drowsy or if your driving deteriorates. How Does Driver Alert Work Driver Alert calculates your alertness level based on your driving behavior in relation to the lane markings and other factors through use of the front camera sensor behind the interior mirror...
Categories
- Manuals Home
- 1st Generation Nautilus Owners Manual
- 1st Generation Nautilus Service Manual
- Anti-Theft Alarm System Settings. Security – Troubleshooting
- Locating the Pre-Collision Assist Sensors
- Replacing the Rear Wiper Blades
- New on site
- Most important about car
Changing a Flat Tire
WARNING: If the tire pressure monitor sensor becomes damaged it may not function.
Note: The use of tire sealant may damage your tire pressure monitoring system and should only be used in roadside emergencies. If you must use a sealant, use the Tire Mobility Kit sealant. Replace the tire pressure monitoring system sensor and valve stem on the wheel by an authorized dealer after use of the sealant.
Note: The tire pressure monitoring system indicator light will illuminate when the spare tire is in use. To restore the full function of the monitoring system, all road wheels equipped with tire pressure monitoring sensors must be mounted on the vehicle.
If you get a flat tire while driving, do not apply the brake hea