Lincoln Nautilus: Front Seats / Seat Heater Mat Installation. General Procedures
Repair
NOTE:
Click here to view a video version of the seat heater mat removal and installation.
View
.jpg)
NOTE:
Always install a new heater mat.
NOTE:
During installation, it is allowable to adhere a new heater mat to any adhesive left behind on the foam.
NOTE:
During installation, make sure the heater mat doesn't have
any folds or creases that the customer may feel when sitting in the
seat.
NOTE:
Typical seat cushion foam and heater mat shown, other seat cushion/backrest foam and heater mats are similar.
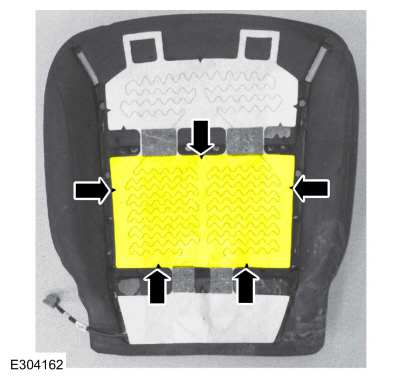
-
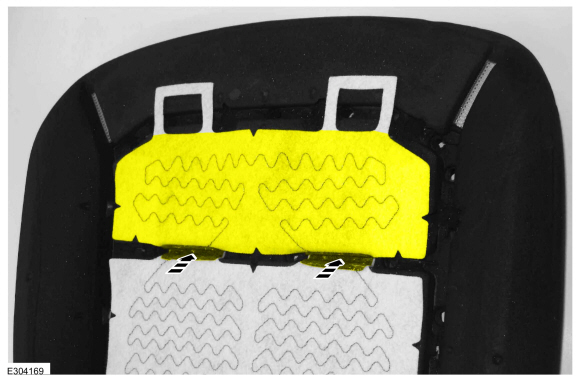
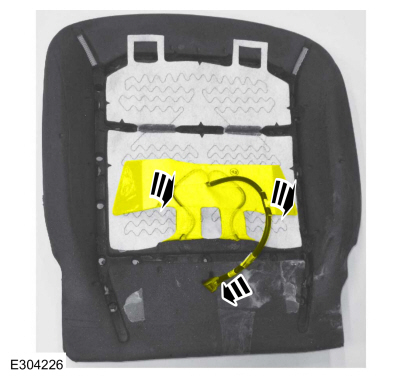
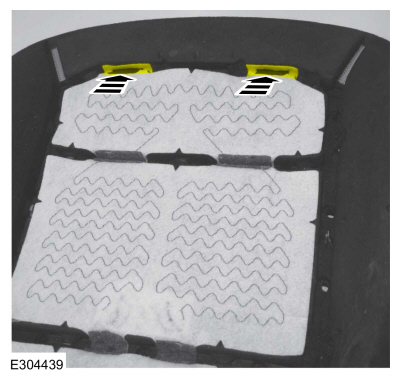
Position the heater mat onto the foam so that the center
section of the heater mat aligns to the center section of the foam.
-
Find the locator marks in the foam and ensure the heater mat aligns to them as closely as possible.
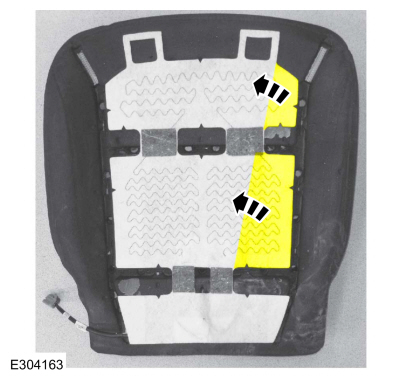
-
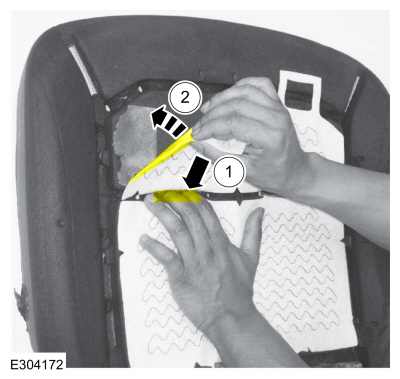
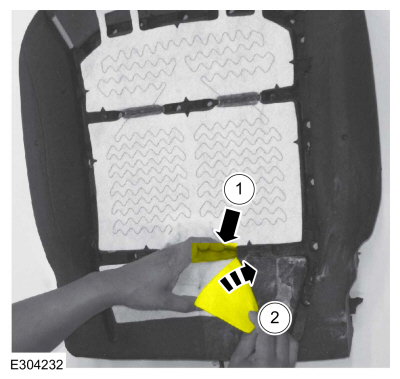
Turn the RH upper and middle sections of the heater mat over to the other side to expose the adhesive paper overlay.
-
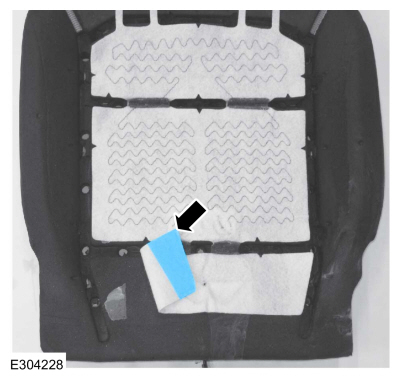
Remove the heater mat adhesive paper overlay.
-
Position the RH upper
and middle sections of the heater mat back over and adhere the middle
section of the heater mat to the middle section of the foam making sure
it's aligned to the foam as in the previous step.
-
Turn the LH upper and middle sections of the heater mat over to the other side to expose the adhesive paper overlay.
-
Remove the heater mat adhesive paper overlay.
-
Position the LH upper
and middle sections of the heater mat back over and adhere the middle
section of the heater mat to the middle section of the foam making sure
they're aligned as in the previous step.
-
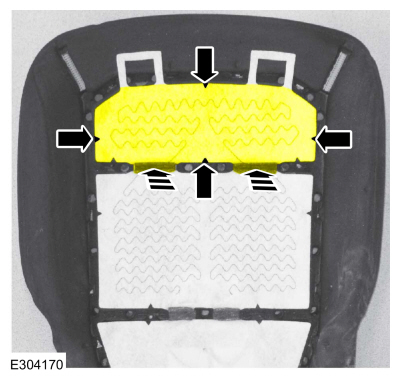
NOTE:
Make sure the heater mat bottoms out in the trench
but do not compress the foam. Light pressure is all that is needed.
If required, tuck the heater mat into the foam trench.
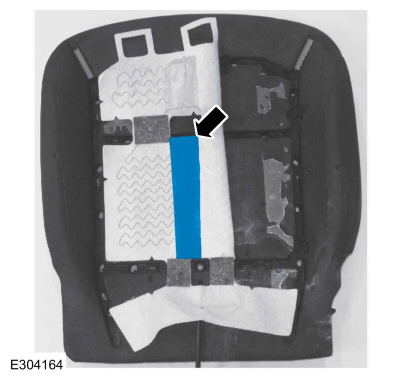
-
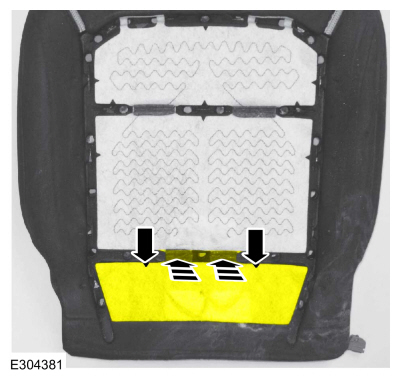
While keeping the heater mat tucked (if required) in the
foam trench, position the heater mat onto the foam so that the front
section of the heater mat aligns to the front section of the foam.
-
Find the locator marks in the foam and ensure the heater mat aligns to them as closely as possible.
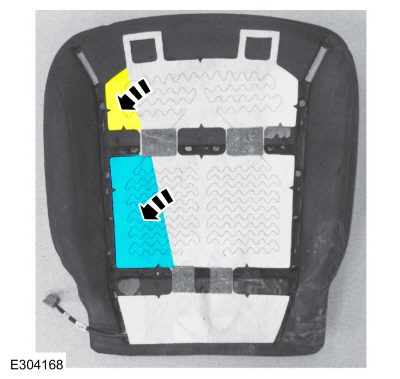
-
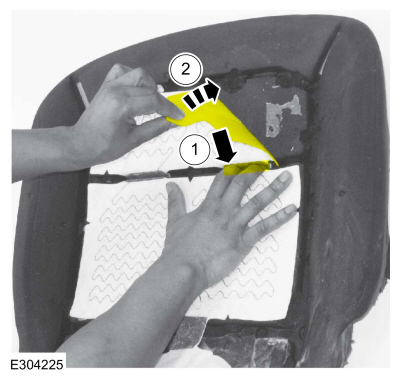
Turn the LH front section of the heater mat over to the other side to expose the adhesive paper overlay.
-
Remove the heater mat adhesive paper overlay.
-
-
NOTE:
Make sure the heater mat bottoms out in the
trench but do not compress the foam. Light pressure is all that is
needed.
If required, hold the heater mat in position and tucked in the trench.
-
Position the LH
front section of the heater mat back over and adhere the heater mat to
the foam making sure it's aligned to the foam as in the previous step.
-
Turn the RH front section of the heater mat over to the other side to expose the adhesive paper overlay.
-
Remove the heater mat adhesive paper overlay.
-
-
NOTE:
Make sure the heater mat bottoms out in the
trench but do not compress the foam. Light pressure is all that is
needed.
If required, hold the heater mat in position and tucked in the trench.
-
Position the RH
front section of the heater mat back over and adhere the heater mat to
the foam making sure it's aligned to the foam as in the previous step.
-
NOTE:
Location will vary by vehicle.
If required, feed the heater mat wiring
pigtail through the foam opening while positioning the rear section of
the heater mat back over on the foam.
-
NOTE:
Make sure the heater mat bottoms out in the trench
but do not compress the foam. Light pressure is all that is needed.
If required, tuck the heater mat into the foam trench.
-
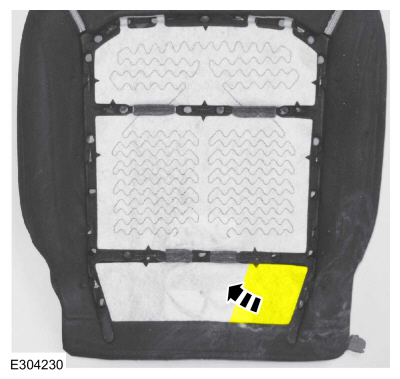
While keeping the heater mat tucked (if required) in the
foam trench, position the heater mat onto the foam so that the rear
section of the heater mat aligns to the rear section of the foam.
-
Find the locator marks in the foam and ensure the heater mat aligns to them as closely as possible.
-
Turn the LH rear section of the heater mat over to the other side to expose the adhesive paper overlay.
-
Remove the heater mat adhesive paper overlay.
-
-
NOTE:
Make sure the heater mat bottoms out in the
trench but do not compress the foam. Light pressure is all that is
needed.
If required, hold the heater mat in position and tucked in the trench.
-
Position the LH rear
section of the heater mat back over and adhere the heater mat to the
foam making sure it's aligned to the foam as in the previous step.
-
Turn the RH rear section of the heater mat over to the other side to expose the adhesive paper overlay.
-
Remove the heater mat adhesive paper overlay.
-
-
NOTE:
Make sure the heater mat bottoms out in the
trench but do not compress the foam. Light pressure is all that is
needed.
If required, hold the heater mat in position and tucked in the trench.
-
Position the RH
rear section of the heater mat back over and adhere the heater mat to
the foam making sure it's aligned to the foam as in the previous step.
-
NOTE:
Make sure the heater mat bottoms out in the trench
but do not compress the foam. Light pressure is all that is needed.
If required, tuck the heater mat into the front trench.
-
Install the seat cushion or backrest cover. Refer to the
appropriate procedure in this or one of the other 501-10 sections.
DTC Chart: DDM
Diagnostics in this manual assume a certain skill level and knowledge of Ford-specific diagnostic practices. REFER to: Diagnostic Methods (100-00 General Information, Description and Operation)...
Repair
WARNING:
To minimize the risk of injury, always wear protective
gloves when working with a steamer. Failure to follow these instructions
may result in serious personal injury...
Other information:
What Is Temporary Neutral Mode
This mode keeps your vehicle in neutral (N)
when you switch your vehicle off. Use this
mode if you exit your vehicle or switch your
vehicle off at an automatic car wash.
Note: Do not tow your vehicle in this mode.
Note: Automatic return to park (P) is delayed
when your vehicle is in this mode...
Removal
WARNING:
Disconnect the 12 volt battery before servicing the direct
current to alternating current (DC-AC) inverter or alternating current
(AC) powerpoint to prevent the risk of high voltage shock. Failure to
follow this instruction may result in serious personal injury...
Categories
How Does Traction Control Work
If your vehicle begins to slide, the system
applies the brakes to individual wheels and,
when needed, reduces power at the same
time. If the wheels spin when accelerating
on slippery or loose surfaces, the system
reduces power in order to increase traction.
Switching Traction Control On and Off
WARNING: The stability and traction
control light illuminates steadily if the
system detects a failure. Make sure you
did not manually disable the traction
control system using the information
display controls or the switch. If the stability
control and traction control light is still
illuminating steadily, have the system
serviced by an authorized dealer
immediately. Operating your vehicle with
the traction co
read more
.jpg)
.jpg)
.jpg)
.jpg)
.jpg)
.jpg)
.jpg)
.jpg)
.jpg)
.jpg)

 Front Seats. Diagnosis and Testing
 Seat Heater Mat Removal. General Procedures