Lincoln Nautilus: Parking Aid - Vehicles With: Parking Aid Camera / 360 Degree View Camera Alignment. General Procedures
Special Tool(s)

|
Mats, 360 Camera Calibration 501-411 |
NOTE: On vehicles equipped with Trailer Reverse Guidance (TRG) (F-Super Duty only) this procedure also performs the Trailer Reverse Guidance camera alignment.
NOTE: Prior to beginning this procedure, perform the following:
-
Inspect the exterior rear view mirrors to make sure they are not folded (if equipped).
-
Using a scan tool retrieve and if necessary repair any IPMB Diagnostic Trouble Codes (DTCs).
-
Clean the camera lenses. Inspect all cameras (except center
high-mounted stoplamp camera and trailer camera, if equipped), the
associated mounting hardware and body components for damage.
NOTE: Damage to or misalignment of any of these components can cause the camera alignment to be unsuccessful.
-
Park the vehicle in a flat, open area (preferably indoors)
with the front wheels straight ahead, steering wheel centered, and with a
minimum of 6 feet of open space to each side, 7 feet of open space in
front, and 11 feet of open space behind the vehicle. The area where the
vehicle is parked must be flat (total height variation of less than 1"), have uniform lighting of good quality, and be free of debris or obstacles.
NOTE: The area where the alignment is performed must be free of shadows and glare. Areas of shadow or bright light will degrade the ability of the cameras to see the target pattern on the calibration mats. Facing the front of the vehicle towards the light source may reduce glare on the calibration mats.
-
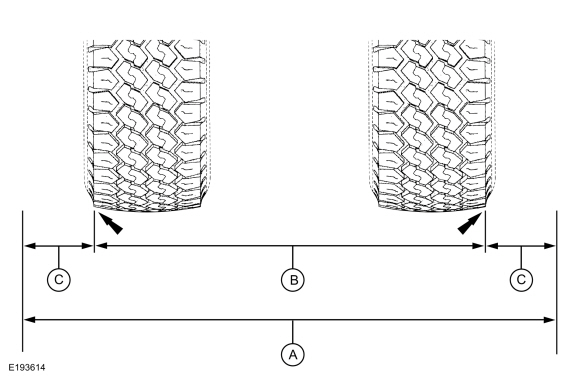
Obtain the mat spacing specification and note this as measurement "A".
For additional information, refer to: Specifications (413-13A Parking Aid - Vehicles With: Rear Parking Aid, Specifications).
-
With the help of an assistant, measure the distance between the outer
edge of the RH rear tire tread block and the outer edge of the LH rear
tire tread block. Note this measurement of tire width as "B".
NOTE: Make sure the measurement is taken at the same location on both tires.
 |
-
Calculate the mat spacing distance from the tire: (A-B)/2=C
-
Subtract the tire width (measurement "B") from the mat spacing specification (measurement "A").
-
Divide the result by 2. Note this measurement as "C".
This is the mat spacing distance from the outer edge of the tire block.
-
Subtract the tire width (measurement "B") from the mat spacing specification (measurement "A").
-
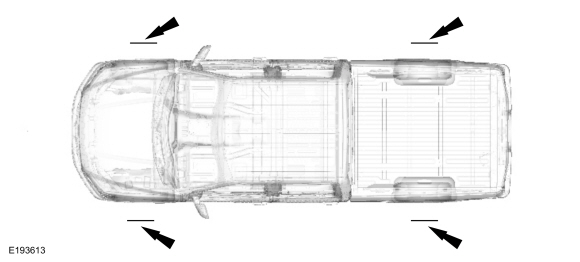
Create mat spacing guidelines at all 4 tires:
NOTE: F-series shown, other vehicles similar.
-
Measure distance "C" from the outer edge of the tire tread block.
-
Using chalk, at distance "C" for each tire, draw a line
on the ground parallel to the side of the vehicle that is several inches
long and roughly aligned with the center of the axle.
-
Measure distance "C" from the outer edge of the tire tread block.
 |
-
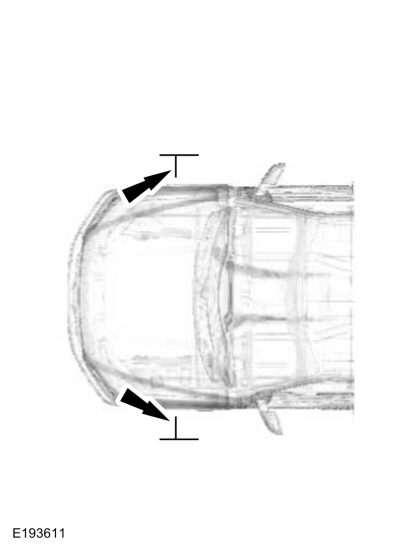
Create front axle alignment guidelines:
NOTE: F-series shown, other vehicles similar.
-
Locate the centerline of the front axle.
-
Using chalk, draw a line on the ground extending
outwards from the center of the front axle, perpendicular to the wheel.
-
Locate the centerline of the front axle.
 |
-
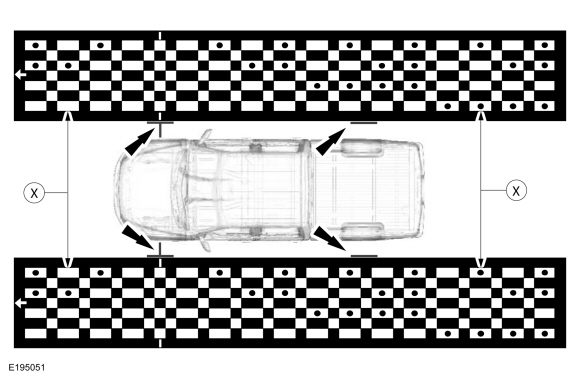
Position the calibration mats on both sides of the vehicle:
NOTE: F-series shown, other vehicles similar.
-
Align the front axle alignment mark on each mat with the front axle alignment guideline created in step 7.
-
Align the inside edge of each mat with the respective front and rear mat spacing guidelines created in step 6.
-
Verify the spacing between the target pattern blocks
matches measurement "X" from the specifications in this section.
For additional information, refer to: Specifications (413-13A Parking Aid - Vehicles With: Rear Parking Aid, Specifications).
-
Align the front axle alignment mark on each mat with the front axle alignment guideline created in step 7.
 |
-
Verify all vehicle doors and tailgate/luggage compartment lid are fully closed.
-
Connect a battery charger. A battery voltage of greater than
11 volts must be maintained throughout the calibration procedure. A
battery charger can be used to maintain the battery voltage. Make sure
any extension cords that are used do not obstruct the calibration mats.
-
Turn the ignition ON. Do not start the engine.
-
Using a diagnostic scan tool, perform the 360 degree camera
alignment procedure following the on-screen instructions under
Electrical>Service Functions>360 Camera Calibration. The camera
alignment success is indicated by the diagnostic scan tool. If the
camera alignment is successful, INSPECT the 360 degree overhead image
for proper alignment. If the camera alignment is unsuccessful, the
diagnostic scan tool indicates one of the following faults:
Fault Condition Fault Code Front Camera Action LH Camera Action Rear Camera Action RH Camera Action Missing software 02 INSTALL a new IPMB . Refer to: Parking Aid - Vehicles With: Parking Aid Camera (413-13B). PreCondition not correct (VRange) 03 INSPECT and VERIFY battery voltage and condition. Battery voltage of at least 11 volts must be maintained during the calibration procedure. PreCondition not correct (NumCameras) 04 INSTALL IPMB as-built data from Professional Technician Society (PTS), following the diagnostic scan tool instructions under Module Programming>As-Built Missing Internal Link 05 - Turn the ignition OFF
- Wait 10 seconds
- Turn the ignition ON, engine off
- REPEAT the alignment procedure using a diagnostic scan tool
Variant Coding Issue 06 INSTALL IPMB as-built data from Professional Technician Society (PTS), following the diagnostic scan tool instructions under Module Programming>As-Built Target not found (Init) 07 - VERIFY the following:
- LH calibration mat placement at the front axle
- Lighting on the LH calibration mat is uniform and of good quality (free of shadows and glare)
- The LH calibration mat is free of obstructions and dirt
- The LH camera lens is clean and free of scratches
- The LH camera is producing an image of good quality
- VERIFY the following:
- RH calibration mat placement at the front axle
- Lighting on the RH calibration mat is uniform and of good quality (free of shadows and glare)
- The RH calibration mat is free of obstructions and dirt
- The RH camera lens is clean and free of scratches
- The RH camera is producing an image of good quality
Target not found (Left) 08 VERIFY the following:
- LH calibration mat placement at the front of the vehicle
- Lighting on the LH calibration mat is uniform and of good quality (free of shadows and glare)
- The LH calibration mat is free of obstructions and dirt
- The front camera lens is clean and free of scratches
- The front camera has been configured using a diagnostic scan tool
- Diagnose and repair any IPMB Diagnostic Trouble Codes (DTCs)
- VERIFY the following:
- LH calibration mat placement at the rear of the vehicle
- Lighting on the LH calibration mat is uniform and of good quality (free of shadows and glare)
- The LH calibration mat is free of obstructions and dirt
- The rear camera lens is clean and free of scratches
- The rear camera has been configured using a diagnostic scan tool
- Diagnose and repair any IPMB Diagnostic Trouble Codes (DTCs)
- Target not found (Right) 09 VERIFY the following:
- RH calibration mat placement at the front of the vehicle
- Lighting on the RH calibration mat is uniform and of good quality (free of shadows and glare)
- The RH calibration mat is free of obstructions and dirt
- The front camera lens is clean and free of scratches
- The front camera has been configured using a diagnostic scan tool
- Diagnose and repair any IPMB Diagnostic Trouble Codes (DTCs)
- VERIFY the following:
- RH calibration mat placement at the rear of the vehicle
- Lighting on the RH calibration mat is uniform and of good quality (free of shadows and glare)
- The RH calibration mat is free of obstructions and dirt
- The rear camera lens is clean and free of scratches
- The rear camera has been configured using a diagnostic scan tool
- Diagnose and repair any IPMB Diagnostic Trouble Codes (DTCs)
- PreCondition not correct (Velocity) 10 - VERIFY that the vehicle is stationary during the alignment procedure.
-
VERIFY the speedometer operates
correctly. If the speedometer does not operate correctly,
For additional information, refer to: Instrumentation, Message Center and Warning Chimes (413-01 Instrumentation, Message Center and Warning Chimes, Diagnosis and Testing).
- RETRIEVE and DIAGNOSE any PCM Diagnostic Trouble Codes (DTCs) that are present. Refer to the appropriate section in Group 303 for the procedure.
-
RETRIEVE and DIAGNOSE any IPMB Diagnostic Trouble Codes (DTCs) that are present.
For additional information, refer to: Parking Aid (413-13A Parking Aid - Vehicles With: Rear Parking Aid, Diagnosis and Testing).
PreCondition not correct (Doors) 11 - VERIFY that all doors and the tailgate/luggage compartment lid are fully closed.
-
RETRIEVE and DIAGNOSE any BCM Diagnostic Trouble Codes (DTCs) that are present.
For additional information, refer to: Body Control Module (BCM) (419-10 Multifunction Electronic Modules, Diagnosis and Testing).
-
RETRIEVE and DIAGNOSE any IPMB Diagnostic Trouble Codes (DTCs) that are present.
For additional information, refer to: Parking Aid (413-13A Parking Aid - Vehicles With: Rear Parking Aid, Diagnosis and Testing).
PreCondition not correct 13 RETRIEVE and DIAGNOSE any IPMB Diagnostic Trouble Codes (DTCs) that are present.
For additional information, refer to: Parking Aid (413-13A Parking Aid - Vehicles With: Rear Parking Aid, Diagnosis and Testing).
Target Identification Error (Left) 0A VERIFY the following:
- LH calibration mat is oriented correctly
- LH calibration mat placement at the front of the vehicle
- Lighting on the LH calibration mat is uniform and of good quality (free of shadows and glare)
- The LH calibration mat is free of obstructions and dirt
- The front camera lens is clean and free of scratches
- The front camera has been configured using a diagnostic scan tool
- Diagnose and repair any IPMB Diagnostic Trouble Codes (DTCs)
- VERIFY the following:
- LH calibration mat is oriented correctly
- LH calibration mat placement at the rear of the vehicle
- Lighting on the LH calibration mat is uniform and of good quality (free of shadows and glare)
- The LH calibration mat is free of obstructions and dirt
- The rear camera lens is clean and free of scratches
- The rear camera has been configured using a diagnostic scan tool
- Diagnose and repair any IPMB Diagnostic Trouble Codes (DTCs)
- Target Identification Error (Right) 0B VERIFY the following:
- RH calibration mat is oriented correctly
- RH calibration mat placement at the front of the vehicle
- Lighting on the RH calibration mat is uniform and of good quality (free of shadows and glare)
- The RH calibration mat is free of obstructions and dirt
- The front camera lens is clean and free of scratches
- The front camera has been configured using a diagnostic scan tool
- Diagnose and repair any IPMB Diagnostic Trouble Codes (DTCs)
- VERIFY the following:
- RH calibration mat is oriented correctly
- RH calibration mat placement at the rear of the vehicle
- Lighting on the RH calibration mat is uniform and of good quality (free of shadows and glare)
- The RH calibration mat is free of obstructions and dirt
- The rear camera lens is clean and free of scratches
- The rear camera has been configured using a diagnostic scan tool
- Diagnose and repair any IPMB Diagnostic Trouble Codes (DTCs)
- Result Exceed Quality Limit 0C - VERIFY the following:
- LH calibration mat placement at the side of the vehicle
- Lighting on the LH calibration mat is uniform and of good quality (free of shadows and glare)
- The LH calibration mat is free of obstructions and dirt
- The LH camera lens is clean and free of scratches
- The LH camera is producing an image of good quality
- VERIFY the following:
- RH calibration mat placement at the side of the vehicle
- Lighting on the RH calibration mat is uniform and of good quality (free of shadows and glare)
- The RH calibration mat is free of obstructions and dirt
- The RH camera lens is clean and free of scratches
- The RH camera is producing an image of good quality
Not Calibrated 0D REPEAT the camera alignment using a diagnostic scan tool Aborted 0E VERIFY the following:
- Battery condition and state of charge
- All door and tailgate/luggage compartment lid are fully closed
Missing Internal Link 0F - Turn the ignition OFF.
- Wait 10 seconds.
- Turn the ignition ON, engine off.
- REPEAT the camera alignment procedure using a diagnostic scan tool.
 Parking Aid. Diagnosis and Testing
DTC Chart(s)
DTC Chart: IPMB
Diagnostics in this manual assume a certain skill level and knowledge of Ford-specific diagnostic practices. REFER to: Diagnostic Methods (100-00 General Information, Description and Operation)...
 Front Parking Aid Camera. Removal and Installation
Removal
Remove the front bumper cover.
Refer to: Front Bumper Cover (501-19 Bumpers, Removal and Installation).
Disconnect the front camera electrical connector...
Other information:
Lincoln Nautilus 2018-2026 Service Manual: Anti-Lock Brake System (ABS) Module. Removal and Installation
Removal NOTE: Removal steps in this procedure may contain installation details. NOTE: The ABS module and HCU are released individually. A new ABS module does not come equipped with an HCU . NOTE: The PMI process must begin with the current ABS module installed...
Lincoln Nautilus 2018-2026 Service Manual: Gateway Module A (GWM). Removal and Installation
Removal NOTE: If installing a new module, it is necessary to upload the module configuration information to the scan tool prior to removing the module. This information must be downloaded into the new module after installation. Using a diagnostic scan tool, begin the PMI process for the GWM following the on-screen instructions...
Categories
- Manuals Home
- 1st Generation Nautilus Owners Manual
- 1st Generation Nautilus Service Manual
- Opening and Closing the Hood
- Anti-Theft Alarm System Settings. Security – Troubleshooting
- USB Ports
- New on site
- Most important about car
Clearing the Garage Door Opener. Reprogramming the Garage Door Opener. Garage Door Opener Radio Frequencies
Clearing the Garage Door Opener
