Lincoln Nautilus: Interior Trim and Ornamentation / A-Pillar Trim Panel. Removal and Installation
Lincoln Nautilus 2018-2026 Service Manual / Body and Paint / Body and Paint / Interior Trim and Ornamentation / A-Pillar Trim Panel. Removal and Installation
Special Tool(s) / General Equipment
| Flat Headed Screw Driver |
Removal
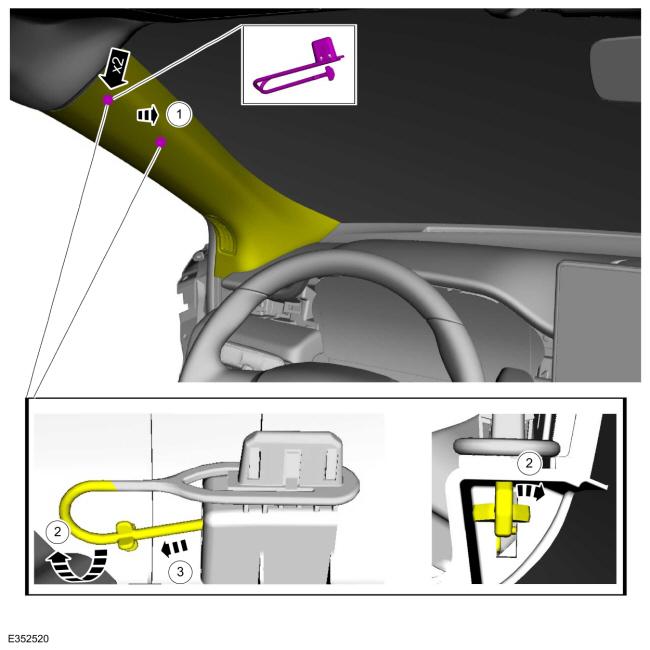
NOTE: Left hand (LH) shown, right hand (RH) similar.
-
Disconnect the tether clips from the A-pillar trim panel.
-
Release the tether clips from the A-pillar trim panel.
-
Rotate the tether clip lines to align the ends with openings.
-
Slide the tether clip ends out of the A-pillar trim panel.
-
Release the tether clips from the A-pillar trim panel.
 |
-
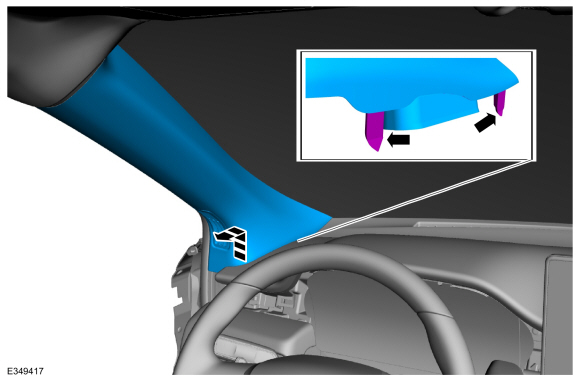
Release the tabs and remove the A-pillar trim panel.
 |
-
Remove the A-pillar tether clips from the bracket.
-
Release the A-pillar tether clip front tab.
Use the General Equipment: Flat Headed Screw Driver
-
Rotate the front of the A-pillar tether clip downward.
-
Release the A-pillar tether clip rear tab.
Use the General Equipment: Flat Headed Screw Driver
-
Rotate the rear of the A-pillar tether clip downward.
-
Release the A-pillar tether clip front tab.
.jpg) |
Installation
-
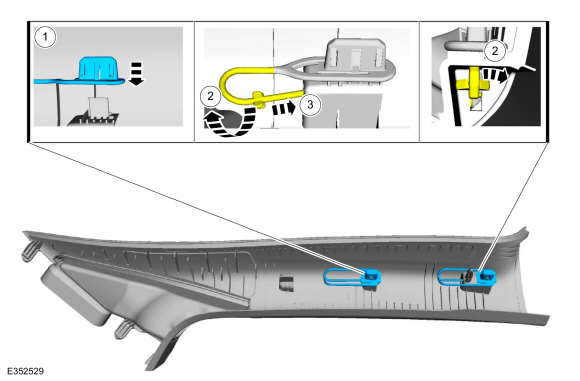
Install the A-pillar tether clips onto the A-pillar trim panel.
-
Install the A-pillar trim panel clip from the tether clips.
-
Rotate the tether clip lines to align the ends with openings.
-
Slide the tether clip ends into the A-pillar trim panel.
-
Install the A-pillar trim panel clip from the tether clips.
 |
-
Install the A-pillar trim panel.
-
Install the A-pillar trim panel tabs into the instrument panel.
-
Install the A-pillar trim panel tether clips into the A-pillar bracket.
-
Install the A-pillar trim panel tabs into the instrument panel.
.jpg) |
-
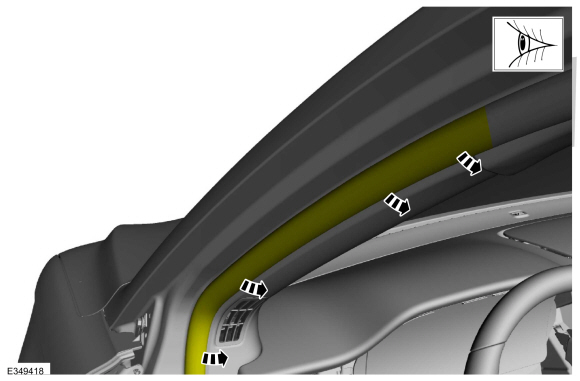
Inspect and position the front door weather strip lip so that it overlaps the top of the A-pillar trim panel.
 |

 B-Pillar Trim Panel. Removal and Installation
Special Tool(s) /
General Equipment
501-403Tool, Pretensioner Quick ConnectTKIT-2012D-FLTKIT-2012D-ROW
Removal
NOTE:
Removal steps in this procedure may contain installation details...
Other information:
Lincoln Nautilus 2018-2026 Service Manual: Roof Rear Frame. Removal and Installation
Special Tool(s) / General Equipment Resistance Spotwelding Equipment 8 mm Drill Bit Spot Weld Drill Bit Locking Pliers Materials Name Specification Seam SealerTA-2-B, 3M™ 08308, LORD Fusor® 803DTM - Removal NOTE: Factory welds may be substituted with resistance or metal inert gas (MIG) plug welds...
Lincoln Nautilus 2018-2026 Service Manual: Front Floor Panel. Removal and Installation
Special Tool(s) / General Equipment Scraper for Straight Edges Hot Air Gun 8 mm Drill Bit MIG/MAG Welding Equipment Spot Weld Drill Bit Locking Pliers Materials Name Specification Seam SealerTA-2-B, 3M™ 08308, LORD Fusor® 803DTM - Removal NOTE: Roof and body side removed for clarity...
Categories
- Manuals Home
- 1st Generation Nautilus Owners Manual
- 1st Generation Nautilus Service Manual
- Interior Lamp Function. Adjusting the Instrument Panel Lighting Brightness. Ambient Lighting. Interior Lighting – Troubleshooting
- Child Safety Locks
- Changing the 12V Battery
- New on site
- Most important about car
USB Ports
Locating the USB Ports
Data Transfer USB Ports

The USB Ports could be in the following locations:
On the lower instrument panel. Inside the media bin. Inside the center console.Note: These USB ports can also charge devices.
Copyright © 2026 www.linautilus.com