Lincoln Nautilus: Side Panel Sheet Metal Repairs / B-Pillar Outer Panel. Removal and Installation
Lincoln Nautilus 2018-2026 Service Manual / Body and Paint / Body and Paint / Side Panel Sheet Metal Repairs / B-Pillar Outer Panel. Removal and Installation
Special Tool(s) / General Equipment
| Resistance Spotwelding Equipment | |
| Spherical Cutter | |
| Hot Air Gun | |
| MIG/MAG Welding Equipment | |
| Spot Weld Drill Bit | |
| Locking Pliers |
Materials
| Name | Specification |
|---|---|
| Seam Sealer TA-2-B, 3M™ 08308, LORD Fusor® 803DTM |
- |
| Flexible Foam Repair 3M™ 08463, LORD Fusor® 121 |
- |
Removal
-
If required, restore the vehicle to pre-accident dimensions.
Refer to: Body and Frame (501-26 Body Repairs - Vehicle Specific Information and Tolerance Checks, Description and Operation).
-
Remove the following items:
-
Remove the B-pillar trim panel.
Refer to: B-Pillar Trim Panel (501-05 Interior Trim and Ornamentation, Removal and Installation).
-
Remove the B-pillar trim panel.
-
Remove the front door striker and rear door hinge at the B-pillar.
-
Position aside the carpeting and wiring harness in the repair area.
-
If damage extends into the roof rail area, the roof panel must be removed.
Refer to: Roof Panel (501-28 Roof Sheet Metal Repairs, Removal and Installation).
Refer to: Roof Panel - Vehicles With: Panoramic Roof Opening Panel (501-28 Roof Sheet Metal Repairs, Removal and Installation).
-
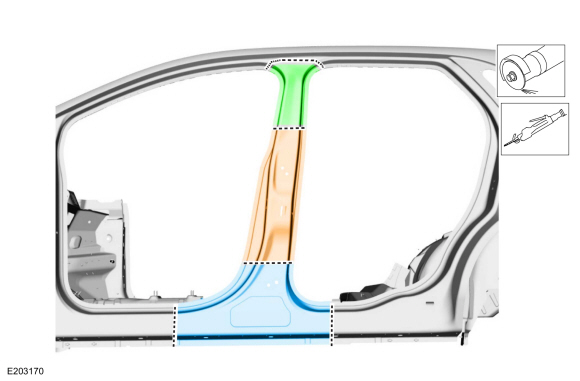
NOTICE: Carefully cut the outer panel only.
NOTE: Partial replacement due to damage is possible and reasonable on the outer panel only
Possible cutlines depending on damage.
 |
-
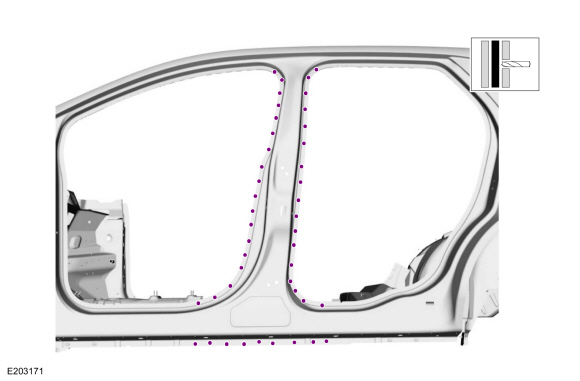
Remove the spot welds.
Use the General Equipment: Spot Weld Drill Bit
 |
-
NOTE: The use of a heat gun may aid in softening the NVH foam.
Remove the B-pillar outer panel.
Use the General Equipment: Hot Air Gun
 |
Installation
-
Cut replacement section from the replacement part.
Use the General Equipment: Spherical Cutter
.jpg) |
-
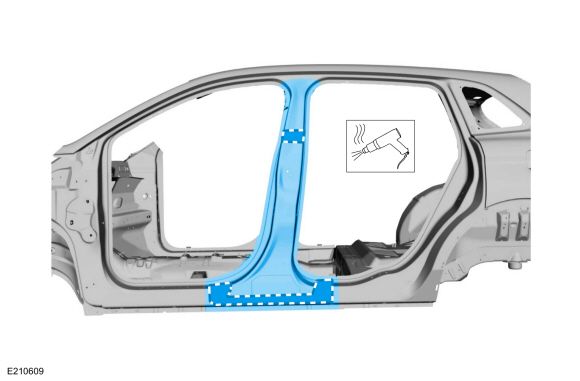
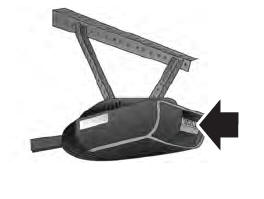
Apply flexible foam at the indicated locations.
Material: Flexible Foam Repair / 3M™ 08463, LORD Fusor® 121
.jpg) |
-
Use the General Equipment: Resistance Spotwelding Equipment
Use the General Equipment: Locking Pliers
.jpg) |
-
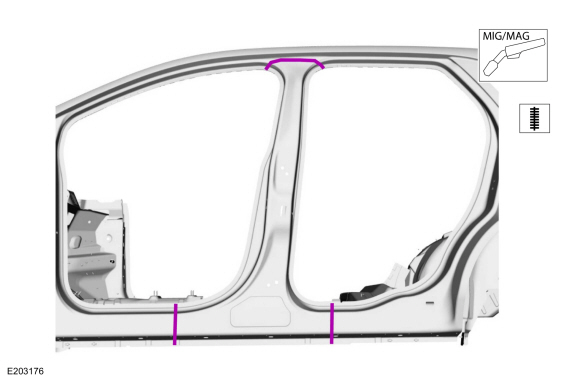
Seam weld at the sectioned cutlines.
Use the General Equipment: MIG/MAG Welding Equipment
 |
-
Metal finish using typical metal finishing techniques.
-
Prime the entire repair area using a Ford approved paint system.
-
Sealing work: All areas must be sealed to production level.
Material: Seam Sealer / TA-2-B, 3M™ 08308, LORD Fusor® 803DTM
-
Restore corrosion protection.
Refer to: Corrosion Prevention (501-25 Body Repairs - General Information, General Procedures).
-
Refinish using a Ford approved paint system.
-
Install the front door striker and the rear door hinge at the B-pillar.
-
Reposition the wiring harness and carpet to original position.
-
Install the roof panel, if required.
Refer to: Roof Panel (501-28 Roof Sheet Metal Repairs, Removal and Installation).
Refer to: Roof Panel - Vehicles With: Panoramic Roof Opening Panel (501-28 Roof Sheet Metal Repairs, Removal and Installation).
-
Install the following items:
-
Install the B-pillar trim panel.
Refer to: B-Pillar Trim Panel (501-05 Interior Trim and Ornamentation, Removal and Installation).
-
Install the B-pillar trim panel.

 Front Door Skin Panel. Removal and Installation
Special Tool(s) /
General Equipment
Grinder
Hot Air Gun
Knife
MIG/MAG Welding Equipment
Locking Pliers
Materials
Name
Specification
Metal Bonding AdhesiveTA-1, TA-1-B, 3M™ 08115, LORD Fusor® 108B, Henkel Teroson EP 5055
-
Seam SealerTA-2-B, 3M™ 08308, LORD Fusor® 803DTM
-
Flexible Foam Repair3M™ 08463, LORD Fusor® 121
-&nb..
Other information:
Lincoln Nautilus 2018-2026 Service Manual: Hands-Free Liftgate Actuation Lower Sensor. Removal and Installation
Removal NOTE: Removal steps in this procedure may contain installation details. Remove the rear bumper cover. Refer to: Rear Bumper Cover (501-19 Bumpers, Removal and Installation). Remove the lower rear bumper cover. Remove the rivets. Release the tabs. Separate the lower rear bumper cover from the center rear bumper cover. ..
Lincoln Nautilus 2018-2026 Service Manual: Elevation System Check. General Procedures
Check Turn the ignition ON, engine OFF. Set the parking brake. Place the gearshift in REVERSE (R) for rear parking aid sensors. Place the gearshift in DRIVE (D) for front parking aid sensors. Using a diagnostic scan tool, monitor the parking aid sensor distance Parameter Identifications (PIDs) to verify no objects are dete..
Categories
- Manuals Home
- 1st Generation Nautilus Owners Manual
- 1st Generation Nautilus Service Manual
- Drive Mode Control
- Switching the Lane Keeping System On and Off. Switching the Lane Keeping System Mode
- Opening the Liftgate
- New on site
- Most important about car
Programming the Garage Door Opener to Your Garage Door Opener Motor
Copyright © 2026 www.linautilus.com