Lincoln Nautilus: Side Panel Sheet Metal Repairs / B-Pillar and Reinforcement. Removal and Installation
Special Tool(s) /
General Equipment
| Resistance Spotwelding Equipment |
| Spherical Cutter |
| Hot Air Gun |
| Air Body Saw |
| 8 mm Drill Bit |
| MIG/MAG Welding Equipment |
| Spot Weld Drill Bit |
| Locking Pliers |
Materials
| Name |
Specification |
Metal Bonding Adhesive
TA-1, TA-1-B, 3M™ 08115, LORD Fusor® 108B, Henkel Teroson EP 5055 |
-
|
Seam Sealer
TA-2-B, 3M™ 08308, LORD Fusor® 803DTM |
-
|
Flexible Foam Repair
3M™ 08463, LORD Fusor® 121 |
-
|
Removal
-
Restore the vehicle to pre-accident dimensions, if required.
Refer to: Body and Frame (501-26 Body Repairs - Vehicle Specific Information and Tolerance Checks, Description and Operation).
NOTE:
The B-pillar inner panel and reinforcement are made of boron
and cannot be sectioned. Components must be replaced at factory seams.
-
Remove the following items:
-
Remove the roof panel.
Refer to: Roof Panel (501-28 Roof Sheet Metal Repairs, Removal and Installation).
Refer to: Roof Panel - Vehicles With: Panoramic Roof Opening Panel (501-28 Roof Sheet Metal Repairs, Removal and Installation).
-
Remove the B-pillar trim panel.
Refer to: B-Pillar Trim Panel (501-05 Interior Trim and Ornamentation, Removal and Installation).
-
Remove the front door
Refer to: Front Door (501-03)
.
-
Remove the rear door
Refer to: Rear Door (501-03)
.
-
Remove the front door striker and rear door hinge at the B-pillar.
-
Position aside the carpeting and wiring harness in the repair area.
-
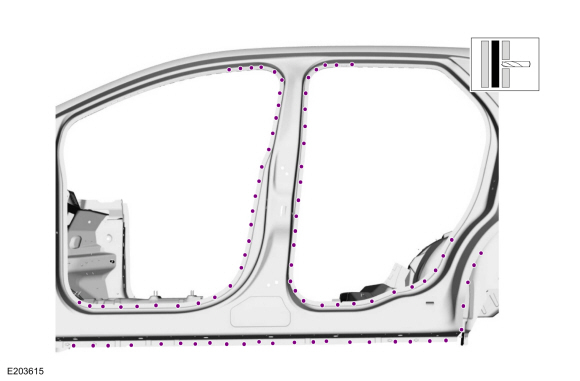
Remove the spot welds.
Use the General Equipment: Spot Weld Drill Bit
-
Remove the spot welds.
Use the General Equipment: Spot Weld Drill Bit
-
NOTICE:
Carefully cut the outer panel only.
NOTE:
The use of a heat gun may aid in softening the NVH foam.
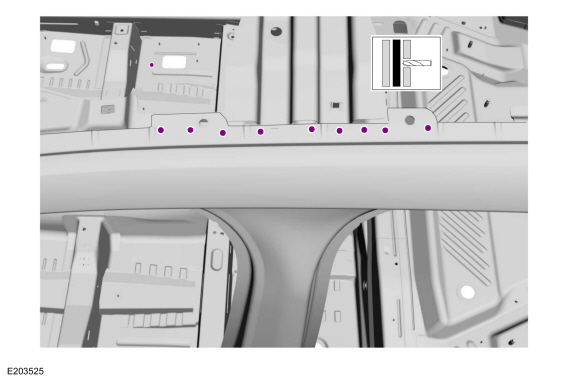
Cut the B-pillar outer panel and remove.
Use the General Equipment: Spherical Cutter
Use the General Equipment: Air Body Saw
Use the General Equipment: Hot Air Gun
-
Remove the spot welds from the B-pillar inner panel.
Use the General Equipment: Spot Weld Drill Bit
-
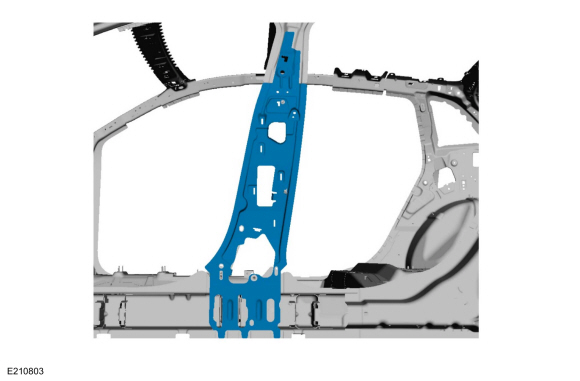
Remove the B-pillar inner panel.
-
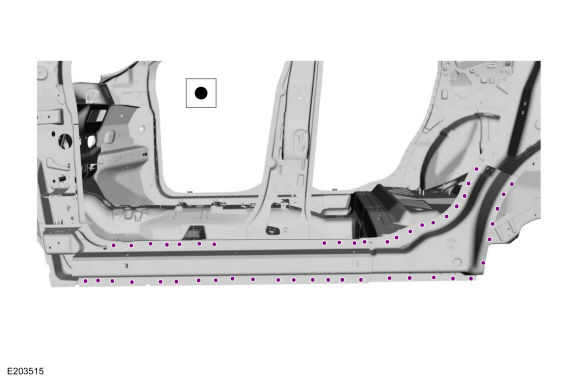
Remove the spot welds from the rocker panel.
-
NOTE:
Use of a heat gun may aid in softening the adhesive.
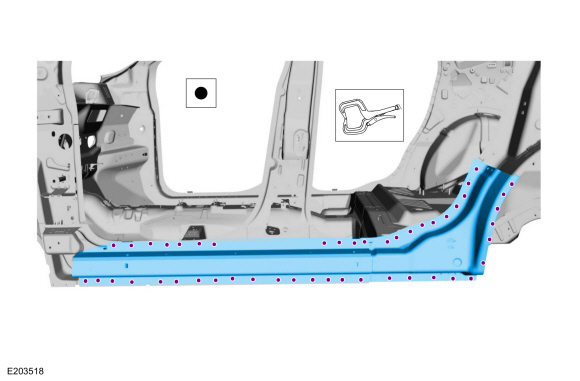
Remove the rocker panel.
-
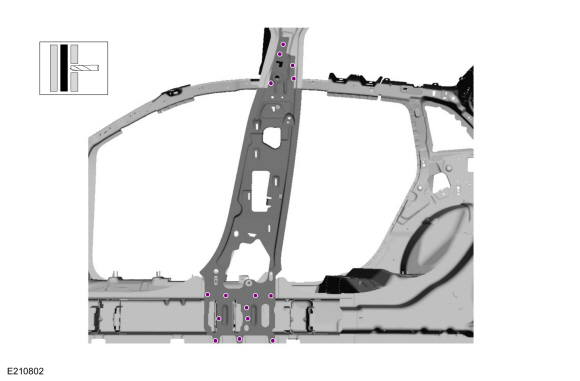
Remove the spot welds from the inner reinforcement.
Use the General Equipment: Spot Weld Drill Bit
-
Remove the inner reinforcement panel.
Installation
NOTE:
The B-pillar inner panel and reinforcement are made of boron
and cannot be sectioned. Components must be replaced at factory seams.
-
Drill the holes for plug welds in the replacement panel.
Use the General Equipment: 8 mm Drill Bit
-
Install and weld the inner reinforcement panel.
Use the General Equipment: Locking Pliers
Use the General Equipment: Resistance Spotwelding Equipment
-
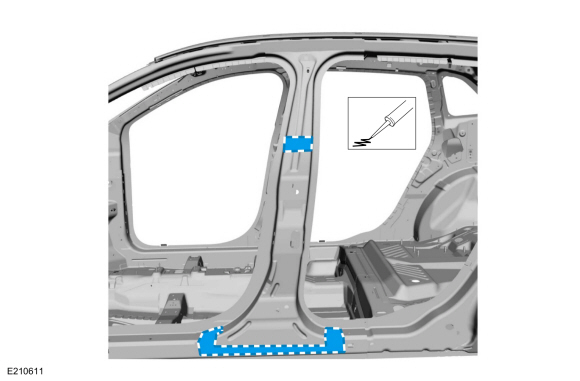
Apply adhesive to the flanges as indicated.
Material: Metal Bonding Adhesive
/ TA-1, TA-1-B, 3M™ 08115, LORD Fusor® 108B, Henkel Teroson EP 5055
-
Install the rocker panel and resistance spot weld.
Use the General Equipment: Resistance Spotwelding Equipment
Use the General Equipment: Locking Pliers
-
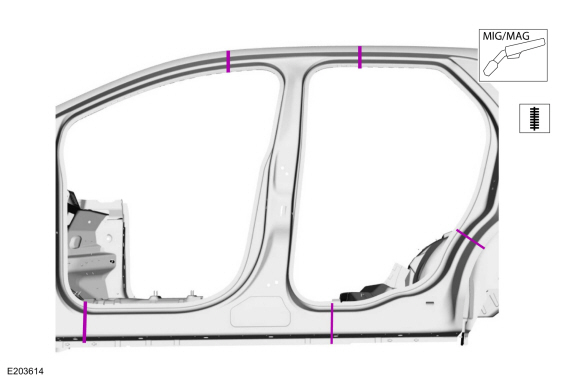
Install and weld the B-pillar panel.
Use the General Equipment: Resistance Spotwelding Equipment
Use the General Equipment: MIG/MAG Welding Equipment
Use the General Equipment: Locking Pliers
-
Apply flexible foam at the indicated locations.
Material: Flexible Foam Repair
/ 3M™ 08463, LORD Fusor® 121
-
Cut section from replacement panels.
Use the General Equipment: Spherical Cutter
Use the General Equipment: Air Body Saw
-
Install the outer panels and resistance spot weld.
Use the General Equipment: Resistance Spotwelding Equipment
Use the General Equipment: Locking Pliers
-
Seam weld the outer panel.
-
Metal finish using typical metal finishing techniques.
-
Sealing work: All areas must be sealed to production level.
Material: Seam Sealer
/ TA-2-B, 3M™ 08308, LORD Fusor® 803DTM
-
Restore corrosion protection.
Refer to: Corrosion Prevention (501-25 Body Repairs - General Information, General Procedures).
-
Refinish using a Ford approved paint system.
-
Install the front door striker and rear door hinge at the B-pillar.
-
Install the following items:
-
Install the roof panel.
Refer to: Roof Panel (501-28 Roof Sheet Metal Repairs, Removal and Installation).
Refer to: Roof Panel - Vehicles With: Panoramic Roof Opening Panel (501-28 Roof Sheet Metal Repairs, Removal and Installation).
-
Install the B-pillar trim panel.
Refer to: B-Pillar Trim Panel (501-05 Interior Trim and Ornamentation, Removal and Installation).
-
Install the front door
Refer to: Front Door (501-03)
.
-
Install the rear door
Refer to: Rear Door (501-03)
.
-
Reposition the wiring harness and carpet to original position.
Special Tool(s) /
General Equipment
Resistance Spotwelding Equipment
Spherical Cutter
Hot Air Gun
MIG/MAG Welding Equipment
Spot Weld Drill Bit
Locking Pliers
Materials
Name
Specification
Seam SealerTA-2-B, 3M™ 08308, LORD Fusor® 803DTM
-
Flexible Foam Repair3M™ 08463, LORD Fusor® 121
-
Removal
If required, restor..
Other information:
Heated Seat Precautions
WARNING: Use caution when using
the heated seat if you are unable to feel
pain to your skin because of advanced
age, chronic illness, diabetes, spinal cord
injury, medication, alcohol use, exhaustion
or other physical conditions. The heated
seat could cause burns even at low
temperatures, especially if used for long
periods of time. Failure to follow this
instructi..
Overview
The
power lock/unlock feature locks or unlocks the doors upon a customer
request from a door lock control switch, the keyless entry keypad, the
passive entry system or a RKE transmitter. Each door can also be locked
manually using the mechanical access opening just above the door latch.
The
passive entry feature automatically locks or unlocks the doors, or
releases the liftgate la..
.jpg)
.jpg)
.jpg)
.jpg)
.jpg)
.jpg)
.jpg)
.jpg)
.jpg)
.jpg)

 B-Pillar Outer Panel. Removal and Installation