Lincoln Nautilus: Front End Sheet Metal Repairs / Fender Apron Panel. Removal and Installation
Special Tool(s) /
General Equipment
| Resistance Spotwelding Equipment |
| Scraper for Straight Edges |
| Hot Air Gun |
| 8 mm Drill Bit |
| MIG/MAG Welding Equipment |
| Spot Weld Drill Bit |
| Locking Pliers |
Materials
| Name |
Specification |
Seam Sealer
TA-2-B, 3M™ 08308, LORD Fusor® 803DTM |
-
|
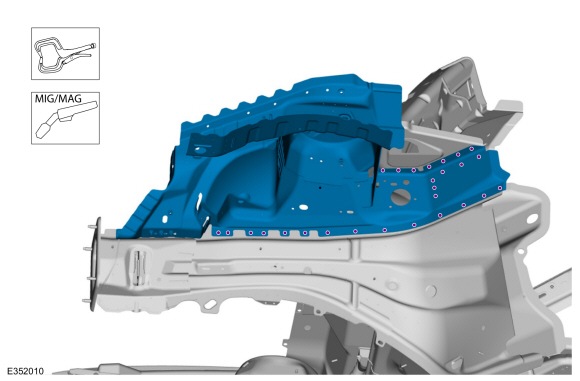
Removal
NOTE:
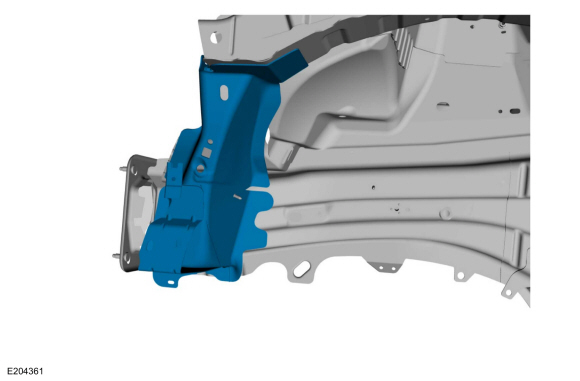
LH side shown, RH side similar.
NOTE:
Factory welds may be substituted with resistance or metal
inert gas (MIG) plug welds. Resistance welds may not be placed directly
over original location. They must be placed adjacent to original
location and match factory welds in quantity. Metal inert gas (MIG) plug
welds must equal factory welds in both location and quantity.
NOTE:
Adequately protect all adjacent areas against cutting, grinding and welding procedures.
-
Depower the SRS .
Refer to: Supplemental Restraint System (SRS) Depowering (501-20B Supplemental Restraint System, General Procedures).
-
If Required:
Dimensionally restore the vehicle to pre-damage condition.
Refer to: Body and Frame (501-26 Body Repairs - Vehicle Specific Information and Tolerance Checks, Description and Operation).
-
Position wiring harness away from the working area.
-
Remove the engine.
Refer to: Engine (303-01A Engine - 2.0L EcoBoost (184kW/250PS) – MI4, Removal).
Refer to: Engine (303-01B Engine - 2.7L EcoBoost (238kW/324PS), Removal).
-
Remove Front Floor Panel Side Member.
Refer to: Front Floor Panel Side Member (501-30 Rear End Sheet Metal Repairs, Removal and Installation).
-
Remove A-Pillar Reinforcement.
Refer to: A-Pillar Reinforcement (501-29 Side Panel Sheet Metal Repairs, Removal and Installation).
-
Remove the spot welds on the fender mounting bracket.
Use the General Equipment: Spot Weld Drill Bit
-
Remove the fender mounting bracket.
Use the General Equipment: Spot Weld Drill Bit
-
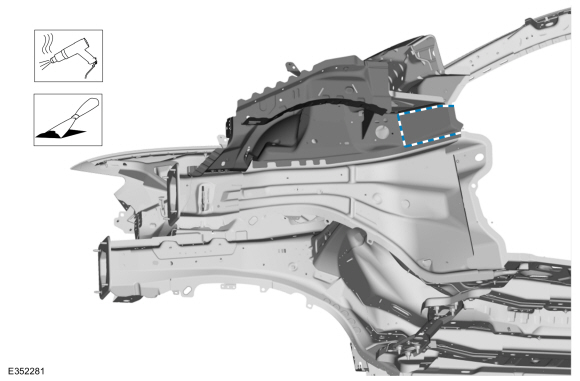
Remove the seam sealer.
Use the General Equipment: Hot Air Gun
Use the General Equipment: Scraper for Straight Edges
-
Remove the seam sealer.
Use the General Equipment: Hot Air Gun
Use the General Equipment: Scraper for Straight Edges
-
Remove the welds.
Use the General Equipment: Spot Weld Drill Bit
-
Remove the welds and Fender Apron Panel.
Use the General Equipment: Spot Weld Drill Bit
Installation
NOTE:
Factory welds may be substituted with resistance or metal
inert gas (MIG) plug welds. Resistance welds may not be placed directly
over original location. They must be placed adjacent to original
location and match factory welds in quantity. Metal inert gas (MIG) plug
welds must equal factory welds in both location and quantity.
NOTE:
Adequately protect all adjacent areas against cutting, grinding and welding procedures.
-
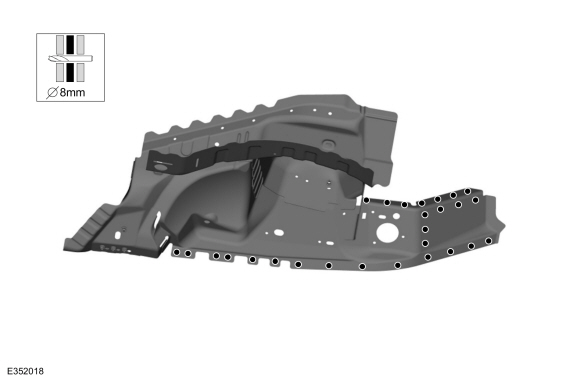
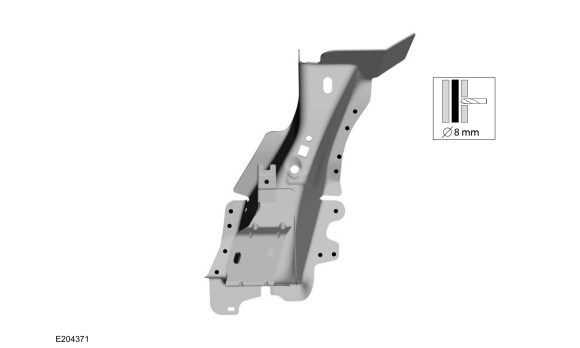
Drill plug weld holes in the Fender Apron Panel.
Use the General Equipment: 8 mm Drill Bit
-
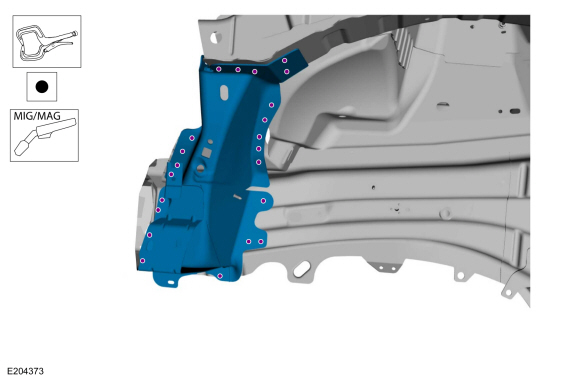
Install the welds and Floor Panel Side Member.
Use the General Equipment: Locking Pliers
Use the General Equipment: MIG/MAG Welding Equipment
-
Install the welds.
Use the General Equipment: Locking Pliers
Use the General Equipment: MIG/MAG Welding Equipment
Use the General Equipment: Resistance Spotwelding Equipment
-
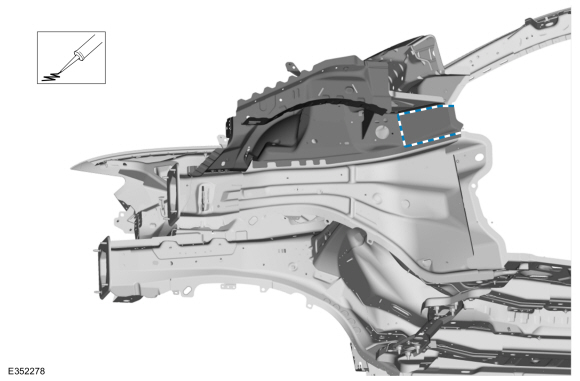
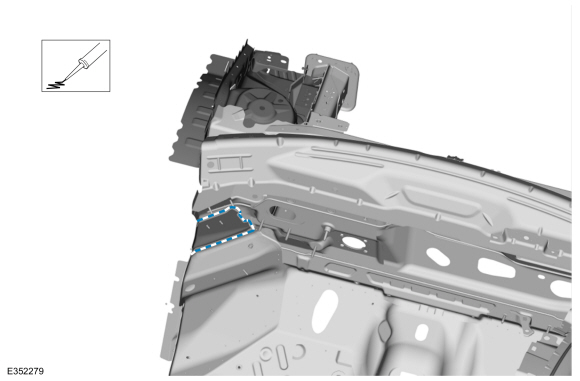
Apply adhesive as indicated.
-
Drill holes in the replacement fender mounting bracket for plug welding.
Use the General Equipment: 8 mm Drill Bit
-
Install the fender mounting bracket and weld.
Use the General Equipment: Locking Pliers
Use the General Equipment: MIG/MAG Welding Equipment
Use the General Equipment: Resistance Spotwelding Equipment
-
Metal finish all welds as required using typical metal finishing techniques and materials.
-
Seam Sealing:
All seams must be sealed to production level.
Material: Seam Sealer
/ TA-2-B, 3M™ 08308, LORD Fusor® 803DTM
-
Refinish using a Ford approved paint system.
-
Restore corrosion protection.
Refer to: Corrosion Prevention (501-25 Body Repairs - General Information, General Procedures).
-
Reposition the wiring harness to original location.
-
Install the engine.
Refer to: Engine (303-01A Engine - 2.0L EcoBoost (184kW/250PS) – MI4, Removal).
Refer to: Engine (303-01B Engine - 2.7L EcoBoost (238kW/324PS), Removal).
-
Install Front Floor Panel Side Member.
Refer to: Front Floor Panel Side Member (501-30 Rear End Sheet Metal Repairs, Removal and Installation).
-
Install A-Pillar Reinforcement.
Refer to: A-Pillar Reinforcement (501-29 Side Panel Sheet Metal Repairs, Removal and Installation).
-
Repower the SRS .
Refer to: Supplemental Restraint System (SRS) Repowering (501-20B Supplemental Restraint System, General Procedures).
Special Tool(s) /
General Equipment
Scraper for Straight Edges
Hot Air Gun
8 mm Drill Bit
MIG/MAG Welding Equipment
Spot Weld Drill Bit
Locking Pliers
Materials
Name
Specification
Seam SealerTA-2-B, 3M™ 08308, LORD Fusor® 803DTM
-
Removal
NOTE:
Roof removed for clarity...
Special Tool(s) /
General Equipment
Resistance Spotwelding Equipment
Spherical Cutter
Grinder
MIG/MAG Welding Equipment
Spot Weld Drill Bit
Locking Pliers
Removal
Restore the vehicle to pre-accident dimensions, if required...
Other information:
Removal
NOTE:
RH side is shown, the LH side is similar.
Remove the rear bumper cover.
Refer to: Rear Bumper Cover (501-19)
.
Remove the rivets, the pin type retainer and the cellular phone antenna.
Installation
To install, reverse the removal procedure...
Keep your loaded vehicle weight within
its design rating capability, with or
without a trailer. Properly loading your
vehicle provides maximum return of
vehicle design performance. Before you
load your vehicle, become familiar with
the following terms for determining your
vehicle’s weight rating, with or without
a trailer, from the vehicle’s Tire and
Loading Information label or Safet..
.jpg)
.jpg)
.jpg)
.jpg)
.jpg)
 Dash Panel. Removal and Installation
 Fender Apron Panel Reinforcement. Removal and Installation