Lincoln Nautilus: Rear Disc Brake / Rear Brake Flexible Hose. Removal and Installation
Removal
NOTICE: Do not spill brake fluid on painted or plastic surfaces or damage to the surface may occur. If brake fluid is spilled onto a painted or plastic surface, immediately wash the surface with water.
NOTE: Removal steps in this procedure may contain installation details.
-
Remove the wheel and tire.
Refer to: Wheel and Tire (204-04A Wheels and Tires, Removal and Installation).
-
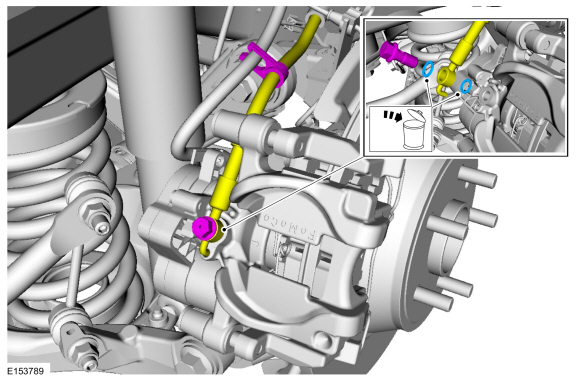
Remove the flow bolt, disconnect the brake hose and
detach the routing bracket from the wiring harness. Discard the washers.
Torque: 18 lb.ft (25 Nm)
 |
-
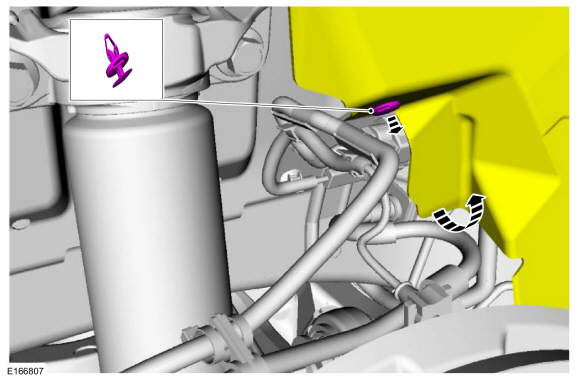
Remove the pin-type retainer and position the splash shield aside.
 |
-
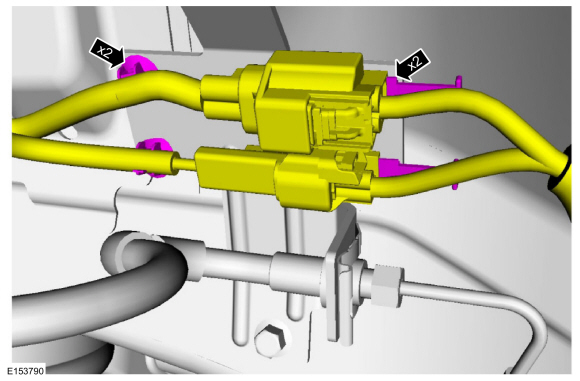
Detach the pin-type retainers and the electrical connectors from the brake hose bracket.
 |
-
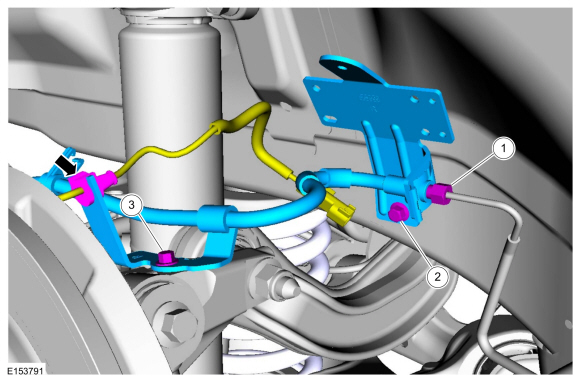
Remove the brake flexible hose.
-
Disconnect the brake tube.
Torque: 159 lb.in (18 Nm)
-
Remove the bolt.
Torque: 22 lb.ft (30 Nm)
-
Remove the bolt, detach the wheel speed sensor wiring and remove the brake flexible hose.
Torque: 124 lb.in (14 Nm)
-
Disconnect the brake tube.
 |
Installation
-
To install, reverse the removal procedure.
-
Bleed the brake system.
Refer to: Brake System Pressure Bleeding (206-00 Brake System - General Information, General Procedures).
 Brake Pads. Removal and Installation
Special Tool(s) /
General Equipment
Brake Caliper Piston Retractor
Materials
Name
Specification
Motorcraft® DOT 4 LV High Performance Motor Vehicle Brake FluidPM-20
WSS-M6C65-A2
Motorcraft® Metal Brake Parts CleanerPM-4-A, PM-4-B, APM-4-C
-
Removal
NOTE:
Removal steps in this procedure may contain installation details...

Other information:
Lincoln Nautilus 2018-2026 Service Manual: Wheel to Hub Runout Minimization. General Procedures
Check NOTE: Wheel-to-hub optimization is important. Clearance between the wheel and hub can be used to offset or neutralize the Road Force® or run-out of the wheel and tire assembly. For every 0.001 inch of wheel-to-hub clearance, the Road Force® can be affected between 1 and 3 pounds depending on the tire stiffness. NOTE: The example below illustrates how the clearance betw..
Lincoln Nautilus 2018-2026 Service Manual: Perimeter Anti-Theft Alarm. Diagnosis and Testing
DTC Charts Diagnostics in this manual assume a certain skill level and knowledge of Ford-specific diagnostic practices. REFER to: Diagnostic Methods (100-00 General Information, Description and Operation). BCM DTC Chart DTC Description Action B109F:01 Intrusion Sensor Module: General Electrical Failure ..
Categories
- Manuals Home
- 1st Generation Nautilus Owners Manual
- 1st Generation Nautilus Service Manual
- Power Outlet - Vehicles With: 110V Power Outlet
- Changing the 12V Battery
- Interior Lamp Function. Adjusting the Instrument Panel Lighting Brightness. Ambient Lighting. Interior Lighting – Troubleshooting
- New on site
- Most important about car
Changing a Flat Tire
WARNING: If the tire pressure monitor sensor becomes damaged it may not function.
Note: The use of tire sealant may damage your tire pressure monitoring system and should only be used in roadside emergencies. If you must use a sealant, use the Tire Mobility Kit sealant. Replace the tire pressure monitoring system sensor and valve stem on the wheel by an authorized dealer after use of the sealant.
Note: The tire pressure monitoring system indicator light will illuminate when the spare tire is in use. To restore the full function of the monitoring system, all road wheels equipped with tire pressure monitoring sensors must be mounted on the vehicle.
If you get a flat tire while driving, do not apply the brake hea