Lincoln Nautilus: Rear Disc Brake / Brake Pads. Removal and Installation
Special Tool(s) / General Equipment
| Brake Caliper Piston Retractor |
Materials
| Name | Specification |
|---|---|
| Motorcraft® DOT 4 LV High Performance Motor Vehicle Brake Fluid PM-20 |
WSS-M6C65-A2 |
| Motorcraft® Metal Brake Parts Cleaner PM-4-A, PM-4-B, APM-4-C |
- |
Removal
NOTE: Removal steps in this procedure may contain installation details.
-
Activate the EPB service mode. WARNING:
Service actions on vehicles equipped with electronic
parking brakes may cause unexpected parking brake application, which
could result in injury to hands or fingers. Put the electronic parking
brake system into service mode prior to servicing or removing rear brake
components. Failure to follow this instruction may result in serious
personal injury.
WARNING:
Service actions on vehicles equipped with electronic
parking brakes may cause unexpected parking brake application, which
could result in injury to hands or fingers. Put the electronic parking
brake system into service mode prior to servicing or removing rear brake
components. Failure to follow this instruction may result in serious
personal injury.
Refer to: Electronic Parking Brake (EPB) Service Mode Activation and Deactivation (206-05 Parking Brake and Actuation, General Procedures).
-
Remove the wheel and tire.
Refer to: Wheel and Tire (204-04A Wheels and Tires, Removal and Installation).
-
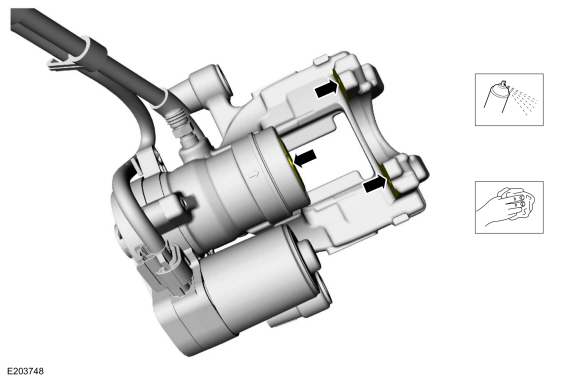
Remove and discard the brake caliper spring.
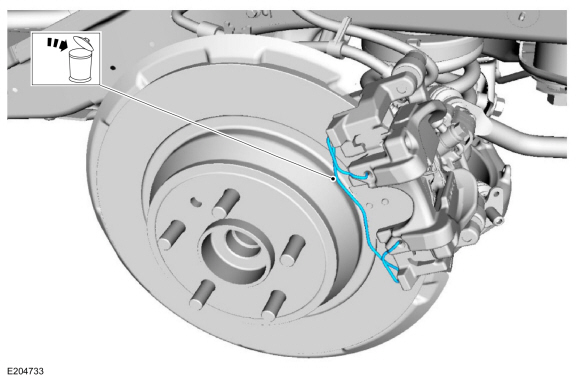 |
-
NOTICE: Do not pry in the caliper sight hole to retract the pistons as this can damage the pistons and boots.
NOTICE: Do not allow the brake caliper and anchor plate assembly to hang from the brake hose or damage to the hose can occur.
Remove the caps, the guide pins and position the brake caliper aside.
Torque: 21 lb.ft (28 Nm)
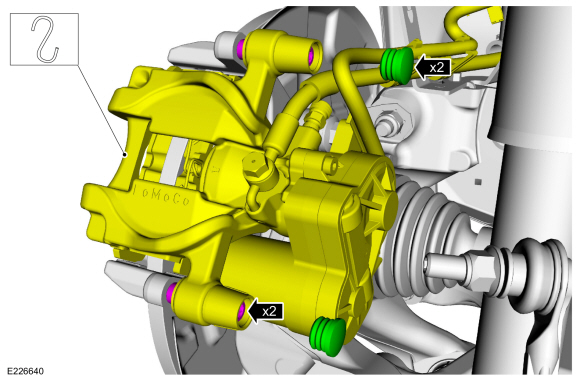 |
-
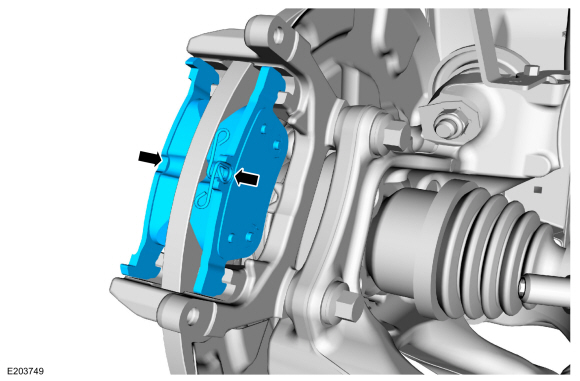
NOTICE: Brake pads with adhesive on the insulator are one-time use only. When the brake pads are separated from the brake caliper, new brake pads must be installed to prevent brake noise and shudder.
Remove and discard the brake pads.
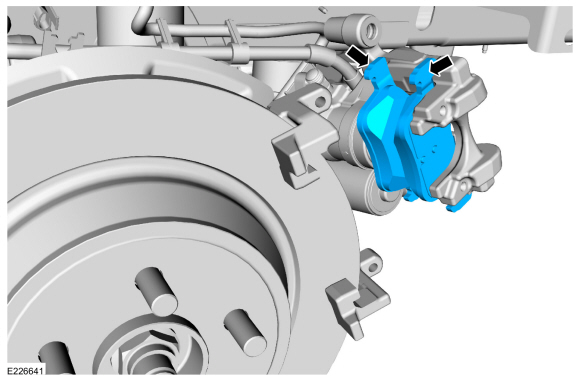 |
-
NOTICE: Use care when pushing the caliper piston into the caliper piston bores or damage to components may occur.
Compress the brake caliper piston until the piston bottoms out in the brake caliper bore.-
NOTICE: Do not apply over 20 Nm (177 in-lb) force when rotating the brake caliper piston or internal damage to the brake caliper may occur.
If the brake caliper piston bottoms out and the piston is still not fully compressed, rotate the piston clockwise while pushing inward using a brake caliper piston retractor until the piston is fully compressed. Use the General Equipment: Brake Caliper Piston Retractor
-
 |
Installation
-
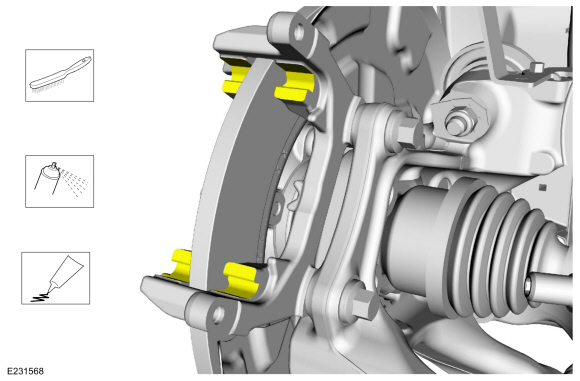
Clean the brake pad-to-anchor plate contact points and apply the lubrication supplied with the brake pad kit.
Material: Motorcraft® Metal Brake Parts Cleaner / PM-4-A, PM-4-B, APM-4-C
 |
-
Clean all residual pad adhesive from the brake caliper piston and the finger area of the brake caliper.
Material: Motorcraft® Metal Brake Parts Cleaner / PM-4-A, PM-4-B, APM-4-C
 |
-
NOTICE: Once the foil backing is removed from the brake pads do not touch the adhesive on the backing.
Remove the foil backing and install the brake pads.
 |
-
NOTICE: Make sure that the brake hose is not twisted when installing the brake caliper or damage to the brake flexible hose may occur.
Position the brake caliper and install the guide pins and caps.
 |
-
Install the new brake caliper spring.
 |
-
Install the wheel and tire.
Refer to: Wheel and Tire (204-04A Wheels and Tires, Removal and Installation).
-
Deactivate the EPB service mode.
Refer to: Electronic Parking Brake (EPB) Service Mode Activation and Deactivation (206-05 Parking Brake and Actuation, General Procedures).
-
NOTICE: Do not spill brake fluid on painted or plastic surfaces or damage to the surface may occur. If brake fluid is spilled onto a painted or plastic surface, immediately wash the surface with water.
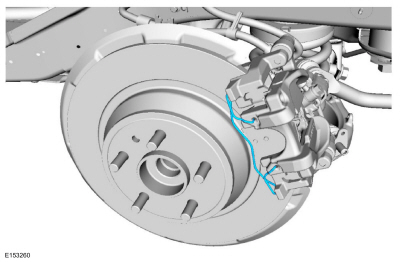
Depress the brake pedal several times, check the brake fluid level in the brake fluid reservoir and add the specified brake fluid as necessary.
Material: Motorcraft® DOT 4 LV High Performance Motor Vehicle Brake Fluid / PM-20 (WSS-M6C65-A2)
 Brake Disc Shield. Removal and Installation
Removal
NOTE:
Removal steps in this procedure may contain installation details.
Remove the brake disc.
Refer to: Brake Disc (206-04 Rear Disc Brake, Removal and Installation)...
 Rear Brake Flexible Hose. Removal and Installation
Removal
NOTICE:
Do not spill brake fluid on painted or plastic surfaces or
damage to the surface may occur. If brake fluid is spilled onto a
painted or plastic surface, immediately wash the surface with water...
Other information:
Lincoln Nautilus 2018-2026 Owners Manual: Symbols Glossary
SYMBOLS USED ON YOUR VEHICLE These are some of the symbols you may see on your vehicle. Air conditioning system Air conditioning system lubricant type Anti-lock braking system Avoid smoking, flames or sparks Battery Battery acid Brake fluid - non petroleum based Brake system Brake system Cabin air filter Check fuel cap Child safety door lock or unlock Child seat lower anchor Child s..
Lincoln Nautilus 2018-2026 Service Manual: Air Conditioning (A/C) Clutch and Air Conditioning (A/C) Clutch Field Coil. General Procedures
Special Tool(s) / General Equipment 412-001 (T71P-19703-B) Remover, Compressor Pulley Activation Remove the A/C compressor. Refer to Air Conditioning A/C Compressor procedure in Group 412. NOTE: If equipped with spring rubber clutch. Using the universal clutch holding tool, hold the clutch and remove the A/C clutch disc and hub bolt. For fixed c..
Categories
- Manuals Home
- 1st Generation Nautilus Owners Manual
- 1st Generation Nautilus Service Manual
- Massage Seats
- Fuel Quality
- Power Outlet - Vehicles With: 110V Power Outlet
- New on site
- Most important about car
Auto-Start-Stop
What Is Auto-Start-Stop
The system is designed to help reduce fuel consumption and CO2 emissions by stopping the engine when it is idling, for example at traffic lights.
Auto-Start-Stop Precautions
WARNING: Apply the parking brake, shift into park (P), switch the ignition off and remove the key before you leave your vehicle. Failure to follow this instruction could result in personal injury or death.
WARNING: Apply the parking brake, shift into park (P), switch the ignition off and remove the key before you open the hood or have any service or repair work completed. If you do not switch the ignition off, the engine could restart at any time. Failure to follow this instruction could result in personal injury or d