Lincoln Nautilus: Exterior Lighting / Headlamp Adjustment. General Procedures
Adjustment
-
NOTE: If the flash video link does not load or is incompatible with your browser, a .wmv version of the video can be accessed at: http://www.fordservicecontent.com/Ford_Content/videos/FusionHeadlampAdj2.wmv
Click on the link above to view video.
Click here to view a video version of this procedure.
.png)
All headlamp types
NOTE: Refer to the Owner's Literature for the headlamp adjustment screw location.
NOTE: Consult your state vehicle inspection manual for recommended tolerance ranges for visual aiming.
NOTE: Horizontal aim is not adjustable.
-
Identify the headlamp type. Vehicles are equipped
with Visually Optically Aligned Left (VOL) or Visually Optically Aligned
Right (VOR) headlamps. Molded in small letters on the headlamp lens is
one of the following: VOL and SAE or VOR and SAE.
-
NOTE: Before starting headlamp adjustment, entry conditions must be met.
-
Vehicle must be on level ground.
-
Tires must be correctly inflated.
-
Vehicle must be normally loaded.
-
Headlamps must be clean.
-
Headlamps must operate correctly.
-
Air suspension switch must be on (if equipped).
-
Vehicle must be on level ground.
-
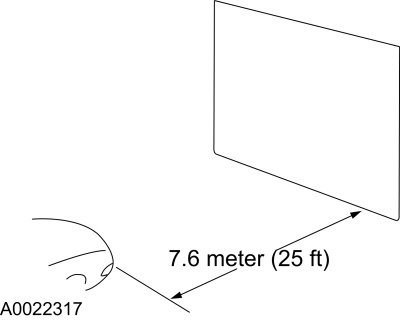
NOTE: The vertical wall or screen must be a minimum of 2.4 m (8ft) wide.
Park the vehicle on a level surface approximately 7.6 m (25 ft) from the vertical wall or screen directly in front of it.
 |
-
NOTE: The bulb center of the low beam bulb is sometimes marked on the lens (circle, crosshair or other mark) or is the center of the low beam reflector, bulb shield or the low beam projector inner lens.
Measure the center of the headlamp height to ground and record the measurement.
.jpg) |
-
NOTE: Use a 2.4 m (8 ft) section of masking tape for the horizontal reference line.
-
For vehicles with headlamp bulb center heights
below 95 cm (37.5 inches), place the horizontal reference line equal to
the headlamp bulb center height.
-
For vehicles with headlamp bulb center heights
between 95 cm - 105 cm (37.5 - 41.5 inches), place the horizontal
reference line at the headlamp bulb center height minus 1.3 cm (0.5
inch).
-
For vehicles with headlamp bulb center heights
above 105 cm (41.5 inches), place the horizontal reference line at the
headlamp bulb center height minus 2.5 cm (1.0 inch).
-
For vehicles with headlamp bulb center heights
below 95 cm (37.5 inches), place the horizontal reference line equal to
the headlamp bulb center height.
-
NOTE: Carry out this procedure in a dark environment to effectively see the headlamp beam pattern.
Turn the low beam headlamps on to illuminate the wall or screen and open the hood.
-
NOTE: The cut off of the beam pattern is the horizontal line of the beam pattern where there is MAXIMUM change between light and dark.
On the wall or screen, locate the cut off of the beam pattern.
VOR-type headlamps
NOTE: Procedure applies to both left and right headlamps with VOR molded on lens.
-
NOTE: The appearance of the VOR beam pattern may vary between vehicles.
There is a distinct cutoff in the right portion of the beam pattern.
-
-
1 - Horizontal reference line
-
2 - Cut off
-
3 - High intensity zone
-
1 - Horizontal reference line
 |
-
NOTE: Align one headlamp while covering the other headlamp.
Align the headlamps to the horizontal reference line. Adjust the headlamp as necessary using the headlamp adjusting screw.
-
Repeat the previous step for the remaining headlamp.
VOL-type headlamps
NOTE: Procedure applies to both left and right headlamps with VOL molded on lens.
-
NOTE: The appearance of the VOL beam pattern may vary between vehicles.
For VOL-type headlamps, there is a distinct cutoff in the left portion of the beam pattern. The edge of this cutoff should be positioned 5 CM (2 in) below the horizontal reference line.
-
-
1 - Horizontal reference line
-
2 - Cut off
-
3 - High intensity zone
-
1 - Horizontal reference line
.jpg) |
-
NOTE: Align one headlamp while covering the other headlamp.
Align the headlamps to the horizontal reference line. Adjust the headlamp as necessary using the headlamp adjusting screw.
-
Repeat the previous step for the remaining headlamp.
 Turn Signal and Hazard Lamps. Diagnosis and Testing
DTC Charts
DTC Chart: BCM
Diagnostics in this manual assume a certain skill level and knowledge of Ford-specific diagnostic practices. REFER to: Diagnostic Methods (100-00 General Information, Description and Operation)...
 Adaptive Front Lighting Module. Removal and Installation
Removal
Remove the headlamp assembly.
Refer to: Headlamp Assembly (417-01 Exterior Lighting, Removal and Installation).
Remove the screws and position the adaptive front lighting module to access the connectors...
Other information:
Lincoln Nautilus 2018-2026 Owners Manual: Fuel Tank Capacity. Fuel and Refueling – Troubleshooting
Fuel Tank Capacity Advertised Capacity The advertised capacity is the maximum amount of fuel that you can add to the fuel tank after running out of fuel. Included in the advertised capacity is an empty reserve. The empty reserve is an unspecified amount of fuel that remains in the fuel tank when the fuel gauge indicates empty...
Lincoln Nautilus 2018-2026 Service Manual: Front Seat Cushion Cover. Removal and Installation
Removal WARNING: The following procedure prescribes critical repair steps required for correct restraint system operation during a crash. Follow all notes and steps carefully. Failure to follow step instructions may result in incorrect operation of the restraint system and increases the risk of serious personal injury or death in a crash...
Categories
- Manuals Home
- 1st Generation Nautilus Owners Manual
- 1st Generation Nautilus Service Manual
- Opening the Liftgate
- Auto-Start-Stop
- Child Safety Locks
- New on site
- Most important about car
Parking Aid Indicators. Parking Aids – Troubleshooting
Parking Aid Indicators
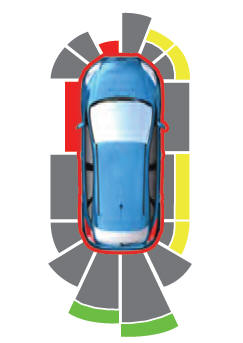
The system provides object distance indication through the information and entertainment display.
As the distance to the object decreases, the indicator waves and the lines move toward the vehicle icon. If there is no object detected, the distance indicator lines are grey.