Lincoln Nautilus: Multifunction Electronic Modules / Radio Transceiver Module (RTM). Removal and Installation
Materials
| Name | Specification |
|---|---|
| 3M™ Super-Fast Repair Adhesive 04747 |
- |
Removal
NOTE: Removal steps in this procedure may contain installation details.
-
NOTE: If installing a new module, it is necessary to upload the module configuration information to the diagnostic scan tool prior to removing the module. This information must be downloaded into the new module after installation.
Carry out the PMI procedure for the RTM .
-
Lower the headliner.
Refer to: Headliner - Lowering (501-05 Interior Trim and Ornamentation) .
-
Using a knife, carefully cut the RTM -to-headliner adhesive and remove the RTM .
-
Disconnect the electrical connector.
-
Disconnect the electrical connector.
.jpg) |
Installation
-
NOTE: Obtain the specified adhesive commercially. Depending on the headliner and optional wire harness(es), the purchase of multiple tubes is suggested.
-
Position the RTM onto the new headliner, making sure the harness has enough length to connect to the RTM .
-
Apply the adhesive in the same location as the factory installed adhesive on the RTM to avoid any NVH concern(s).
Material: 3M™ Super-Fast Repair Adhesive / 04747
-
Position the RTM onto the new headliner, making sure the harness has enough length to connect to the RTM .
-
To install, reverse the removal procedure.
-
Using the previous diagnostic scan tool session, carry out the PMI procedure for the RTM .
 Passenger Door Module (PDM). Removal and Installation
Removal
NOTE:
Removal steps in this procedure may contain installation details.
NOTE:
If installing a new module, it is necessary to
upload the module configuration information to the diagnostic scan tool
prior to removing the module...
 Rear Door Module (RDM). Removal and Installation
Removal
NOTE:
Removal steps in this procedure may contain installation details.
NOTE:
If installing a new module, it is not necessary to upload
the module configuration information to the diagnostic scan tool prior
to removing the module...
Other information:
Lincoln Nautilus 2018-2026 Owners Manual: Auto-Dimming Exterior Mirror
What Is the Auto-Dimming Exterior Mirror The driver exterior mirror dims when the interior auto-dimming mirror turns on. Memory Mirrors (If Equipped) You can save and recall the mirror positions through the memory function. See Memory Function. Heated Exterior Mirrors See Switching the Heated Mirrors On and Off...
Lincoln Nautilus 2018-2026 Owners Manual: Body Control Module Fuse Box
Locating the Body Control Module Fuse Box Accessing the Body Control Module Fuse Box To access the fuses in the body control module fuse box, contact an authorized dealer. Identifying the Fuses in the Body Control Module Fuse Box ..
Categories
- Manuals Home
- 1st Generation Nautilus Owners Manual
- 1st Generation Nautilus Service Manual
- Locating the Pre-Collision Assist Sensors
- Child Safety Locks
- USB Ports
- New on site
- Most important about car
Locating the Pre-Collision Assist Sensors
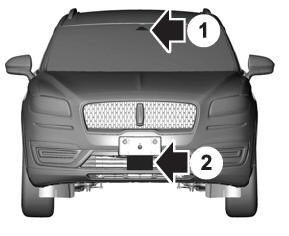
If a message regarding a blocked sensor or camera appears in the information display, something is obstructing the radar signals or camera images. The radar sensor is behind the fascia cover in the center of the lower grille. With a blocked sensor or camera, the system may not function, or performance may reduce. See Pre-Collision Assist – Information Messages.