Lincoln Nautilus: Side Panel Sheet Metal Repairs / Rocker Panel Inner Reinforcement. Removal and Installation
Lincoln Nautilus 2018-2026 Service Manual / Body and Paint / Body and Paint / Side Panel Sheet Metal Repairs / Rocker Panel Inner Reinforcement. Removal and Installation
Special Tool(s) / General Equipment
| Resistance Spotwelding Equipment | |
| Hot Air Gun | |
| Spot Weld Drill Bit | |
| Locking Pliers |
Materials
| Name | Specification |
|---|---|
| Metal Bonding Adhesive TA-1, TA-1-B, 3M™ 08115, LORD Fusor® 108B, Henkel Teroson EP 5055 |
- |
| Seam Sealer TA-2-B, 3M™ 08308, LORD Fusor® 803DTM |
- |
Removal
-
Restore the vehicle to pre-accident dimensions, if required.
Refer to: Body and Frame (501-26 Body Repairs - Vehicle Specific Information and Tolerance Checks, Description and Operation).
NOTE: The rocker panel inner reinforcement is made of martensite steel and cannot be sectioned. It must be replaced at factory seams.
-
Remove the following items:
-
Remove the rocker panel.
Refer to: Rocker Panel (501-29 Side Panel Sheet Metal Repairs, Removal and Installation).
-
Remove the B-pillar inner panel.
Refer to: B-Pillar and Reinforcement (501-29 Side Panel Sheet Metal Repairs, Removal and Installation).
-
Remove the rocker panel.
-
Position aside the carpet and wiring harness in the repair area.
-
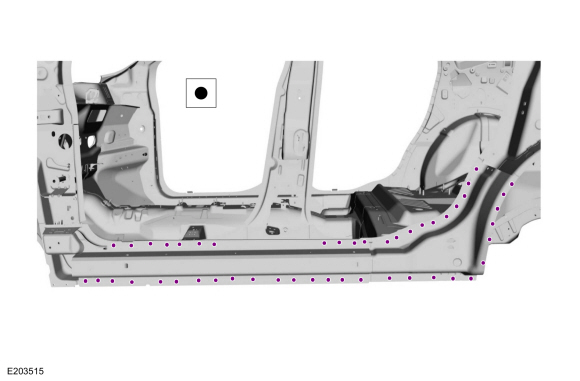
Remove the spot welds.
Use the General Equipment: Spot Weld Drill Bit
 |
-
NOTE: Use of a heat gun may aid in softening the adhesive.
Remove the rocker panel.
Use the General Equipment: Hot Air Gun
 |
Installation
NOTE: The rocker panel inner reinforcement is made of boron and cannot be sectioned. It must be replaced at factory seams.
-
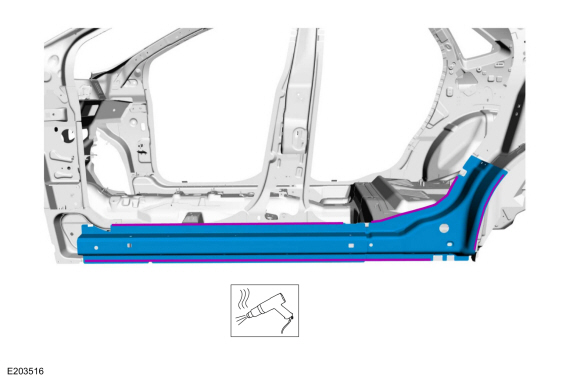
Apply adhesive in the indicated areas.
Material: Metal Bonding Adhesive / TA-1, TA-1-B, 3M™ 08115, LORD Fusor® 108B, Henkel Teroson EP 5055
 |
-
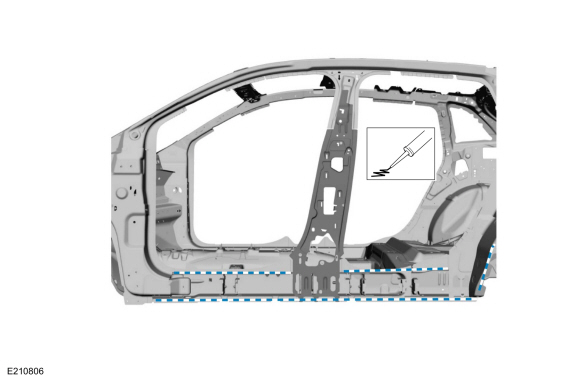
Install the rocker panel and resistance spot weld.
Use the General Equipment: Resistance Spotwelding Equipment
Use the General Equipment: Locking Pliers
.jpg) |
-
Complete weld with:
Refer to: B-Pillar and Reinforcement (501-29 Side Panel Sheet Metal Repairs, Removal and Installation).
-
Prime the repair area using a Ford approved paint system.
-
Sealing work: All areas must be sealed to production level.
Material: Seam Sealer / TA-2-B, 3M™ 08308, LORD Fusor® 803DTM
-
Install the following items:
-
Install the B-pillar inner panel.
Refer to: B-Pillar and Reinforcement (501-29 Side Panel Sheet Metal Repairs, Removal and Installation).
-
Install the rocker panel.
Refer to: Rocker Panel (501-29 Side Panel Sheet Metal Repairs, Removal and Installation).
-
Install the B-pillar inner panel.
-
Restore corrosion protection.
Refer to: Corrosion Prevention (501-25 Body Repairs - General Information, General Procedures).
-
Position the wiring harness and carpet to original position.


Other information:
Lincoln Nautilus 2018-2026 Owners Manual: End User License Agreement
VEHICLE SOFTWARE END USER LICENSE AGREEMENT (EULA) You (“You” or “Your” as applicable) have acquired a vehicle having several devices, including SYNC ® and various control modules, ("DEVICES") that include software licensed or owned by Ford Motor Company and its affiliates ("FORD MOTOR COMPANY"). Those software products of FORD MOTOR COMPANY origin, as well as associated..
Lincoln Nautilus 2018-2026 Owners Manual: How Does Stability Control Work
WARNING: Vehicle modifications involving braking system, aftermarket roof racks, suspension, steering system, tire construction and wheel and tire size may change the handling characteristics of your vehicle and may adversely affect the performance of the electronic stability control system. In addition, installing any stereo loudspeakers may interfere with and adversely affect the electr..
Categories
- Manuals Home
- 1st Generation Nautilus Owners Manual
- 1st Generation Nautilus Service Manual
- Normal Scheduled Maintenance
- Interior Lamp Function. Adjusting the Instrument Panel Lighting Brightness. Ambient Lighting. Interior Lighting – Troubleshooting
- Locating the Pre-Collision Assist Sensors
- New on site
- Most important about car
Replacing the Rear Wiper Blades
Note: Do not hold the wiper blade to lift the wiper arm.
Remove the wiper blade.Copyright © 2026 www.linautilus.com