Lincoln Nautilus: Climate Control System - General Information / Thermostatic Expansion Valve - 2.0L EcoBoost (184kW/250PS) – MI4. Removal and Installation
Lincoln Nautilus 2018-2026 Service Manual / Electrical / Climate Control System / Climate Control System - General Information / Thermostatic Expansion Valve - 2.0L EcoBoost (184kW/250PS) – MI4. Removal and Installation
Removal
NOTICE: During the removal of components, cap, tape or otherwise appropriately protect all openings to prevent the ingress of dirt or other contamination. Remove protective materials prior to installation.
NOTE: Removal steps in this procedure may contain installation details.
-
Recover the refrigerant. Refer to the appropriate Recovery procedure in Group 412.
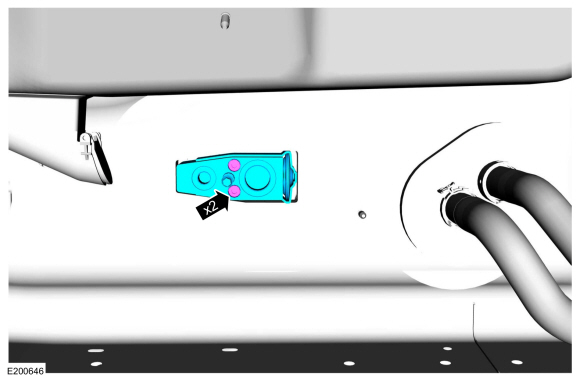
-
Remove the evaporator inlet and outlet manifold bracket nut.
Torque: 18 lb.in (2 Nm)
.jpg) |
-
Remove the air cleaner outlet pipe.
Refer to: Air Cleaner Outlet Pipe (303-12 Intake Air Distribution and Filtering - 2.0L EcoBoost (184kW/250PS) - MI4) .
-
Remove the nut and position aside the evaporator inlet and outlet manifold.
-
Make sure to cover any open ports to prevent debris from entering the system.
Torque: 159 lb.in (18 Nm)
-
Make sure to cover any open ports to prevent debris from entering the system.
.jpg) |
-
Remove the bolts and the thermostatic expansion valve.
-
Make sure to cover any open ports to prevent debris from entering the system.
Torque: 71 lb.in (8 Nm)
-
Make sure to cover any open ports to prevent debris from entering the system.
 |
Installation
-
To install, reverse the removal procedure.
-
NOTICE: Only use the specified material to lubricate the seals.
Install and lubricate new O-ring seals. Refer to the appropriate Specifications in Group 412.
-
Lubricate the refrigerant system with the correct amount
of clean PAG oil. Refer to the appropriate Refrigerant Oil Adding
procedure in Group 412.
 Sunload Sensor. Removal and Installation
Removal
Remove the sunload sesnor.
Disconnect the electrical connector.
Installation
To install, reverse the removal procedure...

Other information:
Lincoln Nautilus 2018-2026 Owners Manual: What Is Cross Traffic Alert? How Does Cross Traffic Alert Work? Cross Traffic Alert Precautions. Cross Traffic Alert Limitations.
What Is Cross Traffic Alert The system alerts you of vehicles approaching from the sides behind your vehicle when you shift into reverse (R). How Does Cross Traffic Alert Work Cross Traffic Alert detects vehicles that approach at a speed between 4–37 mph (6–60 km/h). Coverage decreases when the sensors are partially, mostly or fully obstructed. The sensor on the left-hand side is only ..
Lincoln Nautilus 2018-2026 Service Manual: Steering Column. Removal and Installation
Removal NOTICE: To prevent damage to the clockspring, make sure the front wheels are in the straight-ahead position. NOTICE: Precise tolerances are required when manufacturing a steering column. Never install a repaired, rebuilt, aftermarket, or remanufactured steering column. Always install a new steering column. Failure to follow this direction can result in steering column failure. ..
Categories
- Manuals Home
- 1st Generation Nautilus Owners Manual
- 1st Generation Nautilus Service Manual
- Replacing the Rear Wiper Blades
- Opening the Liftgate
- Locating the Pre-Collision Assist Sensors
- New on site
- Most important about car
Clearing the Garage Door Opener. Reprogramming the Garage Door Opener. Garage Door Opener Radio Frequencies
Clearing the Garage Door Opener

Copyright © 2026 www.linautilus.com