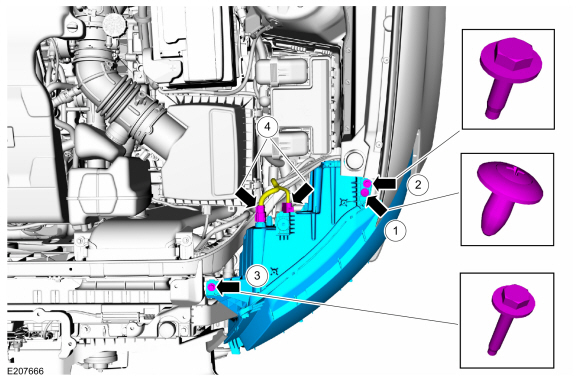
Lincoln Nautilus: Exterior Lighting / Headlamp Assembly. Removal and Installation
Removal
NOTE: Removal steps in this procedure may contain installation details.
-
Remove the front bumper cover.
Refer to: Front Bumper Cover (501-19 Bumpers) .
-
Remove the headlamp assembly.
-
Remove the scrivet.
-
Remove the rear headlamp mounting bolt.
Torque: 42 lb.in (4.8 Nm)
-
Remove the front headlamp mounting bolt.
Torque: 55 lb.in (6.2 Nm)
-
Position the headlamp assembly forward and disconnect the electrical connectors.
-
Remove the scrivet.
 |
Installation
-
To install, reverse the removal procedure.
-
NOTE: Carry out this step only when a headlamp assembly is being replaced.
Using the VCM and IDS software, connect the diagnostic scan tool and execute the “LIN New Module Initialization” routine using the following path: Electrical> Service Functions> LIN New Module Initialization. Follow the diagnostic scan tool directions.
-
NOTE: Carry out this step only when a headlamp assembly is being replaced.
Adjust the headlamp assemblies.
Refer to: Headlamp Adjustment (417-01 Exterior Lighting, General Procedures).
 Front Turn Signal Lamp Bulb. Removal and Installation
Removal
Remove the front turn signal lamp bulb.
Disconnect the electrical connector.
Remove the bulb holder.
Remove the front turn signal lamp bulb...
 Headlamp Bulb. Removal and Installation
Removal
Remove the headlamp assembly.
Refer to: Headlamp Assembly (417-01 Exterior Lighting, Removal and Installation).
Remove the screws and position the ballast...
Other information:
Lincoln Nautilus 2018-2026 Service Manual: Rear Seat Armrest. Removal and Installation
Removal NOTE: Removal steps in this procedure may contain installation details. Remove the inboard child safety seat tether anchor bezel. Release the backrest lower J-clip. Unzip the inboard backrest cover and remove the armrest fasteners...
Lincoln Nautilus 2018-2026 Service Manual: Locked Seatbelt Retractor Releasing. General Procedures
Repair NOTE: If the seatbelt webbing does not extract from the seatbelt retractor from the stowed position, this may be due to a normal condition which happens when the seatbelt retracts at a high rate of speed. Follow these steps to release the seatbelt...
Categories
- Manuals Home
- 1st Generation Nautilus Owners Manual
- 1st Generation Nautilus Service Manual
- Fuel Quality
- Programming the Garage Door Opener to Your Garage Door Opener Motor
- USB Ports
- New on site
- Most important about car
Changing a Flat Tire
WARNING: If the tire pressure monitor sensor becomes damaged it may not function.
Note: The use of tire sealant may damage your tire pressure monitoring system and should only be used in roadside emergencies. If you must use a sealant, use the Tire Mobility Kit sealant. Replace the tire pressure monitoring system sensor and valve stem on the wheel by an authorized dealer after use of the sealant.
Note: The tire pressure monitoring system indicator light will illuminate when the spare tire is in use. To restore the full function of the monitoring system, all road wheels equipped with tire pressure monitoring sensors must be mounted on the vehicle.
If you get a flat tire while driving, do not apply the brake hea
