Lincoln Nautilus: Parking Aid - Vehicles With: Parking Aid Camera / Image Processing Module B (IPMB). Removal and Installation
Lincoln Nautilus 2018-2026 Service Manual / Electrical / Instrumentation and Warning Systems / Parking Aid - Vehicles With: Parking Aid Camera / Image Processing Module B (IPMB). Removal and Installation
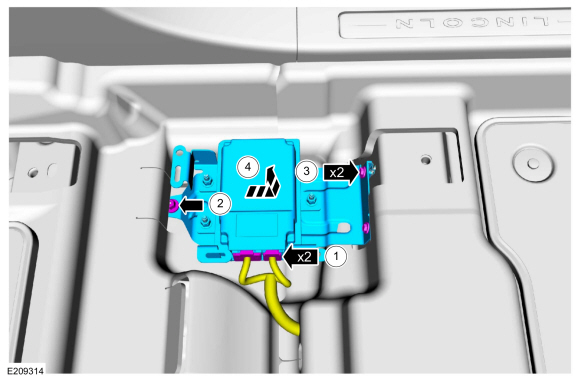
Removal
NOTE: This step is only necessary if the IPMB is being replaced.
NOTE: This procedure can be used for all locations of the component.
-
Using a diagnostic scan tool, begin the PMI process for the IPMB following the on-screen instructions.
-
Position the front driver seat to access the IPMB .
.jpg) |
-
Remove the retainers and the IPMB cover.
.jpg) |
-
Remove the IPMB .
-
Disconnect the electrical connectors.
-
Remove the nut.
Torque: 19 lb.in (2.2 Nm)
-
Remove the screws.
Torque: 19 lb.in (2.2 Nm)
-
Remove the IPMB bracket assembly.
-
Disconnect the electrical connectors.
 |
Installation
-
To install, reverse the removal procedure.
-
NOTE: Carry-out this step only if a IPMB is being replaced.
Using a diagnostic scan tool, complete the PMI process for the IPMB following the on-screen instructions.
 Front Parking Aid Camera. Removal and Installation
Removal
Remove the front bumper cover.
Refer to: Front Bumper Cover (501-19 Bumpers, Removal and Installation).
Disconnect the front camera electrical connector...
 Rear Parking Aid Camera. Removal and Installation
Removal
Remove the liftgate trim panel.
Refer to: Liftgate Trim Panel (501-05 Interior Trim and Ornamentation, Removal and Installation).
Release the inside connections and nuts from the reversing lamp assembly...
Other information:
Lincoln Nautilus 2018-2026 Service Manual: Front Seat Control Switch. Removal and Installation
Special Tool(s) / General Equipment Interior Trim Remover Removal NOTE: Driver seat control switch shown, passenger seat control switch similar. Remove the side shield screws. Remove the side shield...
Lincoln Nautilus 2018-2026 Owners Manual: What Is Phone As a Key. Phone as a Key Limitations
What Is Phone As a Key Phone as a Key allows you to use your phone in place of a passive key. You can use your phone for the following functions: Remote locking and unlocking. Passive entry and exit. Passive start and drive the vehicle. Remote start...
Categories
- Manuals Home
- 1st Generation Nautilus Owners Manual
- 1st Generation Nautilus Service Manual
- Changing the 12V Battery
- Interior Lamp Function. Adjusting the Instrument Panel Lighting Brightness. Ambient Lighting. Interior Lighting – Troubleshooting
- Power Outlet - Vehicles With: 110V Power Outlet
- New on site
- Most important about car
Parking Aid Indicators. Parking Aids – Troubleshooting
Parking Aid Indicators
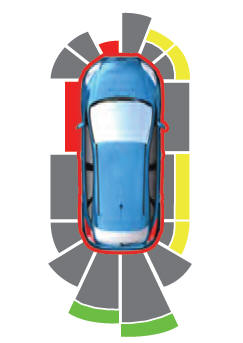
The system provides object distance indication through the information and entertainment display.
As the distance to the object decreases, the indicator waves and the lines move toward the vehicle icon. If there is no object detected, the distance indicator lines are grey.Copyright © 2026 www.linautilus.com