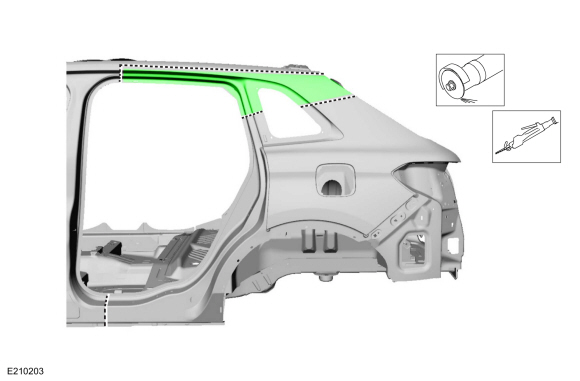
Lincoln Nautilus: Rear End Sheet Metal Repairs / Quarter Panel LH. Removal and Installation
Lincoln Nautilus 2018-2026 Service Manual / Body and Paint / Body and Paint / Rear End Sheet Metal Repairs / Quarter Panel LH. Removal and Installation
Special Tool(s) / General Equipment
| Resistance Spotwelding Equipment | |
| Spherical Cutter | |
| Air Body Saw | |
| 8 mm Drill Bit | |
| MIG/MAG Welding Equipment | |
| Spot Weld Drill Bit | |
| Locking Pliers |
Materials
| Name | Specification |
|---|---|
| Metal Bonding Adhesive TA-1, TA-1-B, 3M™ 08115, LORD Fusor® 108B, Henkel Teroson EP 5055 |
- |
| Flexible Foam Repair 3M™ 08463, LORD Fusor® 121 |
- |
Removal
-
Restore vehicle to pre-accident dimensions, if required.
Refer to: Body and Frame (501-26 Body Repairs - Vehicle Specific Information and Tolerance Checks, Description and Operation).
-
Remove the following items:
-
If required, remove the roof panel.
Refer to: Roof Panel (501-28 Roof Sheet Metal Repairs, Removal and Installation).
Refer to: Roof Panel - Vehicles With: Panoramic Roof Opening Panel (501-28 Roof Sheet Metal Repairs, Removal and Installation).
-
Remove the liftgate.
Refer to: Liftgate (501-03 Body Closures, Removal and Installation).
-
Remove the fuel filler door, LH side only.
Refer to: Fuel Filler Door Assembly (501-03 Body Closures, Removal and Installation).
-
Remove the rear bumper cover.
Refer to: Rear Bumper (501-19 Bumpers, Removal and Installation).
-
Remove the side curtain airbag.
Refer to: Side Curtain Airbag (501-20B Supplemental Restraint System, Removal and Installation).
-
Remove the rear quarter glass.
Refer to: Fixed Glass (501-11 Glass, Frames and Mechanisms, General Procedures).
-
Remove the C-pillar trim panel.
Refer to: C-Pillar Trim Panel (501-05) .
-
Remove the B-pillar trim panel.
Refer to: B-Pillar Trim Panel (501-05 Interior Trim and Ornamentation, Removal and Installation).
-
Remove the rear door.
Refer to: Rear Door (501-03) .
-
If required, remove the roof panel.
-
Position aside the carpeting and wiring harness.
-
NOTE: If damage to the quarter panel extends above the roof side rail area, the roof panel must be removed.
Cut through the outer panel only. Possible cutlines.
Use the General Equipment: Air Body Saw
Use the General Equipment: Spherical Cutter
 |
-
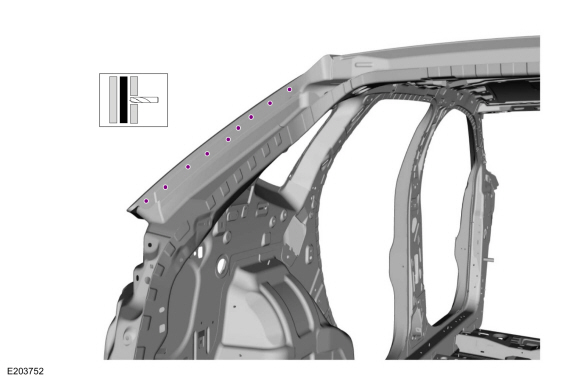
Remove the spot welds.
Use the General Equipment: Spot Weld Drill Bit
 |
-
Remove the spot welds along upper flange.
Use the General Equipment: Spot Weld Drill Bit
 |
-
NOTE: Use of a heat gun may aid in softening the adhesive.
Remove the quarter panel outer panel section.
Use the General Equipment: Spot Weld Drill Bit
.jpg) |
Installation
-
Drill holes in the replacement panel for plug welding.
Use the General Equipment: 8 mm Drill Bit
.jpg) |
-
Apply adhesive and expandable NVH foam as indicated.
Material: Metal Bonding Adhesive / TA-1, TA-1-B, 3M™ 08115, LORD Fusor® 108B, Henkel Teroson EP 5055
Material: Flexible Foam Repair / 3M™ 08463, LORD Fusor® 121
.jpg) |
-
Install the quarter panel and weld.
Use the General Equipment: MIG/MAG Welding Equipment
Use the General Equipment: Resistance Spotwelding Equipment
Use the General Equipment: Locking Pliers
.jpg) |
-
Weld the quarter panel upper flange.
Use the General Equipment: MIG/MAG Welding Equipment
 |
-
Seam weld at the cutline locations.
Use the General Equipment: MIG/MAG Welding Equipment
.jpg) |
-
Metal finish all panel sectioning seams using typical metal finishing techniques.
-
Sealing work: All areas must be sealed to production level.
-
Refinish using a Ford approved paint system.
-
Restore corrosion protection.
Refer to: Corrosion Prevention (501-25 Body Repairs - General Information, General Procedures).
-
Reposition the carpeting and wiring harness.
-
Install the following items:
-
If required, install the roof panel.
Refer to: Roof Panel (501-28 Roof Sheet Metal Repairs, Removal and Installation).
Refer to: Roof Panel - Vehicles With: Panoramic Roof Opening Panel (501-28 Roof Sheet Metal Repairs, Removal and Installation).
-
Install the liftgate.
Refer to: Liftgate (501-03 Body Closures, Removal and Installation).
-
Install the fuel filler door, LH side only.
Refer to: Fuel Filler Door Assembly (501-03 Body Closures, Removal and Installation).
-
Install the rear bumper cover.
Refer to: Rear Bumper (501-19 Bumpers, Removal and Installation).
-
Install the side curtain airbag.
Refer to: Side Curtain Airbag (501-20B Supplemental Restraint System, Removal and Installation).
-
Install the rear quarter glass.
Refer to: Fixed Glass (501-11 Glass, Frames and Mechanisms, General Procedures).
-
Install the C-pillar trim panel.
Refer to: C-Pillar Trim Panel (501-05) .
-
Install the B-pillar trim panel.
Refer to: B-Pillar Trim Panel (501-05 Interior Trim and Ornamentation, Removal and Installation).
-
Install the rear door.
Refer to: Rear Door (501-03) .
-
If required, install the roof panel.
 Inner Quarter Panel and Wheelhouse. Removal and Installation
Special Tool(s) /
General Equipment
Resistance Spotwelding Equipment
8 mm Drill Bit
MIG/MAG Welding Equipment
Spot Weld Drill Bit
Locking Pliers
Materials
Name
Specification
Seam SealerTA-2-B, 3M™ 08308, LORD Fusor® 803DTM
-
Removal
NOTE:
Left hand (LH) side shown, right hand (RH) side similar...
 Rear Bumper Mounting Bracket. Removal and Installation
Special Tool(s) /
General Equipment
8 mm Drill Bit
MIG/MAG Welding Equipment
Spot Weld Drill Bit
Locking Pliers
Materials
Name
Specification
Seam SealerTA-2-B, 3M™ 08308, LORD Fusor® 803DTM
-
Removal
NOTE:
LH side shown, RH side similar...
Other information:
Lincoln Nautilus 2018-2026 Service Manual: Wheel Studs. Removal and Installation
Special Tool(s) / General Equipment Hydraulic Press Removal Remove the front wheel bearing and wheel hub. Refer to: Front Wheel Bearing and Wheel Hub (204-01 Front Suspension, Removal and Installation). Press the wheel stud from the wheel bearing and wheel hub flange...
Lincoln Nautilus 2018-2026 Service Manual: A-Pillar Trim Panel. Removal and Installation
Special Tool(s) / General Equipment Flat Headed Screw Driver Removal NOTE: Left hand (LH) shown, right hand (RH) similar. Disconnect the tether clips from the A-pillar trim panel. Release the tether clips from the A-pillar trim panel...
Categories
- Manuals Home
- 1st Generation Nautilus Owners Manual
- 1st Generation Nautilus Service Manual
- Opening the Liftgate
- Engine Oil Capacity and Specification - 2.0L
- Massage Seats
- New on site
- Most important about car
Replacing the Rear Wiper Blades
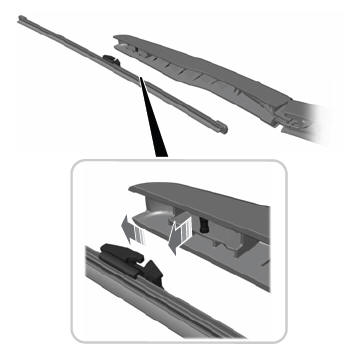
Note: Do not hold the wiper blade to lift the wiper arm.
Remove the wiper blade.Copyright © 2026 www.linautilus.com