Lincoln Nautilus: Body Closures / Rear Door Check Arm. Removal and Installation
Lincoln Nautilus 2018-2026 Service Manual / Body and Paint / Body and Paint / Body Closures / Rear Door Check Arm. Removal and Installation
Removal
NOTE: Removal steps in this procedure may contain installation details.
NOTE: LH side shown, RH similar.
-
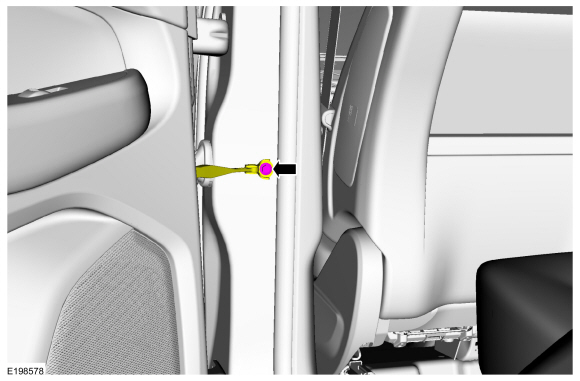
Open the door.
.jpg) |
-
Remove the rear check arm bolt.
Torque: 18 lb.ft (25 Nm)
 |
-
Remove the rear door trim panel.
Refer to: Rear Door Trim Panel (501-05 Interior Trim and Ornamentation, Removal and Installation).
-
NOTE: Door removed from vehicle for clarity.
Remove the rear door speaker.
-
Disconnect the electrical connector.
-
Remove the bolts and the speaker.
Torque: 22 lb.in (2.5 Nm)
-
Disconnect the electrical connector.
.jpg) |
-
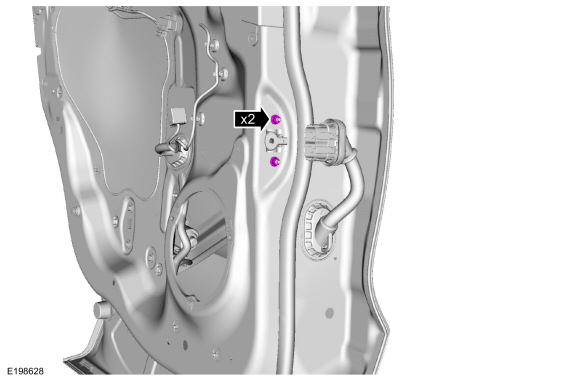
NOTE: Door removed from vehicle for clarity.
Remove the rear door check arm nuts.
Torque: 106 lb.in (12 Nm)
 |
-
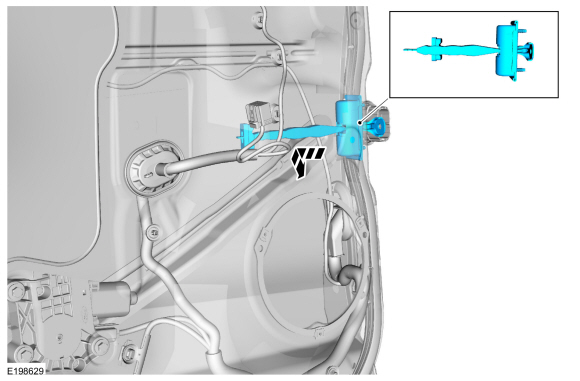
NOTE: Door removed from vehicle for clarity.
Remove the rear door check arm assembly.
 |
Installation
- To install, reverse the removal procedure.
 Rear Door. Removal and Installation
Special Tool(s) /
General Equipment
Door Lift
Removal
NOTE:
Removal steps in this procedure may contain installation details.
NOTE:
LH side shown, RH side similar...
 Rear Gate Trunk Module (RGTM). Removal and Installation
Removal
NOTE:
This step is only necessary when installing a new component.
NOTE:
The PMI process must begin with the current RGTM installed...
Other information:
Lincoln Nautilus 2018-2026 Service Manual: Anti-Theft Key Programming - Scan Tool. General Procedures
Programming NOTE: Make sure the passive key battery(ies) measure at least 2.5 volts. A passive key with a depleted battery only starts the vehicle when in the backup starting location. The RKE functionality remains inoperative until the key battery is replaced...
Lincoln Nautilus 2018-2026 Service Manual: Steering Column. Removal and Installation
Removal NOTICE: To prevent damage to the clockspring, make sure the front wheels are in the straight-ahead position. NOTICE: Precise tolerances are required when manufacturing a steering column. Never install a repaired, rebuilt, aftermarket, or remanufactured steering column...
Categories
- Manuals Home
- 1st Generation Nautilus Owners Manual
- 1st Generation Nautilus Service Manual
- Programming the Garage Door Opener to Your Garage Door Opener Motor
- Folding the Exterior Mirrors - Vehicles With: Manual Folding Mirrors. Folding the Exterior Mirrors - Vehicles With: Power Folding Mirrors
- Massage Seats
- New on site
- Most important about car
Programming the Garage Door Opener to Your Garage Door Opener Motor
Copyright © 2026 www.linautilus.com