Lincoln Nautilus: Glass, Frames and Mechanisms / Rear Door Glass Top Run. Removal and Installation
Lincoln Nautilus 2018-2026 Service Manual / Body and Paint / Body and Paint / Glass, Frames and Mechanisms / Rear Door Glass Top Run. Removal and Installation
Removal
NOTE: LH side shown, RH side similar.
NOTE: Removal steps in this procedure may contain installation details.
-
Lower the rear door window glass to the full down.
.jpg) |
-
Remove the rear door trim panel.
Refer to: Rear Door Trim Panel (501-05 Interior Trim and Ornamentation, Removal and Installation).
-
Remove the rear door upper trim.
-
Remove the retainers from the rear door upper trim.
Torque: 9 lb.in (1 Nm)
-
Remove the rear door upper trim.
-
Remove the retainers from the rear door upper trim.
.jpg) |
-
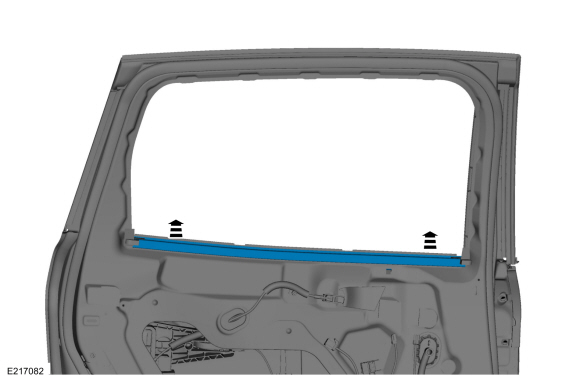
Remove the inner belt moulding.
 |
-
Remove the rear door upper moulding.
Refer to: Rear Door Upper Moulding (501-08 Exterior Trim and Ornamentation, Removal and Installation).
-
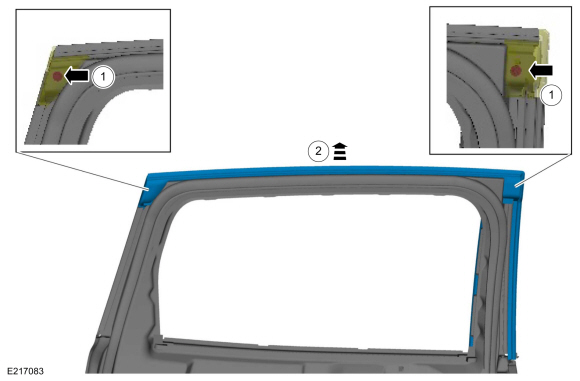
Remove the rear door glass top run.
-
Position aside the top run upper corners and remove the retainers.
Torque: 9 lb.in (1 Nm)
-
Remove the rear door glass top run.
-
Position aside the top run upper corners and remove the retainers.
 |
Installation
-
To install, reverse the removal procedure.
-
If the door is equipped with one touch up/down, carry out the power door window initialization.
Refer to: Power Door Window Initialization (501-11 Glass, Frames and Mechanisms, General Procedures).
 Rear Door Glass Run and Bracket. Removal and Installation
Removal
NOTE:
LH side shown, RH side similar.
NOTE:
The rear door glass run and bracket is serviced with the door latch assembly only.
Remove the rear door latch...
 Rear Door Window Control Switch. Removal and Installation
Removal
NOTE:
LH side shown, RH side similar.
Remove the rear door window control switch.
Remove the rear door window control switch and the bezel assembly...
Other information:
Lincoln Nautilus 2018-2026 Owners Manual: Cleaning the Exterior. Waxing
Cleaning the Exterior Cleaning Headlamps and Rear Lamps We recommend that you only use cold or lukewarm water containing car shampoo to clean the headlamps and the rear lamps. Do not scrape the lamps. Do not wipe lamps when they are dry. Cleaning Windows and Wiper Blades To clean the windshield and wiper blades: Clean the windshield with a non-abrasive glass cleaner...
Lincoln Nautilus 2018-2026 Service Manual: Specifications
Specifications Item Specification Rear fixed glass panel to roof flushness, side (at front of glass) -0.08 - 0.0 in (-0.5 - 0.0 mm) Rear fixed glass panel to roof flushness, rear 0...
Categories
- Manuals Home
- 1st Generation Nautilus Owners Manual
- 1st Generation Nautilus Service Manual
- Replacing the Rear Wiper Blades
- Interior Lamp Function. Adjusting the Instrument Panel Lighting Brightness. Ambient Lighting. Interior Lighting – Troubleshooting
- Locating the Pre-Collision Assist Sensors
- New on site
- Most important about car
Programming the Garage Door Opener to Your Garage Door Opener Motor
Copyright © 2026 www.linautilus.com