Lincoln Nautilus: Rear End Sheet Metal Repairs / Rear Side Member. Removal and Installation
Lincoln Nautilus 2018-2026 Service Manual / Body and Paint / Body and Paint / Rear End Sheet Metal Repairs / Rear Side Member. Removal and Installation
Special Tool(s) / General Equipment
| MIG/MAG Welding Equipment | |
| Spot Weld Drill Bit |
Removal
NOTICE: The rear side member(s) are constructed of Dual Phase (DP) 800 steel and cannot be sectioned. Side member assembly must be replaced at factory joints.
-
Restore vehicle to pre-accident dimensions, if required.
Refer to: Body and Frame (501-26 Body Repairs - Vehicle Specific Information and Tolerance Checks, Description and Operation).
-
Remove the following items:
-
Remove the back panel.
Refer to: Back Panel and Reinforcement (501-30 Rear End Sheet Metal Repairs, Removal and Installation).
-
Remove the rear subframe, as equipped.
Refer to: Rear Subframe - AWD (502-00 Uni-Body, Subframe and Mounting System, Removal and Installation).
Refer to: Rear Subframe - FWD (502-00 Uni-Body, Subframe and Mounting System, Removal and Installation).
-
Remove the fuel tank, as equipped.
Refer to: Fuel Tank (310-01B Fuel Tank and Lines - 2.7L EcoBoost (238kW/324PS), Removal and Installation).
Refer to: Fuel Tank (310-01B Fuel Tank and Lines - 2.7L EcoBoost (238kW/324PS), Removal and Installation).
-
Remove the back panel.
-
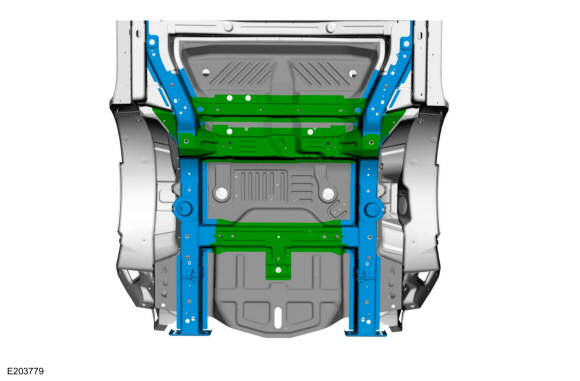
Overview of rear side member assembly.
 |
-
Reposition the carpet and wiring harness away from the working area.
-
Remove the crossmember and reinforcement spot welds as required.
Use the General Equipment: Spot Weld Drill Bit
.jpg) |
Installation
-
Overview of rear side member assembly.
|
-
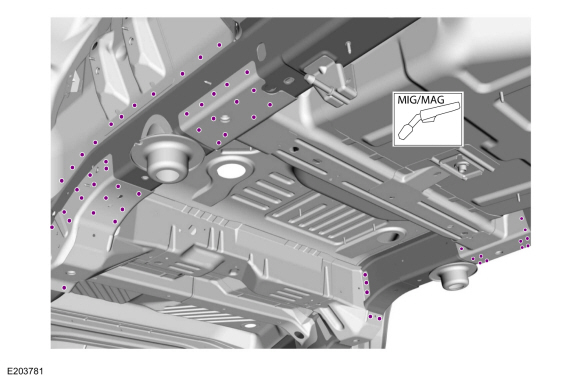
Weld the crossmember and reinforcements.
Use the General Equipment: MIG/MAG Welding Equipment
 |
-
Metal finish as required using typical metal finishing techniques.
-
Sealing work: All areas must be sealed to production level.
-
Refinish using a Ford approved paint system.
-
Restore corrosion protection.
Refer to: Corrosion Prevention (501-25 Body Repairs - General Information, General Procedures).
-
Install the following items:
-
Install the back panel.
Refer to: Back Panel and Reinforcement (501-30 Rear End Sheet Metal Repairs, Removal and Installation).
-
Install the fuel tank, as equipped.
Refer to: Fuel Tank (310-01B Fuel Tank and Lines - 2.7L EcoBoost (238kW/324PS), Removal and Installation).
Refer to: Fuel Tank (310-01B Fuel Tank and Lines - 2.7L EcoBoost (238kW/324PS), Removal and Installation).
-
Install the rear subframe, as equipped.
Refer to: Rear Subframe - AWD (502-00 Uni-Body, Subframe and Mounting System, Removal and Installation).
Refer to: Rear Subframe - FWD (502-00 Uni-Body, Subframe and Mounting System, Removal and Installation).
-
Install the back panel.
-
Reposition the carpeting and wiring harness.
 Rear Floor Panel Section. Removal and Installation
Special Tool(s) /
General Equipment
Spherical Cutter
Grinder
Air Body Saw
MIG/MAG Welding Equipment
Spot Weld Drill Bit
Materials
Name
Specification
Flange SealantCU7Z-19B508-A
WSS-M2G348-A11
Removal
Restore vehicle to pre-accident dimensions, if required...
 Rear Side Member Reinforcement Panel. Removal and Installation
Special Tool(s) /
General Equipment
8 mm Drill Bit
MIG/MAG Welding Equipment
Spot Weld Drill Bit
Locking Pliers
Materials
Name
Specification
Metal Bonding AdhesiveTA-1, TA-1-B, 3M™ 08115, LORD Fusor® 108B, Henkel Teroson EP 5055
-
Removal
NOTE:
Left hand (LH) side shown, right hand (RH) side similar...
Other information:
Lincoln Nautilus 2018-2026 Service Manual: Direct Current/Direct Current (DC/DC) Converter Control Module. Removal and Installation
Removal Position the LH front seat rearward. Disconnect the electrical connector, remove the nuts and the DC/DC converter control module. Torque: 16 lb.ft (22 Nm) Installation To install, reverse the removal procedure...
Lincoln Nautilus 2018-2026 Owners Manual: Introduction
About This Publication WARNING: Driving while distracted can result in loss of vehicle control, crash and injury. We strongly recommend that you use extreme caution when using any device that may take your focus off the road. Your primary responsibility is the safe operation of your vehicle...
Categories
- Manuals Home
- 1st Generation Nautilus Owners Manual
- 1st Generation Nautilus Service Manual
- Engine Oil Capacity and Specification - 2.0L
- Anti-Theft Alarm System Settings. Security – Troubleshooting
- Fuel Quality
- New on site
- Most important about car
Parking Aid Indicators. Parking Aids – Troubleshooting
Parking Aid Indicators
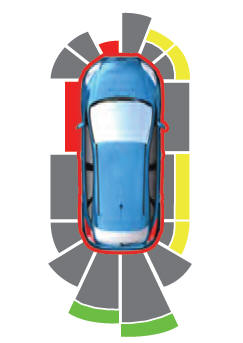
The system provides object distance indication through the information and entertainment display.
As the distance to the object decreases, the indicator waves and the lines move toward the vehicle icon. If there is no object detected, the distance indicator lines are grey.Copyright © 2026 www.linautilus.com