Lincoln Nautilus: Roof Opening Panel / Roof Opening Panel Shield. Removal and Installation
Removal
NOTE: Removal steps in this procedure may contain installation details.
-
Remove the roof opening panel fixed glass.
Refer to: Roof Opening Panel Fixed Glass (501-17 Roof Opening Panel, Removal and Installation).
-
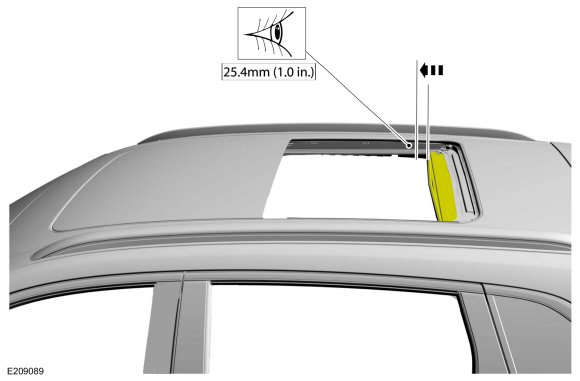
From the fully open position, move the shield approximately 1 in. (25.4 mm) forward.
 |
-
Remove the headliner.
Refer to: Headliner (501-05 Interior Trim and Ornamentation, Removal and Installation).
-
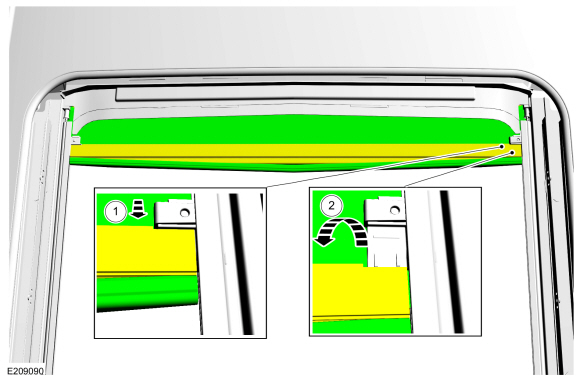
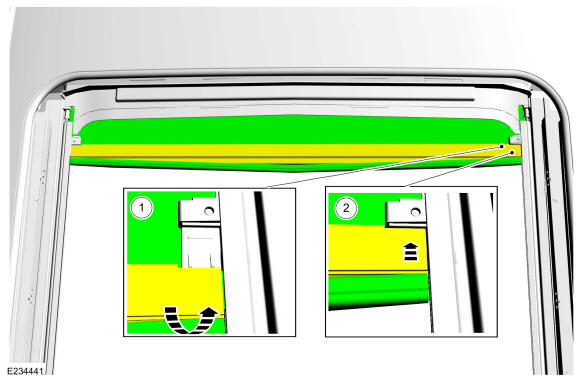
NOTE: LH side shown on inset, RH side similar.
On both sides and at the same time, disconnect the cross bar from the drive cable mechanisms.-
NOTE: This step requires some stretching of the fabric.
Pull the cross bar away from the drive cable mechanism retaining tabs on both sides until the cross bar just clears the drive cable mechanism retaining tabs.
-
Rotate the cross bar down to fully detach the cross bar from the drive cable mechanisms retaining tabs.
-
 |
-
Disconnect the fabric pilot clips from the drive cable mechanisms on both sides.
-
NOTE: The shield is under tension. Hold the cross bar when releasing the second fabric pilot clip to prevent the roller from pulling the fabric, clips and cross bar into the shield bracket assembly.
Using a small flat bladed screwdriver, lift the tab off of the locking button and slide the clip rearward to release the fabric pilot clip from the drive cable mechanisms.
-
Slide the fabric and pilot clips and fabric rearward until it is they are fully out of the track.
-
.jpg) |
-
NOTE: Hold the crosss bar so the roller does not pull the fabric and crossbar into the shield housing assembly.
NOTE: Observe the pilot clip location. The seam in the fabric is aligned with the center/opening of the clip.
Remove both fabric pilot clips from the outer edge seam pockets.
.jpg) |
-
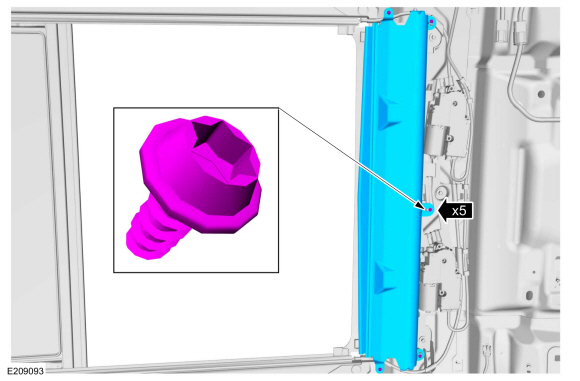
NOTE: A standard binder clip can be used to hold the shield cross bar to the edge of the shield housing to stabilize the shield while removing the shield assembly from the frame for disassembly.
Remove the 5 shield and bracket assembly screws and place the assembly on a suitable work surface.
 |
-
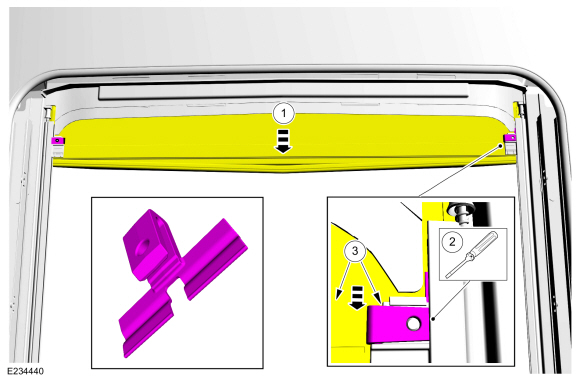
Release the button side of the shield from the shield housing.
-
Press in the retaining ball.
-
NOTE: Lift only enough to fully release the shield from the shield housing.
Lift the retaining ball side of the shield from the shield housing.
-
Press in the retaining ball.
 |
-
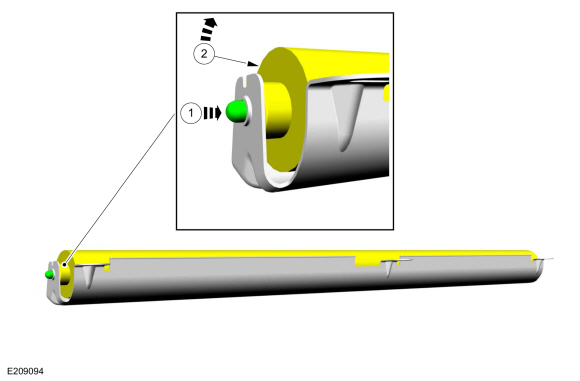
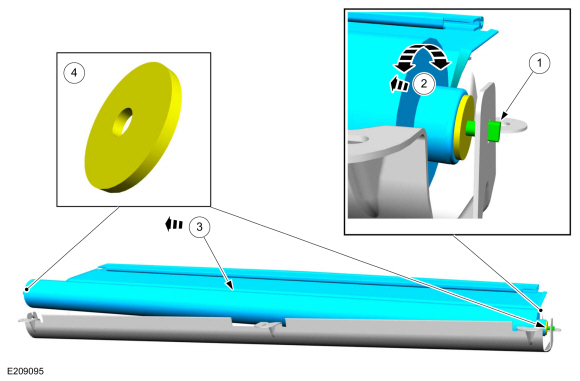
NOTE: Perform steps 1 and 2 together. Do not allow the shaft to pull out of the shield housing until fully removing the shield in substep 3.
Remove the shield from the shield housing.
-
Hold the shaft in the shield housing.
-
NOTE: The shield/shaft tension locking action can be felt while performing steps 1 and 2.
Gently twist and pull the shield until the internal shield/shaft tension lock clicks into position.
-
Remove the shield from the shield housing.
-
Make sure the felt washers are removed with the shield.
-
Hold the shaft in the shield housing.
 |
Installation
-
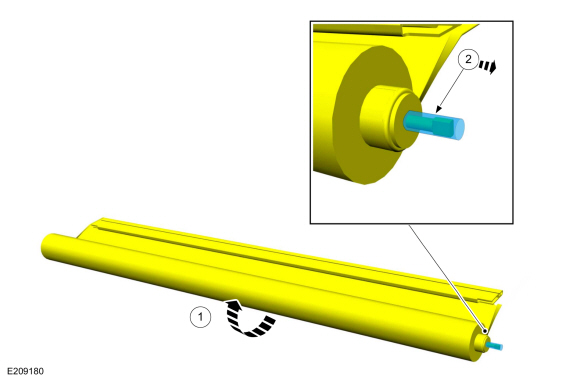
NOTE: A new shield is pretensioned.
Before installing the shield into the shield housing.
-
Roll the shield fabric tight on the roller.
-
NOTE: After inserting the slotted end of the shield into the shield housing, carefully rotate and push the shield toward the slotted end (the slotted housing will keep the shaft from turning) until the tension releases, then do not allow the shield to unwind on the shaft while installing the shield assembly into the vehicle.
To keep proper internal shield/shaft tension, remove the protective cover from the shaft end of the shield just before installing in the shield housing.
-
Roll the shield fabric tight on the roller.
 |
-
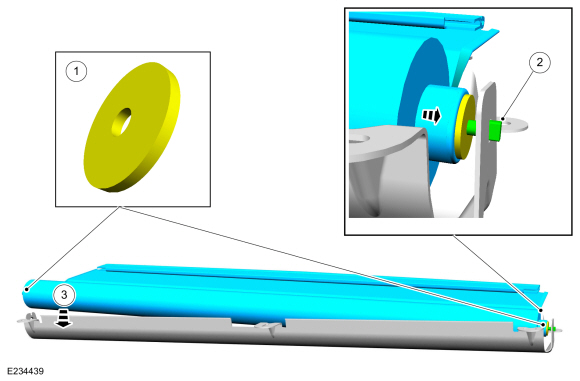
Install the shield into the shield housing.
-
Install the felt washers on the ends of the shield.
-
Position the end of the shaft in the housing and push inward.
-
Place the opposite end of the shield into the
housing. Make sure the retaining ball is seated in the housing.
-
Install the felt washers on the ends of the shield.
 |
-
NOTE: A standard binder clip can be used to hold the shield cross bar to the edge of the shield housing to stabilize the shield while installing the shield assembly.
Position the shield and bracket assembly. Install the 5 screws.
Torque: 13 lb.in (1.5 Nm)
|
-
NOTE: RH side shown on inset, LH side similar.
NOTE: Observe the pilot clip location. The seam in the fabric should be aligned with the center/opening of the clip.
Using an assistant, on both sides, insert the 2 fabric pilot clips into the pockets located at the outer outer edge of the fabric.
.jpg) |
-
Using an assistant, insert the fabric guide clips and fabric in to the tracks on both sides.
 |
-
NOTE: The shield is under tension. Hold the cross bar while engaging the pilot clips to prevent the roller from pulling the fabric, clips and and cross bar back into the shield bracket assembly.
-
Pull the shield forward until the fabric pilot clips make contact with drive cable mechanisms.
-
Using a small flat-bladed screwdriver, spread the clip.
-
Slide the fabric and pilot clips forward and attach
the pilot clips to the drive cable mechanisms. Make sure the clips fully
seated.
-
Pull the shield forward until the fabric pilot clips make contact with drive cable mechanisms.
 |
-
NOTE: LH side shown on inset, RH side similar.
On both sides and at the same time, attach the cross bar to the drive cable mechanisms.
-
NOTE: This step requires some stretching of the fabric.
Pull the cross bar away from the drive cable mechanism retaining tabs on both sides until the cross bar aligns with the drive cable mechanism retaining tabs.
-
Rotate the cross bar upwards and attach the cross bar to the drive cable mechanisms retaining tabs.
-
 |
-
Install the headliner.
Refer to: Headliner (501-05 Interior Trim and Ornamentation, Removal and Installation).
 Roof Opening Panel Seal. Removal and Installation
Removal
Remove the roof opening panel sliding glass panel.
Refer to: Roof Opening Panel Glass (501-17 Roof Opening Panel, Removal and Installation)...
 Bumpers
..
Other information:
Lincoln Nautilus 2018-2026 Service Manual: Front Side Member Section. Removal and Installation
Special Tool(s) / General Equipment Resistance Spotwelding Equipment Spherical Cutter Air Body Saw 8 mm Drill Bit MIG/MAG Welding Equipment Spot Weld Drill Bit Locking Pliers Materials Name Specification Seam SealerTA-2-B, 3M™ 08308, LORD Fusor® 803DTM - Removal NOTE: This procedure is intended for sectioning a small portion of t..
Lincoln Nautilus 2018-2026 Service Manual: Brake Disc Shield. Removal and Installation
Removal NOTE: Removal steps in this procedure may contain installation details. Remove the brake disc. Refer to: Brake Disc (206-03 Front Disc Brake, Removal and Installation). Remove the bolts and the brake disc shield. Torque: 159 lb.in (18 Nm) Installation To install, reverse the removal procedure. ..
Categories
- Manuals Home
- 1st Generation Nautilus Owners Manual
- 1st Generation Nautilus Service Manual
- Interior Lamp Function. Adjusting the Instrument Panel Lighting Brightness. Ambient Lighting. Interior Lighting – Troubleshooting
- Opening the Liftgate
- Opening and Closing the Hood
- New on site
- Most important about car
Clearing the Garage Door Opener. Reprogramming the Garage Door Opener. Garage Door Opener Radio Frequencies
Clearing the Garage Door Opener
