Lincoln Nautilus: Handles, Locks, Latches and Entry Systems / Exterior Rear Door Handle Reinforcement. Removal and Installation
Lincoln Nautilus 2018-2025 Service Manual / Body and Paint / Body and Paint / Handles, Locks, Latches and Entry Systems / Exterior Rear Door Handle Reinforcement. Removal and Installation
Removal
NOTE: LH side shown, RH side similar.
-
Remove the rear door latch.
Refer to: Rear Door Latch (501-14 Handles, Locks, Latches and Entry Systems, Removal and Installation).
-
NOTE: This step is only necessary when installing a new component.
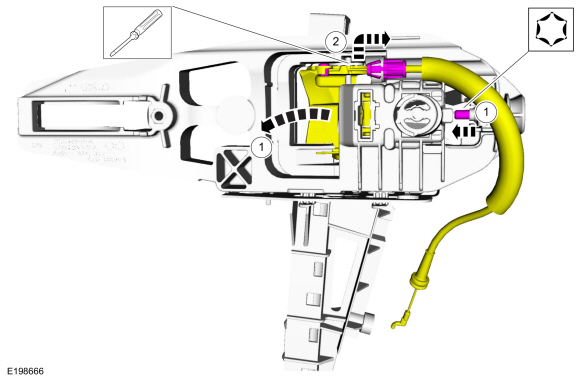
Remove the exterior rear door handle reinforcement.- Tighten the screw to release the rear exterior handle actuation lever tension on the cable.
- Detach and position aside the cable from the exterior rear door handle reinforcement.
 |
-
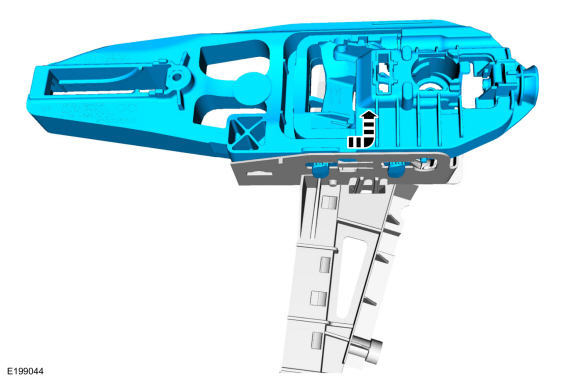
NOTE: This step is only necessary when installing a new component.
Remove the exterior rear door handle reinforcement.
 |
Installation
-
NOTE: This step is only necessary when installing a new component.
Install the exterior rear door handle reinforcement.
.jpg) |
-
NOTE: This step is only necessary when installing a new component.
Install the rear door latch.
-
Install the rear door latch and the screws.
-
Attach the cable to the rear door latch.
-
Install the rear door latch and the screws.
.jpg) |
-
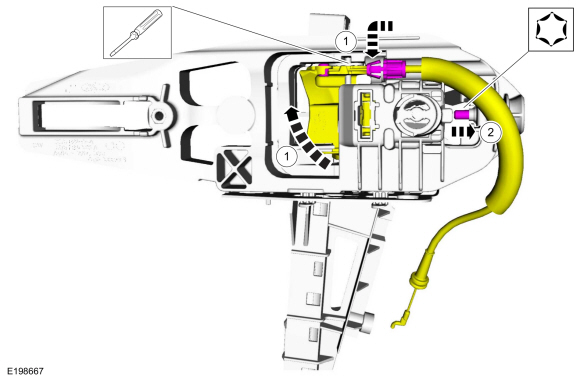
NOTE: This step is only necessary when installing a new component.
NOTE: This step must be done correctly or the exterior door handle will not engage the lever on installation.
Install the exterior rear door handle reinforcement.- Install the cable eyelet to the lever.
- While keeping tension on the cable and holding the handle lever in the engaged position, turn the release screw until the handle lever is positioned against the stop.
 |
-
Install the rear door latch.
Refer to: Rear Door Latch (501-14 Handles, Locks, Latches and Entry Systems, Removal and Installation).
 Exterior Rear Door Handle. Removal and Installation
Removal
NOTE:
LH side shown, RH side similar.
Remove the rear door trim panel.
Refer to: Rear Door Trim Panel (501-05 Interior Trim and Ornamentation, Removal and Installation)...
 Front Door Latch. Removal and Installation
Removal
NOTE:
LH side shown, RH side similar.
Remove the exterior front door handle.
Refer to: Exterior Front Door Handle (501-14 Handles, Locks, Latches and Entry Systems, Removal and Installation)...
Other information:
Lincoln Nautilus 2018-2025 Service Manual: Water Drain Panel Reinforcement. Removal and Installation
Special Tool(s) / General Equipment Resistance Spotwelding Equipment 8 mm Drill Bit MIG/MAG Welding Equipment Spot Weld Drill Bit Locking Pliers Materials Name Specification Seam SealerTA-2-B, 3M™ 08308, LORD Fusor® 803DTM - Removal NOTE: Left hand (LH) side shown, right hand (RH) side similar...
Lincoln Nautilus 2018-2025 Owners Manual: Automatic Return to Park (P)
What Is Automatic Return to Park (P) Your vehicle shifts into park (P) if you attempt to exit your vehicle without the transmission in park (P). How Does Automatic Return to Park (P) Work Your vehicle shifts into park (P) when your vehicle is stationary and any of the following occur: You switch the vehicle off...
Categories
- Manuals Home
- 1st Generation Nautilus Owners Manual
- 1st Generation Nautilus Service Manual
- Replacing the Rear Wiper Blades
- USB Ports
- Switching the Lane Keeping System On and Off. Switching the Lane Keeping System Mode
- New on site
- Most important about car
USB Ports
Locating the USB Ports
Data Transfer USB Ports

The USB Ports could be in the following locations:
On the lower instrument panel. Inside the media bin. Inside the center console.Note: These USB ports can also charge devices.
Copyright © 2025 www.linautilus.com